
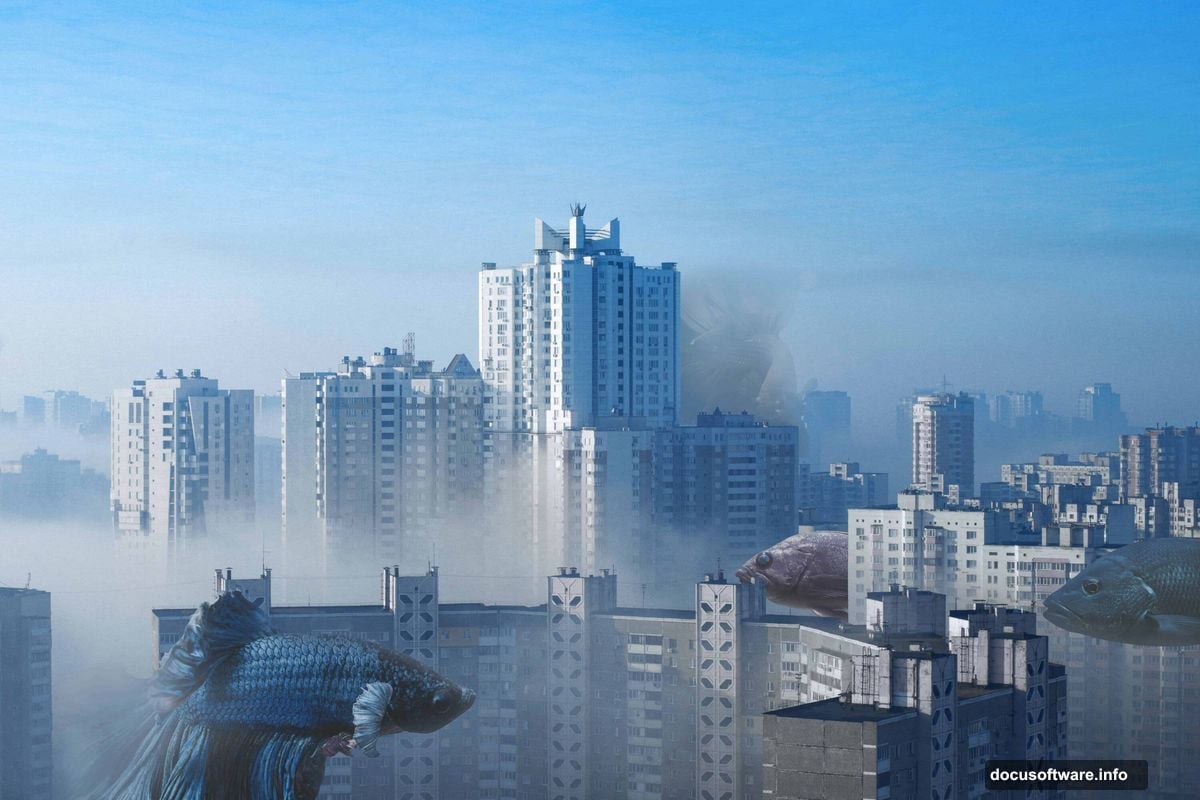
Ever wondered what a city would look like if fish swam through its streets instead of cars? That’s exactly the kind of wildly creative scene this Photoshop tutorial helps you build. We’re talking full surreal photo manipulation — a bustling cityscape transformed into an underwater world filled with fish, mood lighting, and dreamy atmosphere.
This project is perfect whether you’re just getting comfortable with Photoshop or already know your way around the workspace. We’ll walk through every step together, from opening your first photo to applying the final Camera Raw touches that tie everything together.
Here’s what we’ll cover: placing and masking fish, using Adjustment Layers for color and tone, and finishing everything off with an underwater photo overlay that makes the whole scene feel truly immersive.
Gather Your Tutorial Resources First
Before diving in, you’ll need six source images: a city background, four different fish photos, a boy image, and an underwater scene. Download all of them before starting so you’re not hunting for assets mid-tutorial.
Having everything ready saves a lot of frustration. Trust me on that one.
Setting Up Your City Background
Start by going to File > Open and selecting your city photo. Once it’s open, duplicate the layer immediately by pressing Ctrl/Cmd + J. This gives you a backup copy of the original underneath — a habit worth building into every project you do.
That duplicated layer is what you’ll work on throughout the tutorial. The original stays locked safely at the bottom.

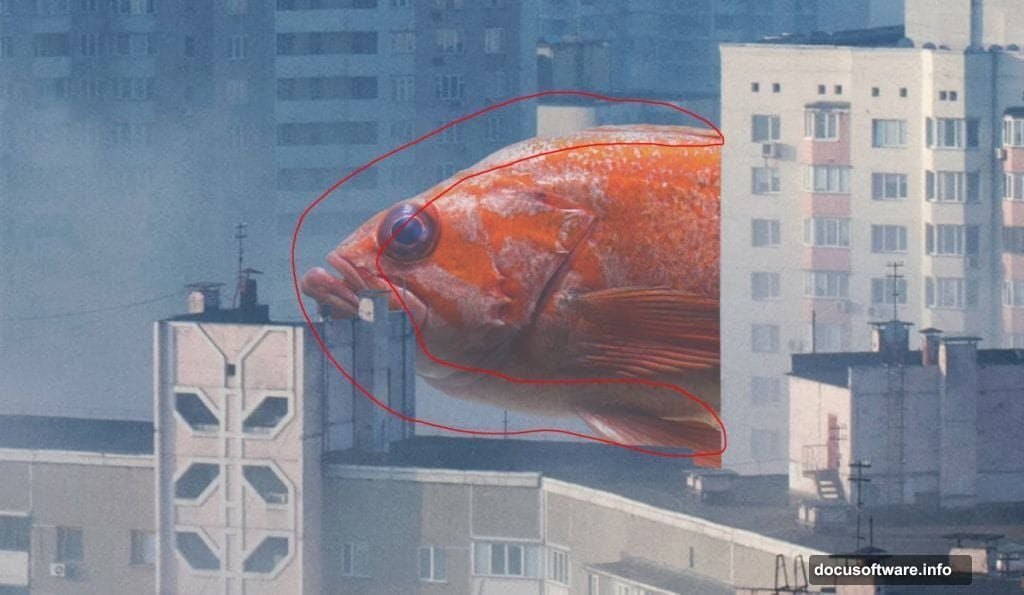
Cutting Out Fish 1 with the Pen Tool
Now open Fish 1 the same way through File > Open. Here’s where the real work begins.
Select the Pen Tool (P) and start tracing around the fish. The Pen Tool creates what Photoshop calls anchor points — small squares that define the path of your selection. Click to place your first anchor point, then keep clicking around the fish’s outline to build a connected path made of straight segments.
A few things to keep in mind as you work:
- The most recently placed anchor point always shows as a solid square
- Previously placed points turn hollow once you move on
- To close the path, hover back over your starting point until a small circle appears next to your cursor, then click
When your path is complete, right-click and choose “Make Selection.” Set the Feather Radius to 0px and make sure Anti-aliased is checked. This keeps your selection edges sharp and clean.
Copy the selection (Ctrl/Cmd + C), then paste it (Ctrl/Cmd + V) directly onto your city canvas. Use the Transform Tool (Ctrl/Cmd + T) to resize and position the fish. In older Photoshop versions, hold Alt + Shift while dragging to scale proportionally. In Photoshop CC, holding Alt alone handles all sides together.
Masking and Blending the Fish
Once your fish is positioned, add a layer mask to its layer. Grab the Brush Tool (B), choose a Soft Round brush, set the foreground color to black, and paint over any edges or parts of the fish that look out of place.
This is where patience pays off. Slow, gentle brushstrokes around the fins and tail make the fish look like it genuinely belongs in the scene rather than being pasted on top.
Adding Depth with Adjustment Layers
Next, add a Levels Adjustment Layer directly above your fish layer. This controls the highlights, midtones, and shadows to help the fish match the lighting in the city background. Tweak until the fish feels like it exists in the same light as the environment around it.
Then create a new layer above that. Switch your Brush Tool foreground color to #8d9aad — a soft blue-gray — and set the brush Flow to just 10%. Paint gently along the fish’s edges. This adds a subtle atmospheric haze that mimics how objects look when light scatters around them.
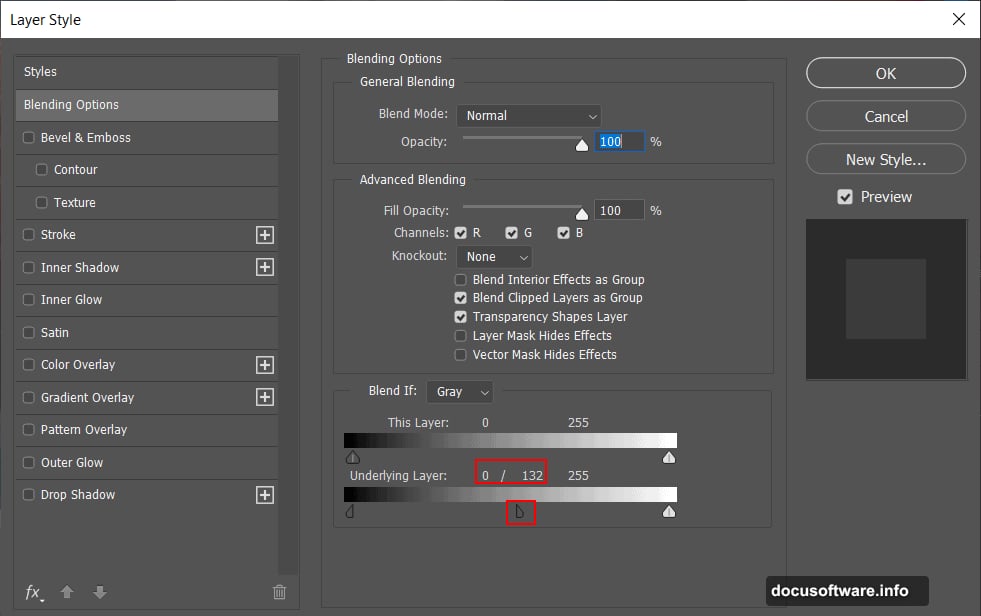
Here’s the blending trick that makes this step special: open Blending Options for that layer, find the Underlying Layer slider, hold Alt, and drag the slider to the right. Holding Alt splits the slider, which creates a smooth transition instead of a harsh cutoff. The result looks far more natural.
Refining Color and Eye Detail
Add a Black and White Adjustment Layer and drop its Opacity to 30%. This slightly desaturates the fish to match the cooler, more muted tones of a city environment. Full-color tropical fish in a gray cityscape would look jarring — this tones things down just enough.
For the eye, create a new layer and set its Blend Mode to Color Dodge with Opacity at 26%. Use a Soft Round brush with a medium gray (#808080) and paint gently over the eye area. Color Dodge brightens what’s underneath, giving the eye a subtle, lifelike gleam without looking overdone.
Bringing in Fish 2 with Quick Selection
Open Fish 2 and this time use the Quick Selection Tool (W) instead of the Pen Tool. Click and drag across the fish and Photoshop automatically detects its edges based on contrast and color differences.
Quick Selection works great on fish with clear color separation from their backgrounds. Once your selection looks good, copy and paste it onto the canvas just like before. Resize and position it using the Transform Tool, then repeat the masking and adjustment process from the earlier steps.
Building the Underwater Atmosphere
After all your fish are placed and refined, it’s time to bring in the underwater photo. Open it and place it above your city layer but below the fish layers. Experiment with blend modes — Multiply, Overlay, and Soft Light all produce different atmospheric effects.
This underwater layer is what pulls the whole composition together. It adds color casts, light refraction, and depth that make your city feel like it’s genuinely submerged.
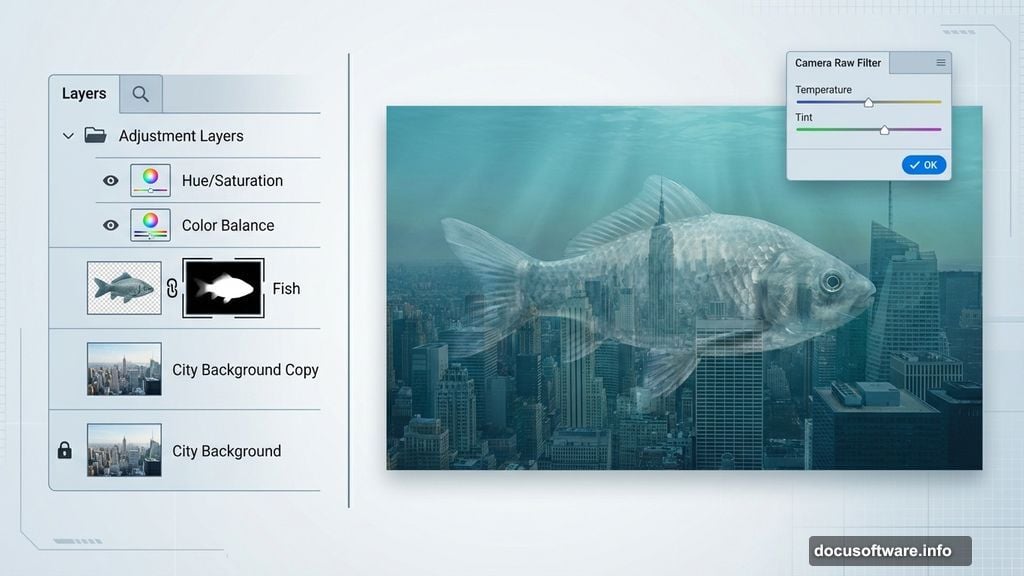
Final Polish with Camera Raw Filter
The last step ties everything together beautifully. Go to Filter > Camera Raw Filter and spend some time with the controls there. Bring up the Blues slightly to reinforce the underwater mood. Add a little Clarity to sharpen mid-tone details. A gentle Vignette darkens the edges and draws the eye toward the center of your scene.
Camera Raw is basically a finishing studio for your whole image. Even subtle adjustments here make an enormous difference to how professional and cohesive the final result feels.
This is one of those projects that looks complicated but breaks down into very manageable steps. Take it one layer at a time, don’t rush the masking work, and enjoy watching a surreal underwater cityscape come to life right in front of you.