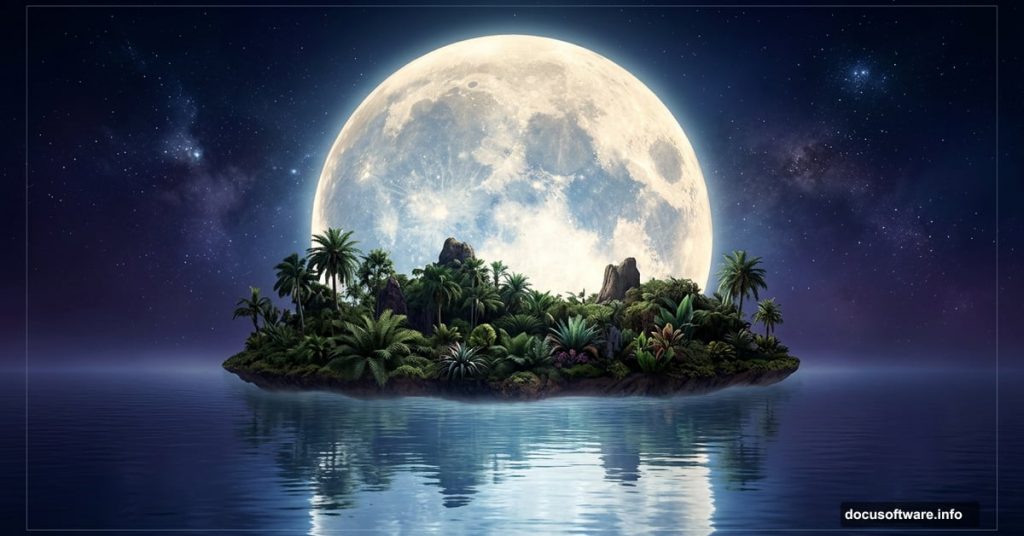
Photo manipulation is one of the most exciting things you can do in Photoshop. You get to build entire worlds that never existed, combining ordinary photos into something completely extraordinary. This tutorial walks you through creating a dreamy, surreal scene where an oversized moon hovers over a tropical island, complete with realistic water reflections, shadows, and atmospheric lighting.
It’s a bit more advanced than your average beginner project, but don’t let that scare you off. Each step builds on the last, and by the end you’ll have a genuinely impressive composite image in your portfolio.
Here’s what you’ll need before you start: an island stock photo, a mountains photo, a moon image, a cosmos/space package, and a sky replacement image. Gather those first, then dive in.
Setting Up Your Document
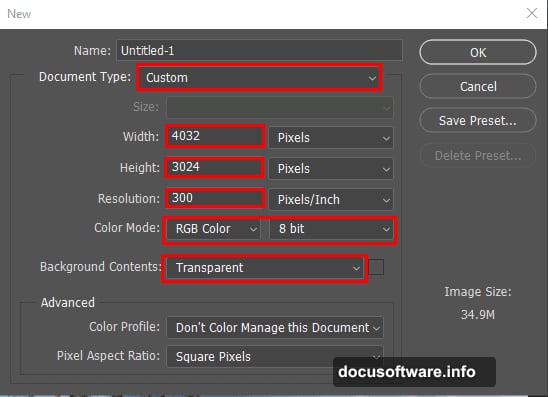
First things first. Open Photoshop and create a new document with your desired canvas settings. Think about your final output size here. A larger canvas gives you more flexibility when positioning elements later, so don’t go too small.
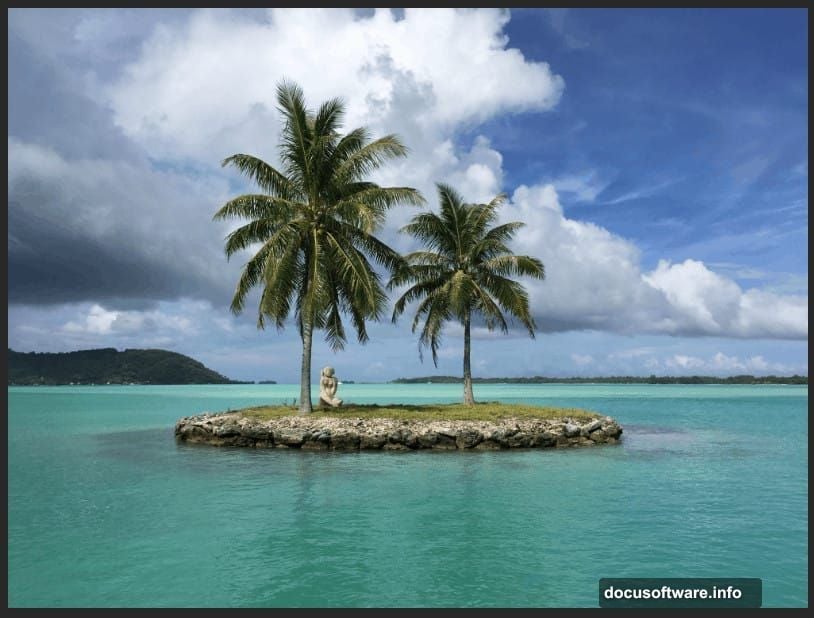
Once your document is ready, go to File > Place and select your island stock photo. Place it into the document and position it as your base layer. This island is your foundation, and everything else builds on top of it.
Clone Stamp Tool Cleans the Island
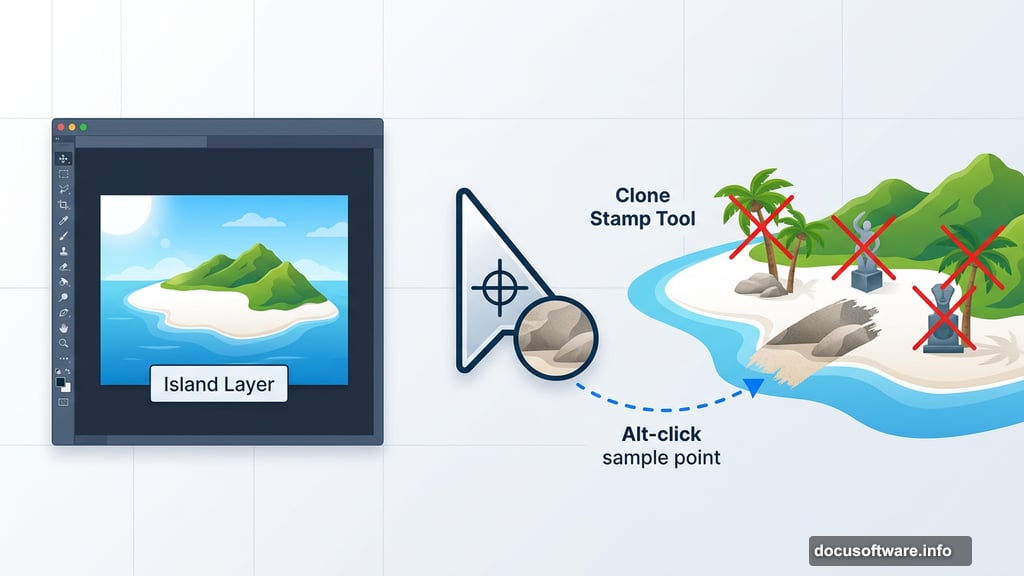
Here’s where things get interesting. The island photo probably has palms, sculptures, or other elements that don’t fit the surreal mood you’re going for. The Clone Stamp Tool (S) lets you paint over those unwanted objects using detail sampled from nearby areas of the image.
Start by selecting your Island layer and duplicating it with Ctrl + J. Always work on a duplicate rather than the original. That way, if something goes wrong, your original layer stays intact.
To use the Clone Stamp effectively, Alt-click (or Option-click on Mac) on a clean area of the image. That sets your sample point. A small preview inside the tool cursor shows exactly what texture you’re about to paint with, which makes it much easier to align sampled detail with surrounding areas. Then brush over the objects you want to remove. A crosshair tracks where the tool is copying from as you paint.
Take your time with this step. Rushing the cloning process is the most common reason composite images look fake. Zoom in close, use a soft brush, and work in small strokes.
Adjustment Layers Set the Mood
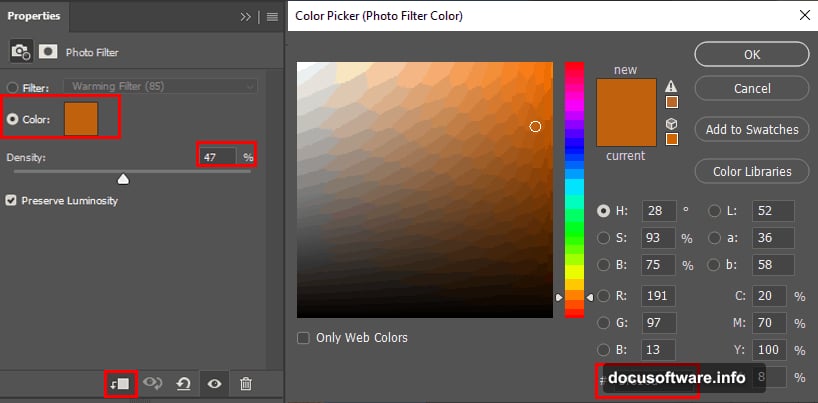
Now the fun begins. With your cleaned island layer ready, add a Selective Color adjustment layer on top. This gives you precise control over individual color ranges in your image. Pushing the blues cooler and the shadows darker helps set that mysterious, otherworldly atmosphere you’re building toward.

Next, add a Photo Filter adjustment layer and drop its opacity to 40%. A cooling filter works beautifully here. It ties everything together and starts giving the scene that blue-hour, almost-midnight feeling. Keeping the opacity at 40% rather than 100% keeps the effect subtle and believable.
Bringing in the Mountains
Select your background Island layer, then go to File > Open and load your mountains stock photo. Use the Rectangular Marquee Tool (M) to drag a selection around the mountain area you want to use. Hold Shift while dragging to keep your selection perfectly constrained.
Copy that selection with Ctrl/Cmd + C, then paste it directly onto your working canvas with Ctrl/Cmd + V. Use the Transform Tool (Ctrl/Cmd + T) to resize and position the mountains. Hold Alt + Shift while dragging the corner handles to resize proportionally from the center. If you’re using Photoshop CC, just hold Alt to resize all sides together.
Masking Out the Sky
This is arguably the most critical technical step in the whole process. Add a layer mask to your mountains layer. Then grab the Pen Tool (P) to trace carefully around the mountain edges, cutting away the sky.
The Pen Tool has a learning curve, but nothing beats it for clean, precise selections on detailed edges. Once you’ve traced your path, right-click and choose Make Selection. Set your Feather Radius to 0.5 pixels and make sure Anti-aliased is checked before clicking OK.
That tiny half-pixel feather is important. It softens the edge just enough to stop the mountains from looking like they were cut out with scissors, while keeping the selection crisp.
Now press Ctrl/Cmd + Shift + I to invert your selection. Switch to the Brush Tool (B) with your foreground color set to black. Paint over the selected sky area on your layer mask. Black on a mask hides pixels, so the sky disappears while your mountain edges stay clean and natural-looking.
Why This Tutorial Rewards the Effort
Techniques like realistic water reflections, atmospheric light matching, and careful masking are exactly the skills that separate convincing composites from obvious fakes. Every photo manipulation you’ve seen that made you do a double-take was built on this same foundation: clean selections, matched lighting, and thoughtful color grading.
Working through a project like this moon island scene teaches you to see photos differently. You start noticing light direction, color temperature, and edge quality in every image you look at. Those instincts are genuinely useful whether you’re doing personal creative projects or professional design work.
Push through the trickier steps, especially the Pen Tool masking. It feels awkward at first and then suddenly clicks, and once it does, you’ll use it constantly. The Clone Stamp cleanup and adjustment layer work that follow are more forgiving and actually pretty enjoyable once the foundation is solid.