There’s something magical about mushrooms at night. That quote from the tutorial resources says it perfectly — mushrooms are just the visible tip of something much stranger growing underneath. So naturally, they make perfect subjects for surreal, dreamlike photo manipulations.
This step-by-step Photoshop tutorial walks you through transforming a plain daytime photo into a glowing, atmospheric night scene. You’ll work with blurred backgrounds, adjustment layers, extracted elements, and a Camera Raw finish to pull everything together. Whether you’re just getting comfortable with Photoshop or you’ve done a few composites before, this project is a satisfying one to complete.
Let’s get into it.
Your Starter Resources
Before anything else, gather everything you need. The tutorial uses these free assets:
- Background photo
- Mushroom image
- Butterflies
- Branch
- Human model
- Custom brushes
Download them all first. Having everything ready before you start saves a lot of frustration mid-project.
Convert the Background to a Smart Object
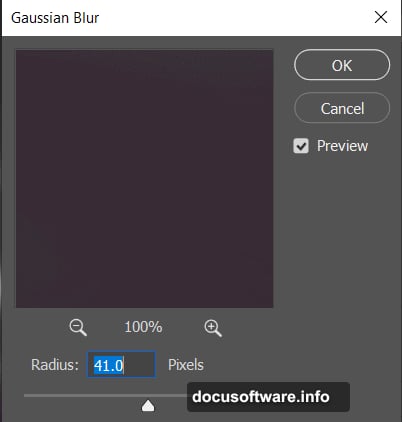
Open your background image in Photoshop. Right-click the layer in the Layers panel and choose Convert to Smart Object. This is an important first move because it keeps your original photo safe while letting you apply filters non-destructively.
Next, go to Filter > Blur > Gaussian Blur and set the Radius to 41 pixels. That soft blur pushes the background into the distance. It creates depth immediately, making your foreground elements pop once you add them later.
Smart Objects are genuinely worth using here. If you change your mind about the blur amount later, you can just double-click the filter and adjust. No damage done.
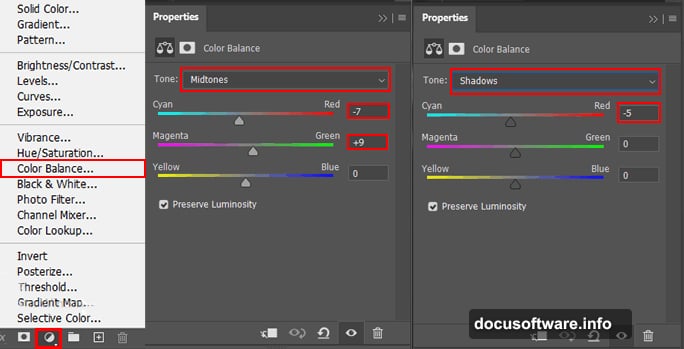
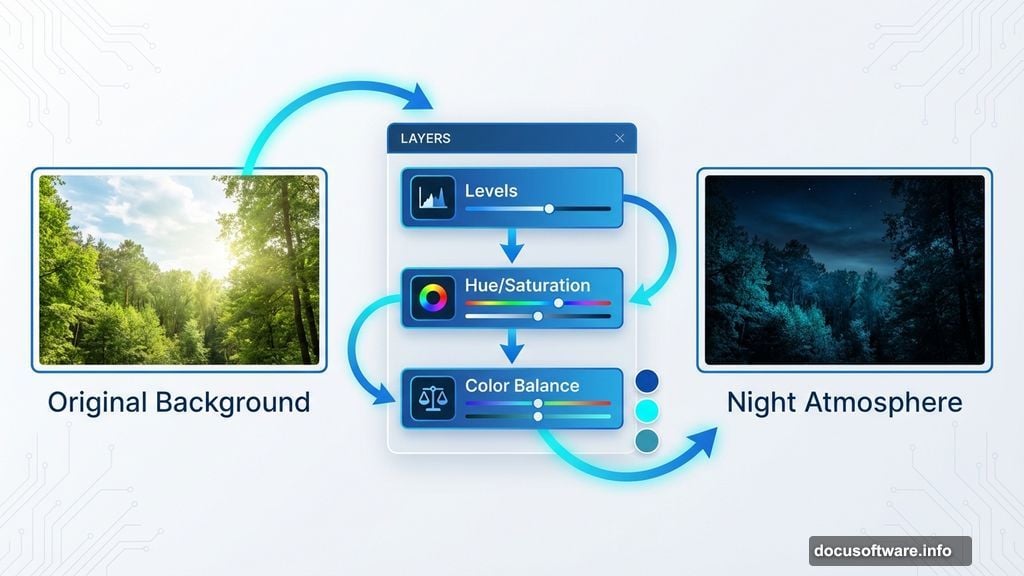
Stack Three Adjustment Layers for Night Atmosphere
This is where the daytime scene starts feeling nocturnal. Add these three adjustment layers in sequence, each one building on the last:
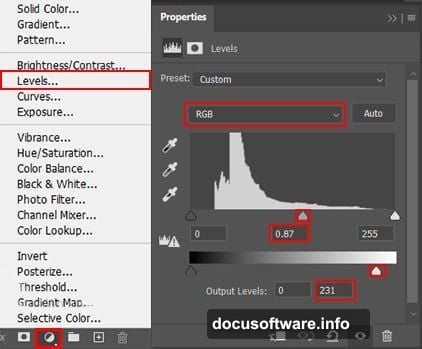
Levels — Darken the overall image. Pull the midtone slider left to crush some of that daytime brightness out of the scene.
Hue/Saturation — Cool down the colors and reduce saturation. Nighttime scenes lose warmth fast. Shifting hues slightly toward blue and desaturating helps sell the illusion.
Color Balance — Fine-tune the shadows and midtones. Pushing blues and cyans into the shadows reinforces that moonlit quality without making everything look like a filter slapped on top.
These three layers working together create convincing night lighting. And since they’re adjustment layers, they sit above your background without permanently changing a single pixel.
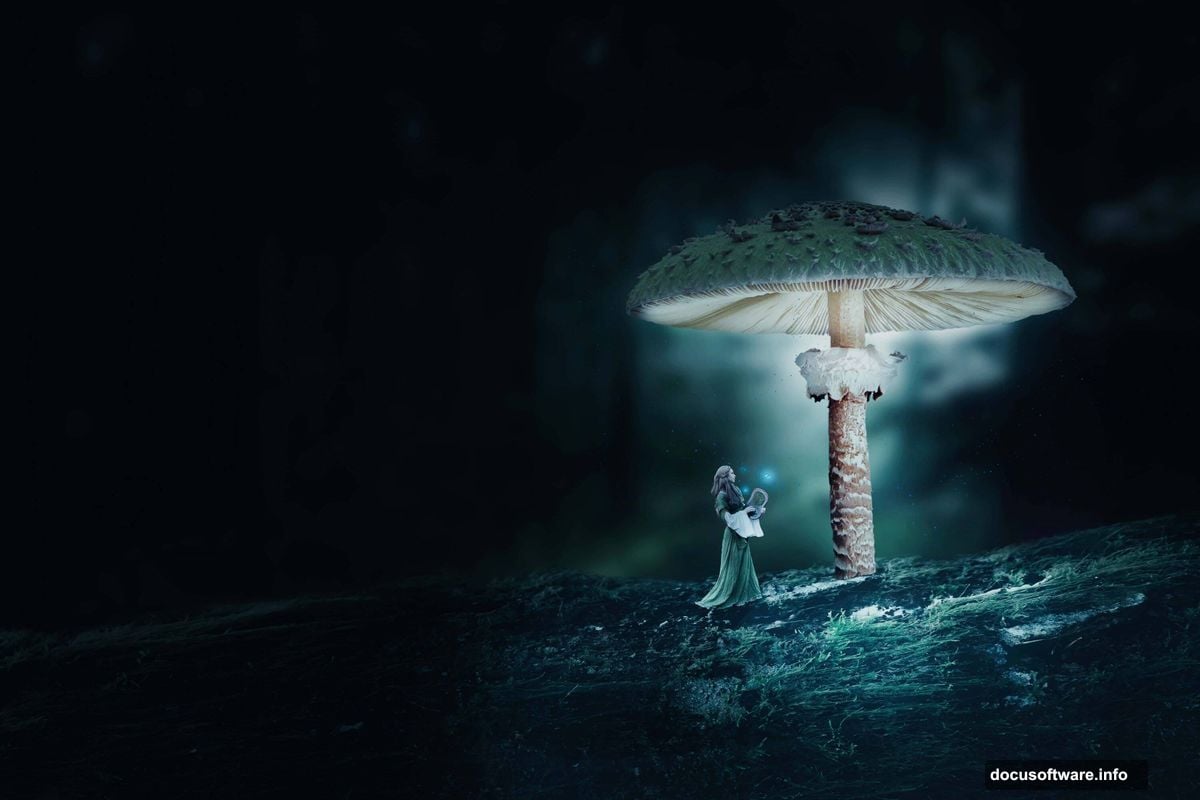
Bring in the Branch
Open your branch image separately. Grab the Quick Selection Tool (keyboard shortcut: W) and paint over the branch to select it. The tool reads edges and similar tones automatically, so it does most of the work for you.
One tip that helps a lot: check Auto-Enhance in the Options bar before you start selecting. It refines edges on the fly and gives you a cleaner cutout with less manual cleanup.
Once your selection looks good, copy it (Ctrl/Cmd + C) and paste it (Ctrl/Cmd + V) into your main canvas. Use the Transform Tool (Ctrl/Cmd + T) to resize and position it. Hold Alt + Shift to scale proportionally if you’re using an older Photoshop version. In Photoshop CC, just hold Alt and all sides scale together.
Add a Levels adjustment layer clipped to the branch layer. This lets you match its brightness to the rest of the scene independently.
Extract and Place the Mushrooms
Open the mushroom photo and use the same Quick Selection approach to isolate the largest mushroom first. Select, copy, paste into your canvas, and transform it into position.
The Quick Selection tool works well for organic shapes like mushrooms because it follows natural edges and tonal shifts. If it grabs too much or misses a section, hold Alt while painting to subtract from the selection, or just keep painting to add more.
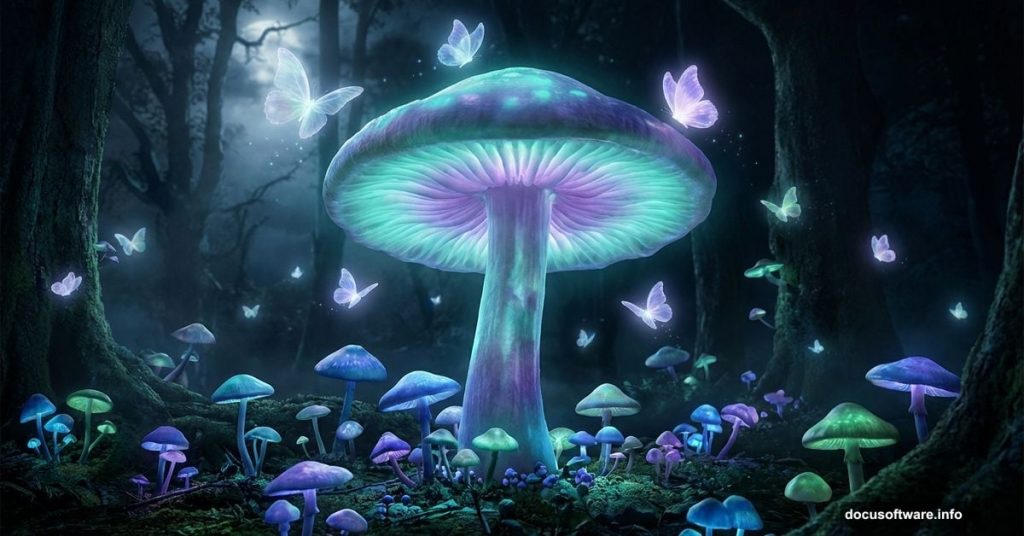
Getting the mushroom placement right takes a few tries. Scale it generously — oversized mushrooms are part of what makes these scenes feel surreal and dreamlike. That deliberate sense of wrong scale is a feature, not a mistake.
Build Out the Forest Scene
With the main background elements placed, the scene starts to take shape. Additional mushrooms, butterflies, and the model all get extracted using the same selection and paste workflow. Each element gets its own adjustment layers to match the night lighting.
The key to making a composite feel cohesive is keeping your light sources consistent. Everything in this scene should look like it’s lit from the same direction with the same cool, dim quality. When something looks too bright or too warm compared to everything else, a clipped Levels or Hue/Saturation adjustment layer on that specific layer fixes it quickly.
Custom brushes add the final atmospheric details — glowing particles, light rays, or scattered light dots that suggest bioluminescence. These small touches complete the otherworldly feel that makes surreal composites memorable.
Finish With Camera Raw Filter

The final step pulls the whole composition together. With all your layers merged or flattened into a Smart Object, go to Filter > Camera Raw Filter. This gives you powerful, photography-style controls over the final look.
Increase contrast slightly. Pull the highlights down. Lift the shadows just a touch so the darkest areas retain some detail. Shift the color temperature cooler. Add a slight blue or teal tint to the shadows. A gentle vignette around the edges draws the eye toward the center of the scene.
Camera Raw is genuinely one of the best finishing tools in Photoshop for composites like this. It lets you make the final image feel like a single photograph rather than a collection of layered pieces.
The finished scene should feel like you stumbled into a forest that doesn’t follow normal rules — giant glowing mushrooms, butterflies drifting through cold blue air, branches framing something that looks like it belongs in a dream. That’s the target, and these techniques get you there.
If you try this one, share what you make. Surreal composites are one of those projects where your version ends up looking nothing like the tutorial, and that’s usually a good thing.