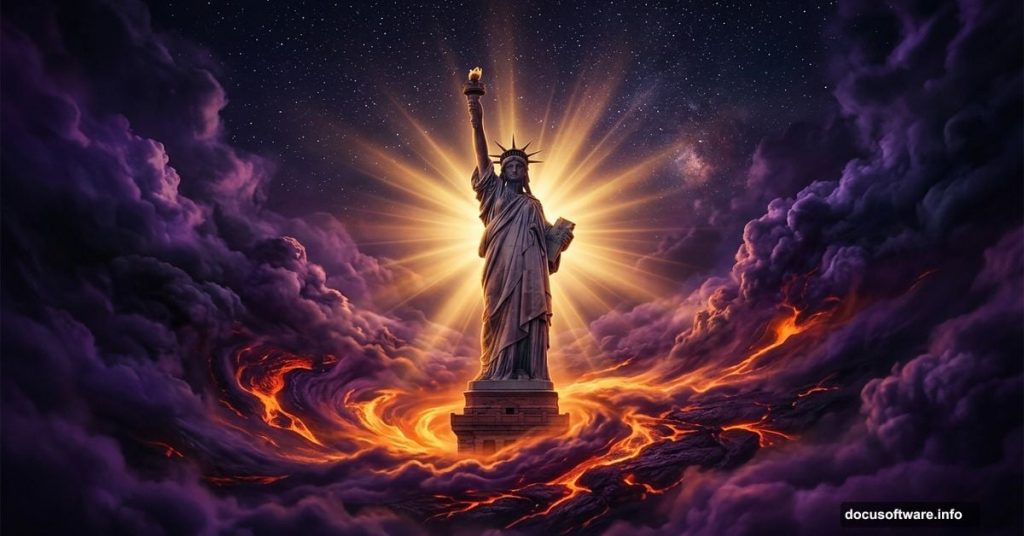
There’s something powerful about combining iconic imagery with creative photo manipulation. The Statue of Liberty already carries enormous symbolic weight. So when you blend it with dramatic skies, flowing lava textures, and sweeping light rays, the result feels genuinely striking.
This tutorial walks you through the full process. You’ll layer backgrounds, blend textures, mask complex shapes, and finish everything with a Camera Raw polish. By the end, you’ll have a surreal, emotionally resonant composite that pushes your Photoshop skills in a few useful directions.
Here’s a quick look at what you’ll need before diving in.
Gather Your Tutorial Resources First
Before opening Photoshop, download everything you need. Hunting for assets mid-project breaks your creative flow and wastes time.
For this project, grab the following:
- Background image
- Flag photo
- Statue of Liberty image
- Fire texture
- Birds and seagulls
- Starry night texture
- Lava texture
- Clouds brushes
- Rays brushes
- Crack texture
Having all of these ready means you can move through each step without stopping. Plus, it helps you see how all the pieces fit together before you start building.
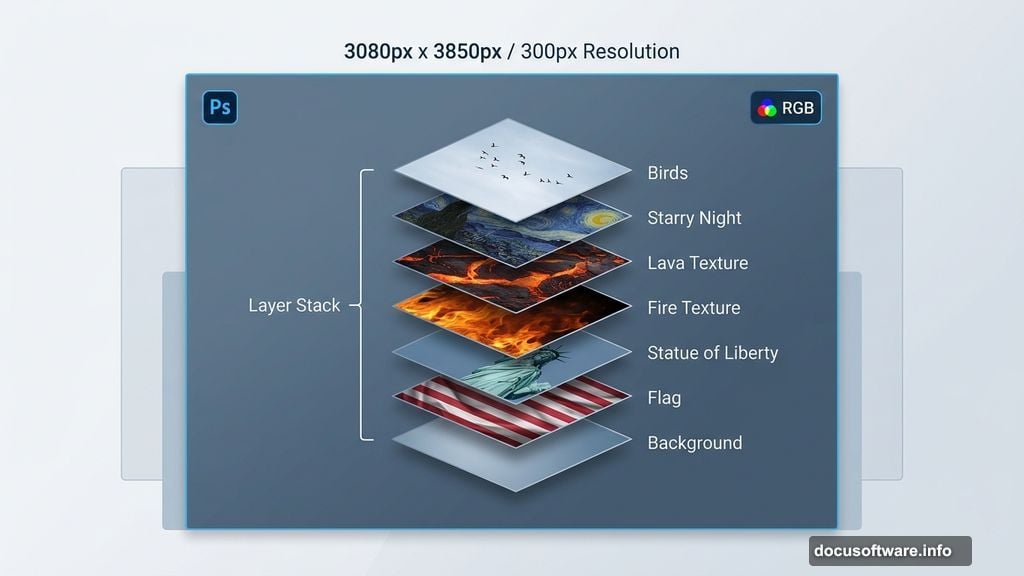
Step 1: Set Up Your Canvas
Start by creating a fresh document. Go to File > New and enter these settings:
- Preset: Custom
- Width: 3080px
- Height: 3850px
- Resolution: 300px
- Color Mode: RGB Color, 8-bit
- Background Contents: Transparent
The high resolution matters here. You’re building a detailed composite, and working at 300px gives you clean edges and sharp textures throughout. Scaling down later is always easier than scaling up.
Step 2: Place Your Background
Go to File > Place and select your background image. Once it lands on the canvas, use the Transform tool (Ctrl/Cmd + T) to resize and position it.
Hold Alt + Shift to scale proportionally from the center. If you’re in Photoshop CC, just hold Alt and the tool handles all sides together automatically.
Take your time positioning this layer. It sets the mood for everything that comes after. A well-placed background makes blending later steps much smoother.

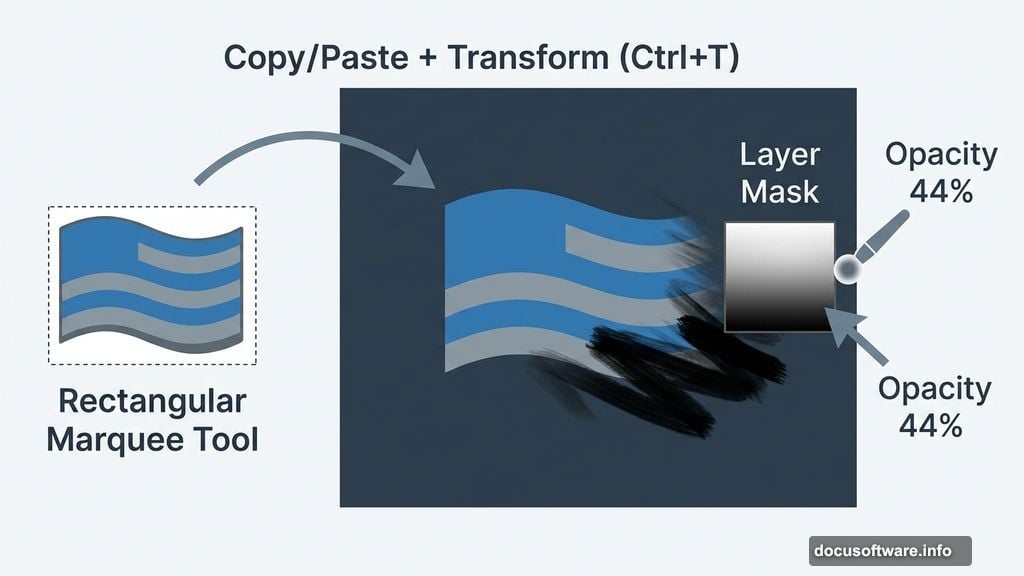
Step 3: Add and Mask the Flag
Open your flag image and grab the Rectangular Marquee Tool (M). Draw your selection around the flag, then copy (Ctrl/Cmd + C) and paste (Ctrl/Cmd + V) it onto your main canvas.
Use the Transform tool again to size and position it where you want it. Then add a Layer Mask to the flag layer.
Now grab the Brush Tool (B), select a Soft Round brush, and set your foreground color to black. Paint over the flag’s background areas to hide them. Set your brush Opacity to 44% so the effect stays gradual and natural-looking.
The lower opacity is key here. Hard edges at full opacity look jarring. But a soft, gradual mask blends the flag into the scene convincingly.
Step 4: Cut Out the Statue of Liberty
Go to File > Open and load your Statue of Liberty image. This is where things get more precise.
Select the Pen Tool (P) and start tracing around the statue’s outline. The Pen Tool creates clean, accurate selections that no other tool quite matches for complex shapes.
Click to create anchor points along the edges. For straight sections, single clicks create sharp corner points. For curves, click and drag to create smooth, curved path segments. Take your time around the torch, crown, and arm details.
When your path is complete, right-click and choose “Make Selection.” Then add a Layer Mask to cleanly separate the statue from its original background.
The Pen Tool feels awkward at first. But it rewards patience. Once you have a clean cutout, every blending step after this becomes much easier and more convincing.
Step 5: Blend With Adjustment Layers
With your background, flag, and statue in place, it’s time to start tying everything together visually. Adjustment layers are your best tool here.
Add a Hue/Saturation adjustment layer clipped to the statue to shift its color tones toward your overall palette. Follow that with a Curves adjustment to control brightness and contrast. Pulling the shadows down slightly and lifting the midtones gives the statue more drama.
The goal is making all your elements feel like they exist in the same light. Right now they probably look pasted together. Adjustment layers fix that by unifying the tones across your whole composition.
Step 6: Add the Lava Texture
Place your lava texture onto the canvas and position it around the base of the composition. Change the blending mode to Overlay or Soft Light and see which feels right for your specific assets.
Add a layer mask and use a soft black brush to fade the edges of the lava texture naturally. You want it to feel like it’s rising from below, not stamped onto the image.
Lava adds heat and urgency to the scene. It contrasts beautifully with the cool symbolic weight of the statue above it. That tension is part of what makes this manipulation feel meaningful rather than random.
Step 7: Bring In the Birds
Place your bird and seagull images into the composition. Scale them down significantly so they feel distant and natural in the scene.
Scatter them across the upper portions of the image, especially near the statue’s torch and around the cloud layers. Vary their sizes slightly. Smaller birds feel further away, which adds depth.
Clip a Curves adjustment layer to your bird layers and darken them slightly. Birds in dramatic lighting often read as dark silhouettes, and that look fits this scene perfectly.
Step 8: Paint Your Cloud and Ray Brushes
Load your cloud brushes into Photoshop and create a new layer above your background but below the statue. Choose a soft gray-white color and start building cloud formations around the statue.
Work in multiple passes at different opacities. Start at 30-40% opacity for the base layer, then build density in specific areas. The goal is dramatic, not cluttered.
Then grab your ray brushes on a new layer and set the blending mode to Screen. Paint light rays emanating from behind the statue or from the upper corners. Keep the opacity low, around 20-30%. Rays should feel atmospheric, not painted.
Step 9: Finish With Camera Raw Filter
This final step ties everything together. Go to Filter > Camera Raw Filter and treat this like your final color grade.
Boost the Clarity slightly to bring out texture detail. Adjust the Color Temperature to push toward a warmer or cooler tone depending on your vision. Pull the Highlights down and lift the Shadows a touch to recover detail in both extremes.
Finally, add a subtle Vignette in the Lens Corrections panel. Darkening the edges just slightly draws the viewer’s eye toward the center of the composition where the statue lives.
Camera Raw is genuinely one of the most powerful finishing tools in Photoshop. Using it as a final adjustment filter on your flattened composite gives you precise, non-destructive control over the entire image’s mood.
Photo manipulation like this teaches you more than technique. It teaches you how to think about light, color, and storytelling all at once. The Statue of Liberty already carries meaning. Your job as the artist is to amplify that meaning through careful, patient layering.
Work slowly, save often, and don’t be afraid to toggle layers on and off to check how each piece contributes to the whole. The best composites feel inevitable, like every element belonged there from the start.