
Ever wonder what happens when marine life takes over urban landscapes? Let’s create that exact vision.
This Photoshop tutorial shows you how to transform ordinary city photos into surreal underwater ecosystems. Fish swim through streets. Buildings become coral reefs. Reality bends in beautiful, impossible ways.
You’ll learn photo manipulation techniques that work for any surreal composite. Plus, the process teaches color matching, blending modes, and advanced masking that apply to countless other projects.
What You Need Before Starting
Grab these resources first. The tutorial works best with high-resolution images of similar lighting conditions.
Required Images:
- Urban cityscape photo (preferably daytime with clear details)
- Multiple fish photos from different angles
- Underwater scene for atmosphere
- Optional: Human figure for scale reference
Photoshop Skills You’ll Use:
- Pen Tool for precise selections
- Layer masks for seamless blending
- Adjustment layers for color matching
- Blending modes for realistic integration
- Camera Raw Filter for final polish

Most techniques work in Photoshop CS6 and newer. Some features like improved masking work better in CC versions. But the core concepts apply to any recent Photoshop release.
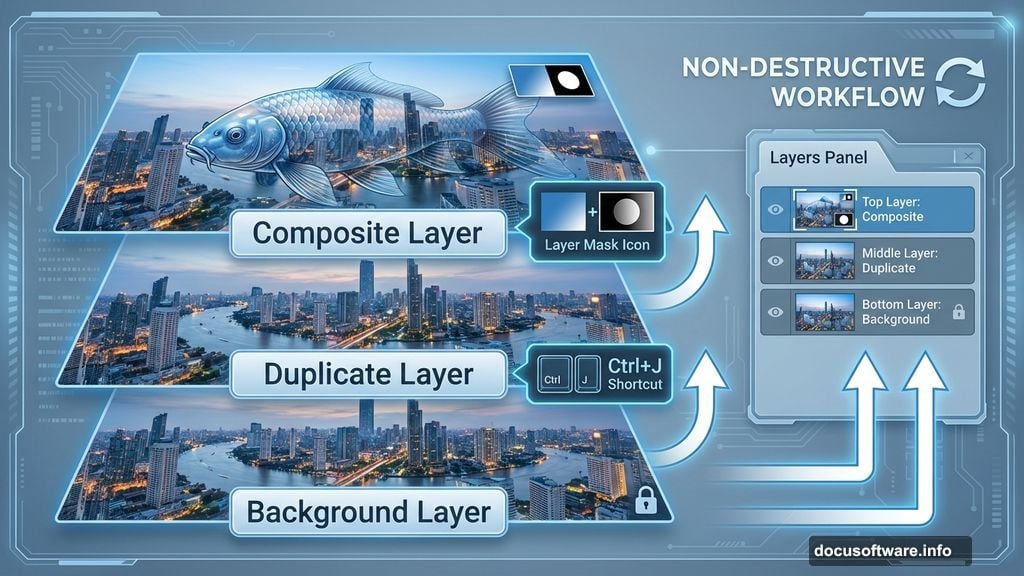
Set Up Your Canvas
Open your cityscape photo first. This becomes your foundation.
Duplicate the background layer immediately (Ctrl/Cmd + J). Always work non-destructively. So if you mess up, the original stays intact.
This habit saves hours of frustration. Plus, it lets you experiment freely without fear of ruining your work.
Extract Your First Fish
Open your first fish image. Now comes the selection work.
Grab the Pen Tool (P). Click around the fish to create anchor points. The Pen Tool gives cleaner selections than Quick Selection for organic shapes like fish.
Pen Tool Tips:
- Click for straight segments between points
- Keep points minimal for smoother curves
- Zoom in close for detailed areas like fins
- The last point shows as solid, previous ones hollow
- Close the path by clicking the first point
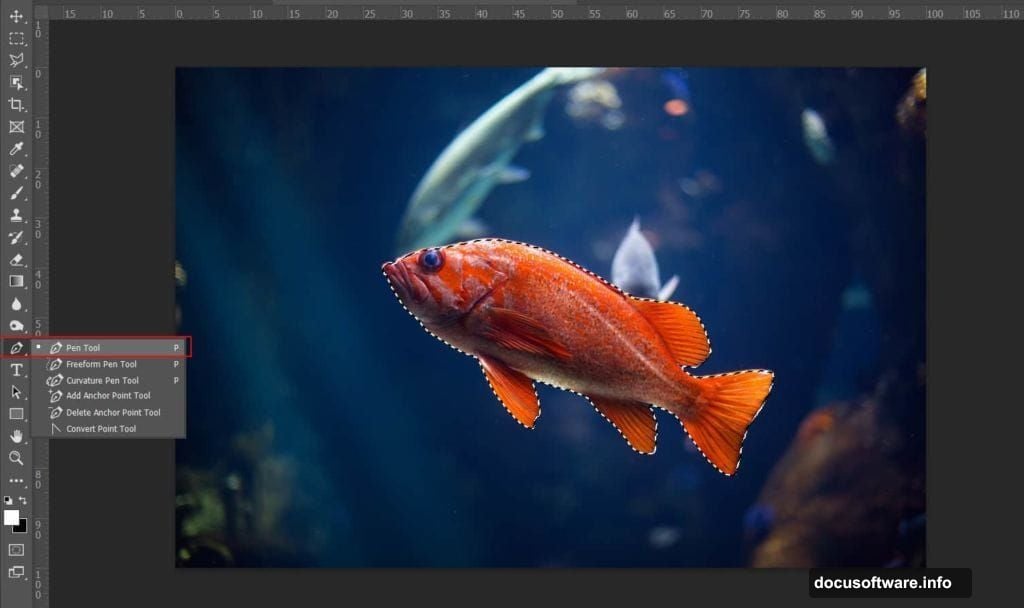
Right-click your completed path. Choose “Make Selection” from the menu. Set Feather Radius to 0px and check Anti-aliased for smooth edges.
Copy the selection (Ctrl/Cmd + C). Paste it into your city document (Ctrl/Cmd + V). The fish appears on its own layer.
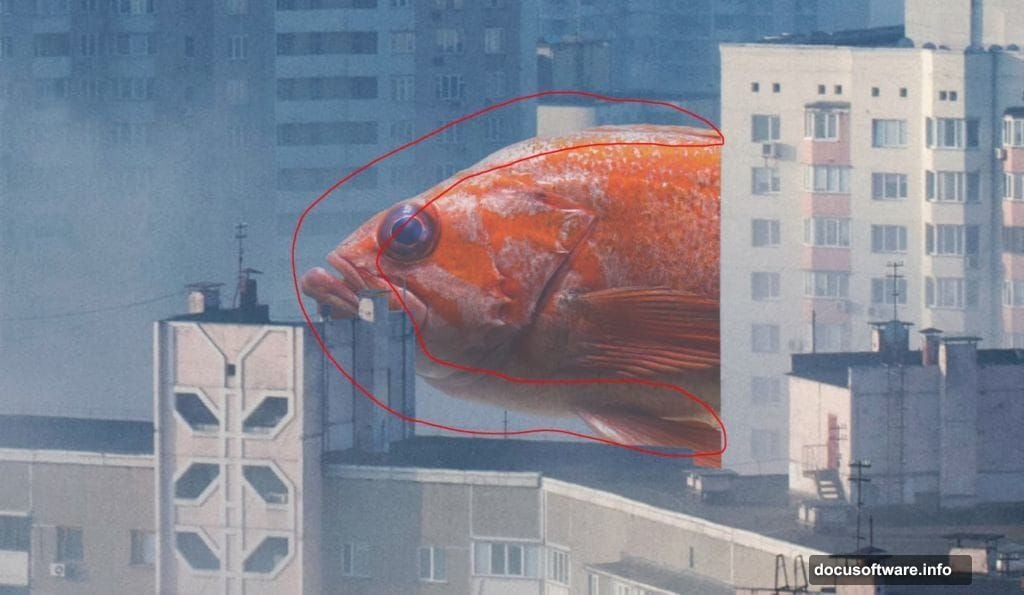
Position and Scale Fish Naturally
Hit Ctrl/Cmd + T to transform. Hold Alt + Shift while dragging corners to resize proportionally from center. In Photoshop CC, just hold Alt.
Scale matters here. Fish should feel massive but believable. Think “what if evolution went wild” not “fake movie poster.”
Create a layer mask. Grab a soft round Brush Tool (B). Set foreground to black. Paint along edges where the fish meets buildings or sky. This blends the fish into the environment instead of floating awkwardly on top.
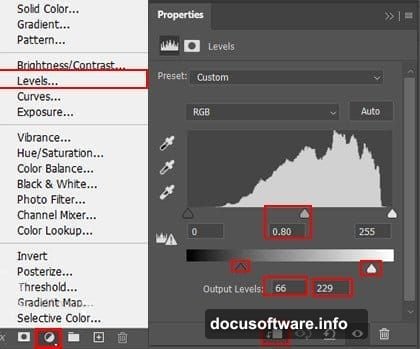
Match Colors With Adjustment Layers
Fish from different photos rarely match your scene’s lighting. So color correction becomes essential.
Add a Levels adjustment layer. Clip it to your fish layer (Alt-click between layers). Adjust the middle slider until the fish’s brightness matches surrounding elements.
Next, create a new layer above the fish. Set blending mode to Overlay or Soft Light. Use a soft brush with color sampled from your city photo (#8d9aad works well for overcast scenes). Paint along fish edges at 10% flow.
This technique adds environmental color to your subject. Buildings reflect light onto nearby objects. Your fish should too.
Add Depth With Blending Options
Double-click your painting layer. The Blending Options dialog opens.
Find “Underlying Layer” at the bottom. Hold Alt and drag the right slider left. This creates a split slider. Adjust both halves to blend highlights smoothly.
Why does this work? It reveals texture from the layer below while keeping your color adjustments. The fish gains depth without looking painted over.
Desaturate for Underwater Atmosphere
Add a Black and White adjustment layer. Set opacity to 30%.
Underwater scenes lose color saturation as depth increases. This subtle desaturation sells the illusion without going full grayscale. Your city retains color but feels submerged.
Bring Fish Eyes to Life
Fish eyes catch light distinctively. Create a new layer. Set blend mode to Color Dodge with 26% opacity.
Select a soft brush. Choose mid-gray (#808080) as foreground. Paint a small highlight in each eye. Just one or two clicks does it.
Color Dodge brightens based on blend color. Gray creates moderate brightening perfect for eye highlights. White would blow out. Black does nothing.
Add Secondary Fish Elements
Open your second fish photo. Use Quick Selection Tool (W) this time for variety. Click and drag across the fish. The tool expands selection based on color and edge detection.
Copy and paste into your main document. Transform and position (Ctrl/Cmd + T). Hold Alt while resizing from center.
Placement Strategy:
- Vary fish sizes to create depth
- Overlap some fish behind buildings
- Leave negative space for visual breathing room
- Consider swimming direction and flow
Repeat the color matching process. Each new element needs Levels adjustment, edge blending, and atmospheric desaturation. Consistency sells the composite.
Layer Additional Fish
Keep adding fish from different photos. Vary their placement throughout your cityscape.
Some should swim in foreground. Others disappear behind structures. This layering creates dimensional space instead of flat collage.
For each fish:
- Extract cleanly with Pen Tool or Quick Selection
- Position and scale appropriately
- Add layer mask and blend edges
- Match colors with Levels
- Paint ambient lighting
- Adjust blending options
- Apply subtle desaturation
Repetition might seem tedious. But each iteration reinforces the surreal underwater environment. Plus, no two fish need identical treatment. Lighting varies based on position.
Integrate Underwater Atmosphere
Open your underwater photo. This adds particles, light rays, and water color.
Place it above all fish layers. Set blend mode to Screen or Lighten. Lower opacity to 40-60% depending on intensity.
Screen mode brightens the image based on blend layer colors. It creates that hazy underwater glow without completely obscuring your work.
Add a layer mask. Paint with black to remove underwater texture from areas that should stay clear. Buildings might peek through more sharply while streets get full underwater treatment.
Add Optional Human Element
A person provides scale reference. It helps viewers grasp the massive size of your fish city.
Extract your human figure cleanly. Position them small against towering fish or enormous buildings. This reinforces the surreal scale you’ve created.

Apply the same color matching workflow. The figure needs to feel part of the environment. Not pasted on top.
Final Polish With Camera Raw
Flatten a copy of all layers (Ctrl/Cmd + Alt + Shift + E). This creates a merged layer while preserving your layer stack below.
Go to Filter > Camera Raw Filter. Here you can globally adjust:
- Exposure: Brighten or darken overall scene
- Contrast: Add punch or create haze
- Clarity: Sharpen details or soften for dreamy effect
- Vibrance: Boost colors without oversaturation
- Color Temperature: Shift toward blue for underwater feel
The HSL panel lets you target specific colors. Shift blues toward cyan. Reduce orange saturation. Enhance the aquatic color palette.
Finally, add subtle vignetting. Drag Vignetting slider left in Effects panel. This draws eyes toward your central composition.
Common Mistakes to Avoid
Inconsistent Lighting: Fish from sunny photos don’t work in overcast cityscapes without major color correction. Match your light direction and intensity.
Hard Selection Edges: Nothing screams “Photoshop job” like harsh cutout edges. Feather your masks. Paint softly. Blend thoroughly.
Ignoring Perspective: A fish photographed from above shouldn’t appear at eye level in your scene. Flip and transform to match viewer angle.
Over-sharpening: Underwater scenes have natural softness. Don’t crank Clarity to 100. Subtle haze sells the effect better.
Scale Confusion: Make fish either realistically sized or impossibly huge. Mid-size looks like a mistake rather than artistic choice.
Why This Technique Matters
Surreal compositing teaches fundamental Photoshop skills that extend far beyond fish cities.
You learned precise selection. Color matching across disparate images. Advanced blending for seamless integration. These skills apply to product visualization, concept art, advertising, and portrait compositing.
Plus, surreal work lets you break rules creatively. Reality constrains so much design work. Projects like this remind you that Photoshop enables impossible visions.
The techniques scale too. Use them to composite anything: floating islands, giant food, miniature worlds, architectural fantasies. The workflow stays similar even as subjects change.
Most importantly, this process teaches you to see images as raw material. That city photo contains potential far beyond its original capture. Every image in your library holds similar possibilities once you master manipulation.
Practice these techniques until blending feels intuitive. Then push further. Combine more elements. Create stranger juxtapositions. Build entire worlds inside Photoshop.
The software gives you tools. Your imagination determines how far they go.