
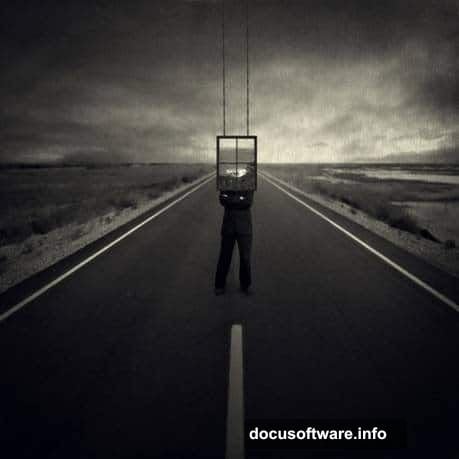
Want to build an eerie dreamscape that stops viewers in their tracks? This photo manipulation tutorial walks you through creating a surreal portrait of a mysterious window-headed figure on a desolate road.
You’ll master depth of field techniques using Photoshop‘s blur tools. Plus, you’ll learn how to blend light and shadow for seamless compositing. The result? A moody black-and-white image that looks like it escaped from someone’s nightmare.
Let’s dive into the technical process behind this haunting effect.
What You’ll Need Before Starting
Gather these stock images before you begin. Most are available free from DeviantArt stock photographers:
Essential Resources:
- Road scene from Nightfate-stock
- Window image from Mehrunnisa-stock
- Cliff background from The-Strawberry-Tree
- Business suit from rhyfelwr-stock
- Swing prop from Shoofly-Stock
- Metal and paper textures from Wojtar-stock
Make sure you have Photoshop CS6 or newer. Earlier versions work but some adjustment layers behave differently.
Set Up Your Canvas
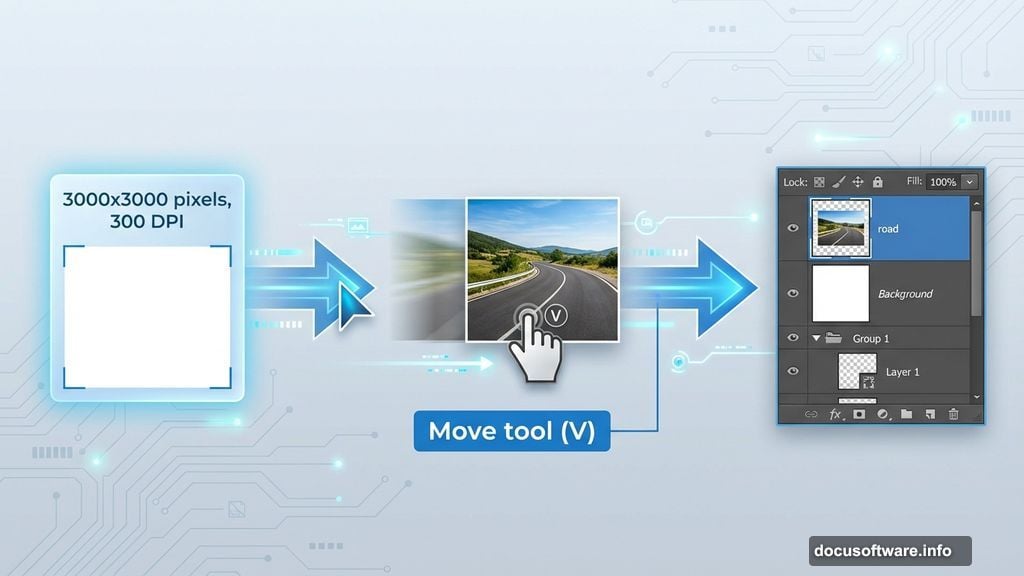
First, create your working space. Go to File > New and input these exact specifications:
- Width: 3000 pixels
- Height: 3000 pixels
- Resolution: 300 DPI
- Color Mode: RGB, 8-bit
- Background: Transparent
Why 3000×3000 pixels? This gives you enough resolution for print-quality output. Plus, you can crop to different aspect ratios later without losing detail.
The square format also makes composition easier. You’re not fighting rectangular constraints while arranging surreal elements.
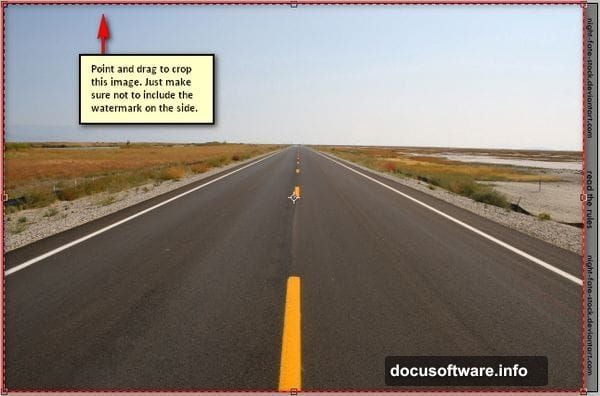
Build Your Road Foundation
Open the road stock image. You’ll notice a watermark in the corner. Remove it by activating the Crop tool (press C on your keyboard).
Drag the crop boundaries to exclude the watermark area. Then press Enter to commit the crop.
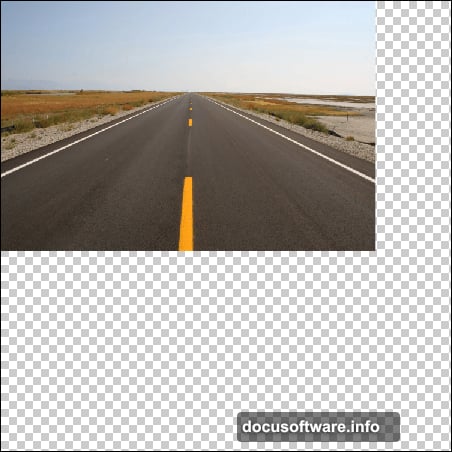
Now comes the tricky part. Activate the Move tool (V) and drag the road image onto your blank canvas. Don’t worry about perfect placement yet.
Position the road in the upper portion of your canvas. This leaves room below for resizing without cutting off important details.
Here’s where it gets technical. Rename this layer to “road” by double-clicking the layer name. Good layer organization saves headaches later.
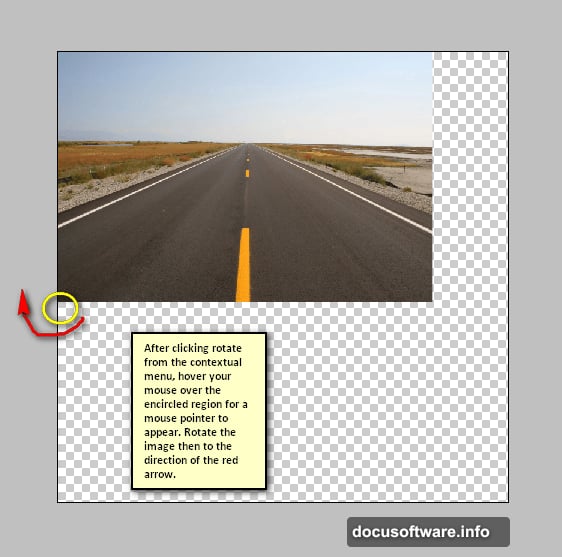
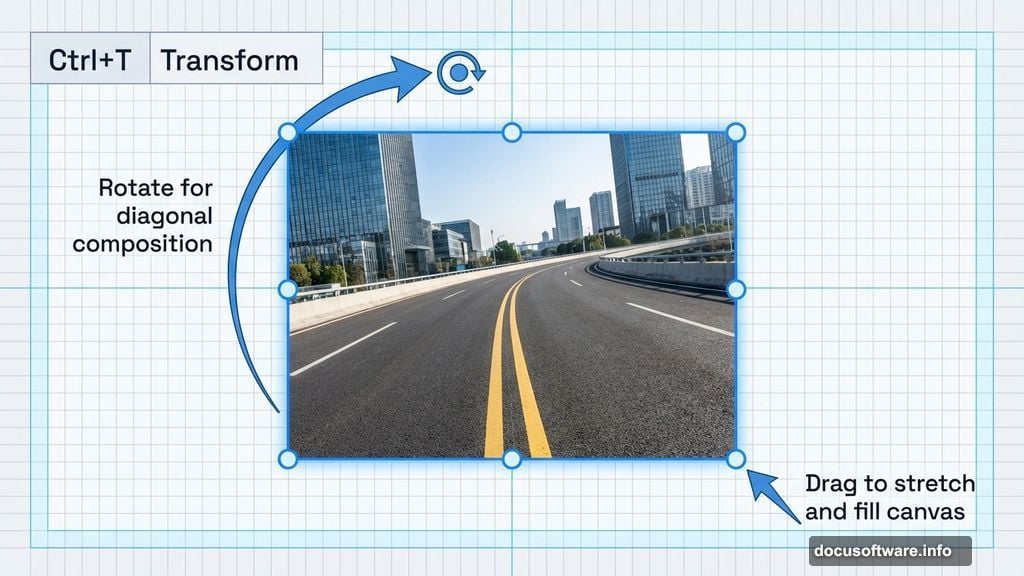
Rotate and Resize for Impact
Activate the Transform tool by pressing Ctrl+T (Cmd+T on Mac). You’ll see small squares appear around your image borders.
Right-click anywhere on the canvas. Choose “Rotate” from the menu. Rotate the road slightly to create dynamic diagonal lines. Diagonal compositions feel more dramatic than straight horizontal ones.
The edges won’t align perfectly with your canvas. That’s fine. We’ll fix it now.
With Transform still active, grab the bottom-right corner square. Drag it down and to the right until it reaches the canvas edge. Do the same with the top corner.
You’re essentially stretching the road to fill your square canvas. The slight distortion adds to the surreal feeling.
Press Enter to commit the transformation.
Create Atmospheric Depth
This is where your image transforms from flat to dimensional. We’re using blur techniques to simulate how cameras actually see depth.
Duplicate your road layer (Ctrl+J or Cmd+J). Name the copy “road blur.”
Go to Filter > Blur > Lens Blur. This filter mimics real camera optics better than Gaussian blur.
Adjust the radius to around 15-20 pixels. The exact number depends on your taste. More blur pushes the background farther away.
But here’s the trick: Don’t blur everything equally. Use a layer mask to blur only the distant portions of the road.
Select the Gradient tool. Choose black-to-white linear gradient. Drag from the bottom of your image toward the top.
This creates gradual blur that mimics natural depth of field. The foreground stays sharp while the background softens.
Introduce Your Window-Headed Subject
Open the window stock image. Cut it out carefully using the Pen tool for precision. Quick Selection works for faster results but expect to clean up edges.
Place the window where your subject’s head will be. Scale it down using Transform (Ctrl+T).
Next, open the suit stock image. This becomes your figure’s body. Cut out the torso and position it below the window.
The connection point matters. Overlap the window bottom slightly with the suit collar. This sells the illusion that the window is actually the head.
Blend the edges using a soft brush on a layer mask. Paint away any harsh transitions with 20-30% opacity. Build up the effect gradually.
Add Environmental Context
Open the cliff background. This adds atmospheric perspective behind your main figure.
Place it above your road layer but below your subject. Scale and position it to fill the horizon line.
Lower the opacity to around 60-70%. This pushes it back in space visually. Too opaque and it competes with your main subject.
Use a layer mask to blend the cliff into the road. Paint with a large soft brush at low opacity. You’re aiming for a seamless transition where road meets horizon.
The swing stock image adds a secondary element. Place it off to the side, slightly out of focus. This creates narrative tension without explaining too much.
Light and Shadow Integration
Nothing screams “fake composite” louder than mismatched lighting. Fix this by adding consistent light direction.
Create a new layer above all your elements. Set the blend mode to Overlay.
Choose a soft brush with white color. Paint light onto areas that face your imaginary light source. I recommend top-right for this composition.
Lower the layer opacity to 30-40%. Subtle lighting looks more realistic than dramatic highlights.

Now create another layer set to Multiply blend mode. Paint with dark gray (not pure black) on areas that should be in shadow.
This darkens surfaces facing away from your light source. It’s the secret to making separate images look like they belong together.
Texture for Atmosphere
Open the metal texture. Place it above all layers and set blend mode to Overlay or Soft Light.
Scale it to cover your entire canvas. Lower opacity to 15-20%.
Textures add visual interest and disguise minor compositing flaws. The grainy quality also enhances the dreamlike feeling.
Add the paper texture in a separate layer. Use the same blend mode approach. Stack different textures at low opacities for complex surface quality.
But don’t overdo it. Too much texture makes images look muddy. When in doubt, dial it back.
Black and White Conversion Magic
This converts your color image into haunting monochrome. But we’re not just desaturating.
Add a Black & White adjustment layer at the top of your layer stack. This gives you control over how each color converts to gray.
Drag the red slider to lighten skin tones. Move the blue slider left to darken skies. Yellow slider affects the road and some foliage.
Play with these sliders until you get strong contrast. Surreal images need bold tonal differences to maintain visual impact.
Next, add a Curves adjustment layer. Create an S-curve by lifting the highlights and lowering the shadows.
This increases contrast even more. The image should feel punchy, not flat.
Fine-Tune the Mood
Add a Levels adjustment layer. Drag the black input slider slightly right. This crushes the darkest shadows to pure black.
Conversely, drag the white input slider slightly left. This ensures your brightest highlights are true white.
These adjustments create that classic noir feeling. Pure blacks and whites with rich midtones between them.
Consider adding a slight vignette. Create a new layer filled with white. Apply Filter > Lens Correction and move the Vignette slider left.
This darkens the edges and draws eyes toward your central figure.
Export Your Final Image
Flatten your image or save a layered version for future edits. I recommend keeping the layered master file.
For web sharing, export as JPEG at 80-85% quality. For print, keep it as TIFF or high-quality JPEG.
Your final image should measure 3000×3000 pixels at 300 DPI. That’s large enough for a 10×10 inch print at full quality.
The mysterious window-headed figure stands alone on that endless road. The viewer wonders: Is this a dream? A nightmare? Something else entirely?
That ambiguity makes surreal images powerful. You’ve created space for viewers to project their own interpretations.
The Secret to Believable Surrealism
Here’s what most tutorials miss: Surreal doesn’t mean random. The best surreal images follow internal logic.
Your lighting stays consistent. Your depth of field makes optical sense. Your tonal range remains believable even if your subject isn’t.
Technical execution sells impossible scenes. Master the fundamentals of compositing, lighting, and color theory. Then break reality in ways that feel intentional rather than accidental.
This technique applies to any surreal concept. Swap the window for a birdcage. Replace the road with clouds. The process remains the same.
Start with strong stock images. Build proper depth. Match lighting across all elements. Add atmosphere through texture and tone. The subject matter changes but the principles don’t.