
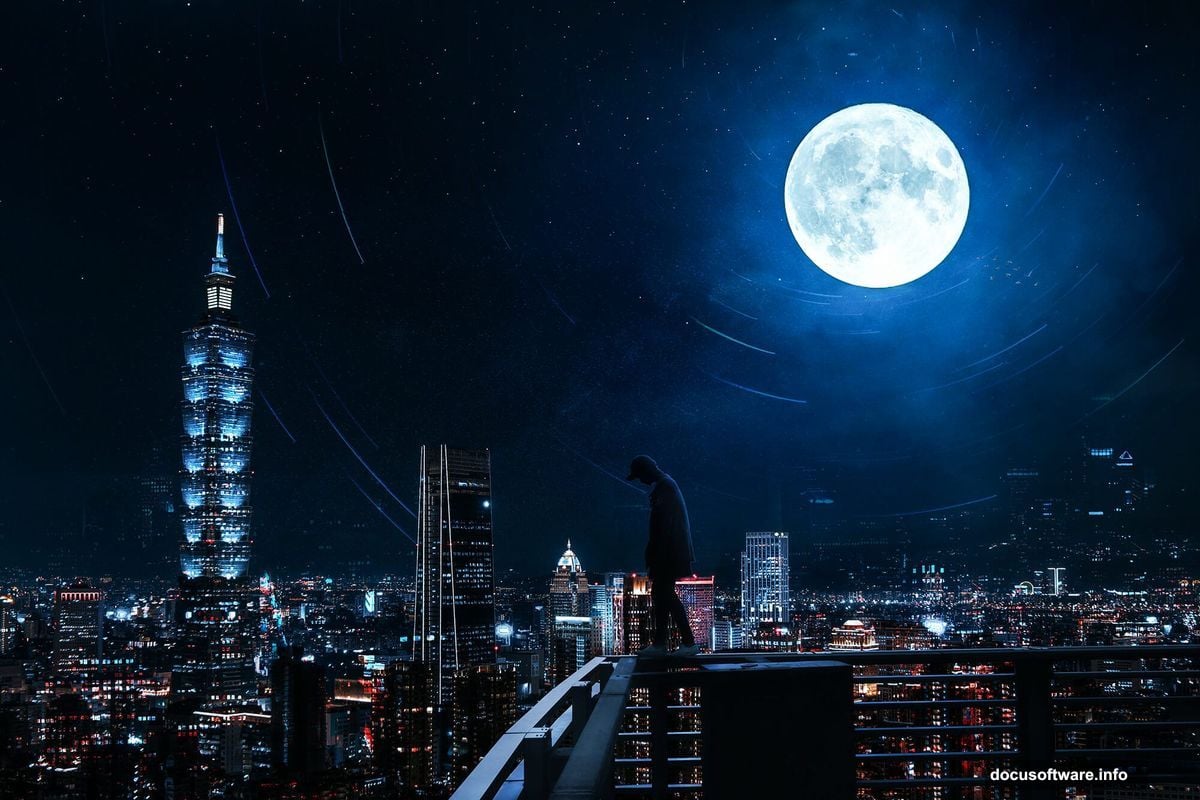
Building atmospheric urban scenes sounds intimidating. But Photoshop makes it surprisingly manageable with the right approach.
This tutorial walks through creating a moody rooftop cityscape from scratch. We’ll blend multiple images, add dramatic lighting, and finish with professional color grading. Plus, the techniques work for any composite scene you want to build.
Set Up Your Canvas Right
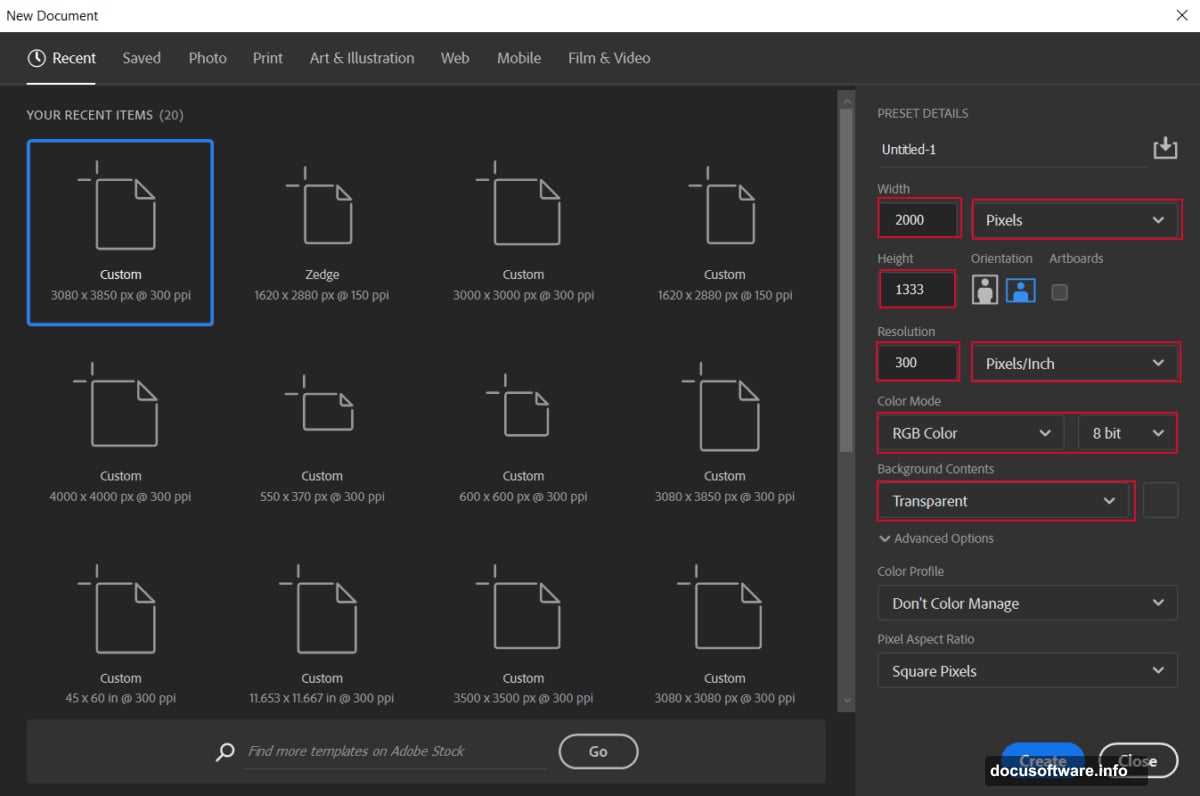
Start with proper dimensions. Press Ctrl/Cmd + N to create a new file.
Set width to 2000 pixels and height to 1333 pixels. Resolution should be 300 DPI for print quality. Choose RGB color mode with 8-bit depth. Make the background transparent so you can layer elements cleanly.
These settings give you enough resolution for web use and small prints. So you won’t need to recreate everything if you want higher quality later.
Place Your Base City Image
Go to File > Place and select your city photograph. The transform tool activates automatically.
Hold Alt + Shift while dragging corner handles. This maintains the image’s aspect ratio. In Photoshop CC, you only need Alt. Position your city skyline across the lower two-thirds of the canvas.
Right-click the layer and choose Rasterize. This converts the smart object into editable pixels. You’ll need this for the next adjustments.
Add Atmospheric Glow to Buildings
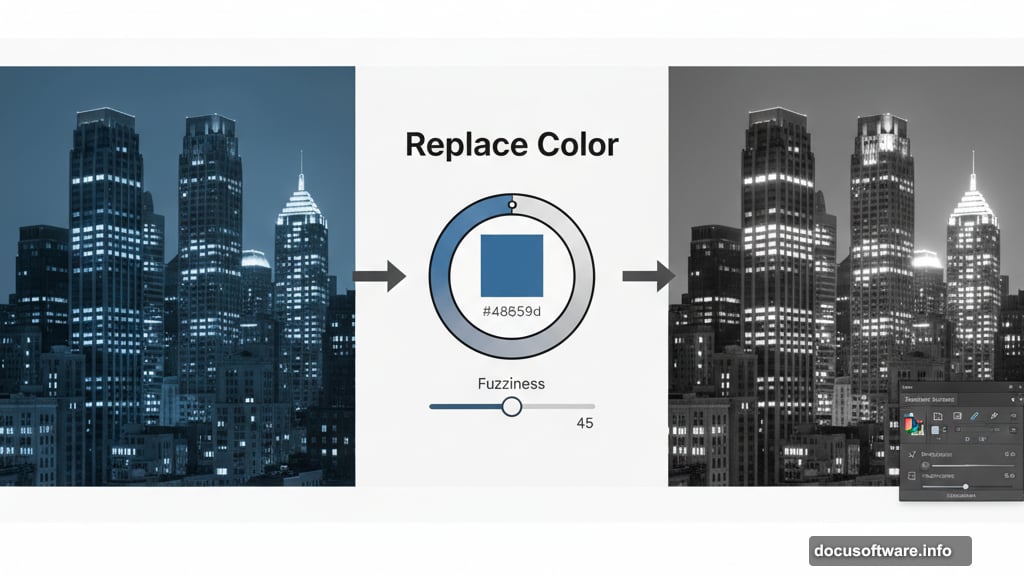
Duplicate your city layer with Ctrl/Cmd + J. Then navigate to Image > Adjustments > Replace Color.
Set the color picker to blue (#4a859d). Check the Localized Color Clusters box. Move Fuzziness to 45, drop Saturation to -100, and push Lightness to +100.
This technique transforms blue tones in windows and reflective surfaces into bright highlights. It creates that “lights just turned on at dusk” effect without painstaking manual work.
Build Depth With Curves Adjustments
Add a Curves adjustment layer from the Adjustments panel. Pull the curve line upward slightly to brighten the overall scene.
Create another Curves layer. This time press Ctrl/Cmd + I to invert the mask to black. Grab a soft round brush with white as your foreground color.
Paint over areas where light would naturally fall. Focus on building tops, street lights, and illuminated windows. This selective brightening adds dimension that flat adjustments can’t match.
Layer the Secondary Glow Effect
Place your glow texture file the same way you added the city. Position it over the skyline and resize to cover the lit areas.
Create a layer mask. Switch to a soft black brush and paint away glow from the sky and cloud areas. You want glow concentrated on the cityscape itself.
Change the blend mode to Color Dodge. Then duplicate this layer twice with Ctrl/Cmd + J. Three stacked glow layers create intense luminosity without looking artificial.
Extract Your Main Subject Cleanly
Open your person image in a new file. Select the Pen Tool (P) from the toolbar.
Click around your subject’s outline to create anchor points. The Pen Tool draws precise paths between clicks. Take your time on complex areas like hair and clothing edges.
When you complete the path back to your starting point, right-click and choose Make Selection. Set Feather Radius to 0.5 pixels for slightly soft edges. Click OK, then add a layer mask to hide the background.
Position and Blend Your Subject
Copy your masked subject and paste into your main composition. Press Ctrl/Cmd + T to transform.
Scale the person down until the proportions look natural against the cityscape. Rooftop figures usually appear smaller due to perspective. Position them on a rooftop edge or elevated surface.
The key to believable composites is matching light direction. Your subject’s lighting should come from the same angle as the city’s glow.
Match Subject Lighting to Scene
Add a Curves adjustment layer. Right-click and choose Create Clipping Mask so it only affects your person layer.
Adjust the curve to match your subject’s brightness to the surrounding scene. If the city glows warm, add a slight upward curve in the red channel. Cool scenes need blue channel adjustments.
Create another clipped Curves layer. Invert the mask with Ctrl/Cmd + I. Use a white brush to paint light onto the side of your subject facing the city glow. This rim lighting sells the composite.
Add Celestial Elements for Atmosphere
Place your moon image above all city layers. Resize and position it in the upper third of your canvas.
Change the blend mode to Screen. This makes the black background disappear while keeping the moon visible. Lower opacity to 60-70% so it doesn’t overpower the scene.
Screen mode works perfectly for light elements against dark backgrounds. Remember this trick for stars, lights, and other glowing objects.
Create Depth With Texture Overlays
Place your Milky Way texture file. Resize it to cover most of the sky area.
Set blend mode to Screen and reduce opacity to 30-40%. The galaxy adds texture without dominating. Position the brightest areas away from your main subject so they don’t compete for attention.
Repeat this process with cloud textures if your sky looks too empty. Multiple subtle layers beat one heavy texture every time.
Scatter Birds for Scale and Movement
Place your birds image. These silhouettes help establish scale and add life to static scenes.
Transform the layer to scatter individual birds across different areas. Duplicate and flip horizontally for variety. Reduce opacity slightly on distant birds to enhance depth perception.
Birds draw the eye upward and fill negative space naturally. Just don’t overdo it. Three to five small groups work better than dozens of individual birds.
Polish With Camera Raw Filter
Merge all visible layers into a new layer. Press Ctrl/Cmd + Alt/Opt + Shift + E. This creates a flattened copy while preserving your original layers underneath.

Go to Filter > Camera Raw Filter. This opens Adobe’s powerful color grading interface.
Increase Clarity slightly to enhance midtone contrast. Add a touch of Vibrance to boost colors without oversaturating skin tones. Adjust Temperature toward warm if you want golden hour lighting, or cool for nighttime scenes.
Fine-Tune Color Balance
Still in Camera Raw, open the Color Mixer panel. Adjust individual color channels to perfect your palette.
Shift blues toward cyan for night skies. Push oranges toward yellow in city lights. Small adjustments make huge differences in mood.
The Split Toning panel adds color to highlights and shadows separately. Warm highlights (orange/yellow) and cool shadows (blue/purple) create that cinematic look. Keep it subtle though. Saturation around 15-20 is plenty.
Add Final Vignette and Sharpening
In the Effects panel, add a subtle Post-Crop Vignette. Set Amount to -15 or -20. This darkens edges and draws attention toward your subject.
Switch to the Detail panel. Increase Sharpening to 60-80 with Radius at 1.0. Raise Masking to 70 so sharpening only affects edges, not noise.
Click OK to apply all Camera Raw adjustments. Your urban rooftop scene is complete.
Common Pitfalls to Dodge
Mismatched lighting ruins composites faster than anything else. Always check that light direction stays consistent across all elements. Your subject, city, and sky should all share the same light source.
Over-processing kills believability too. If adjustments look obvious, you’ve gone too far. Step back frequently to check your work with fresh eyes.
Finally, don’t skip layer organization. Name your layers and group related elements. You’ll thank yourself when you need to make changes later.
Why This Technique Works Everywhere
These composite methods work beyond cityscapes. Forest scenes, mountain vistas, even fantasy landscapes follow the same principles.
Master these core skills: precise selections, blend modes, adjustment layers, and color grading. They form the foundation of virtually all Photoshop compositing work.
Plus, once you build your technique library, you’ll work faster. That glow effect trick works on any backlit scene. The selective brightening approach enhances any photograph. These aren’t one-off solutions. They’re tools you’ll use constantly.
Start simple with this tutorial. Then experiment with your own image combinations. The creative possibilities expand as your technical skills improve.