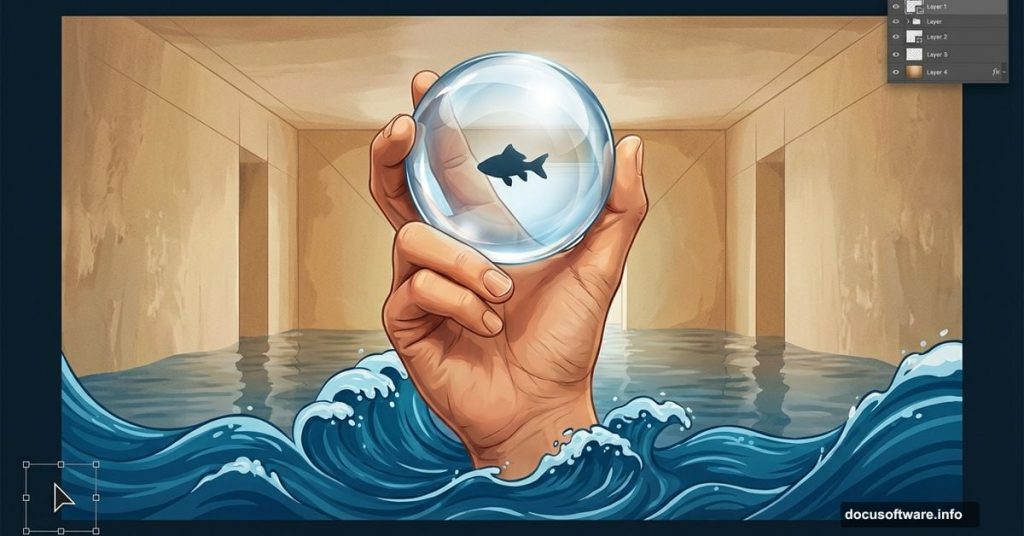
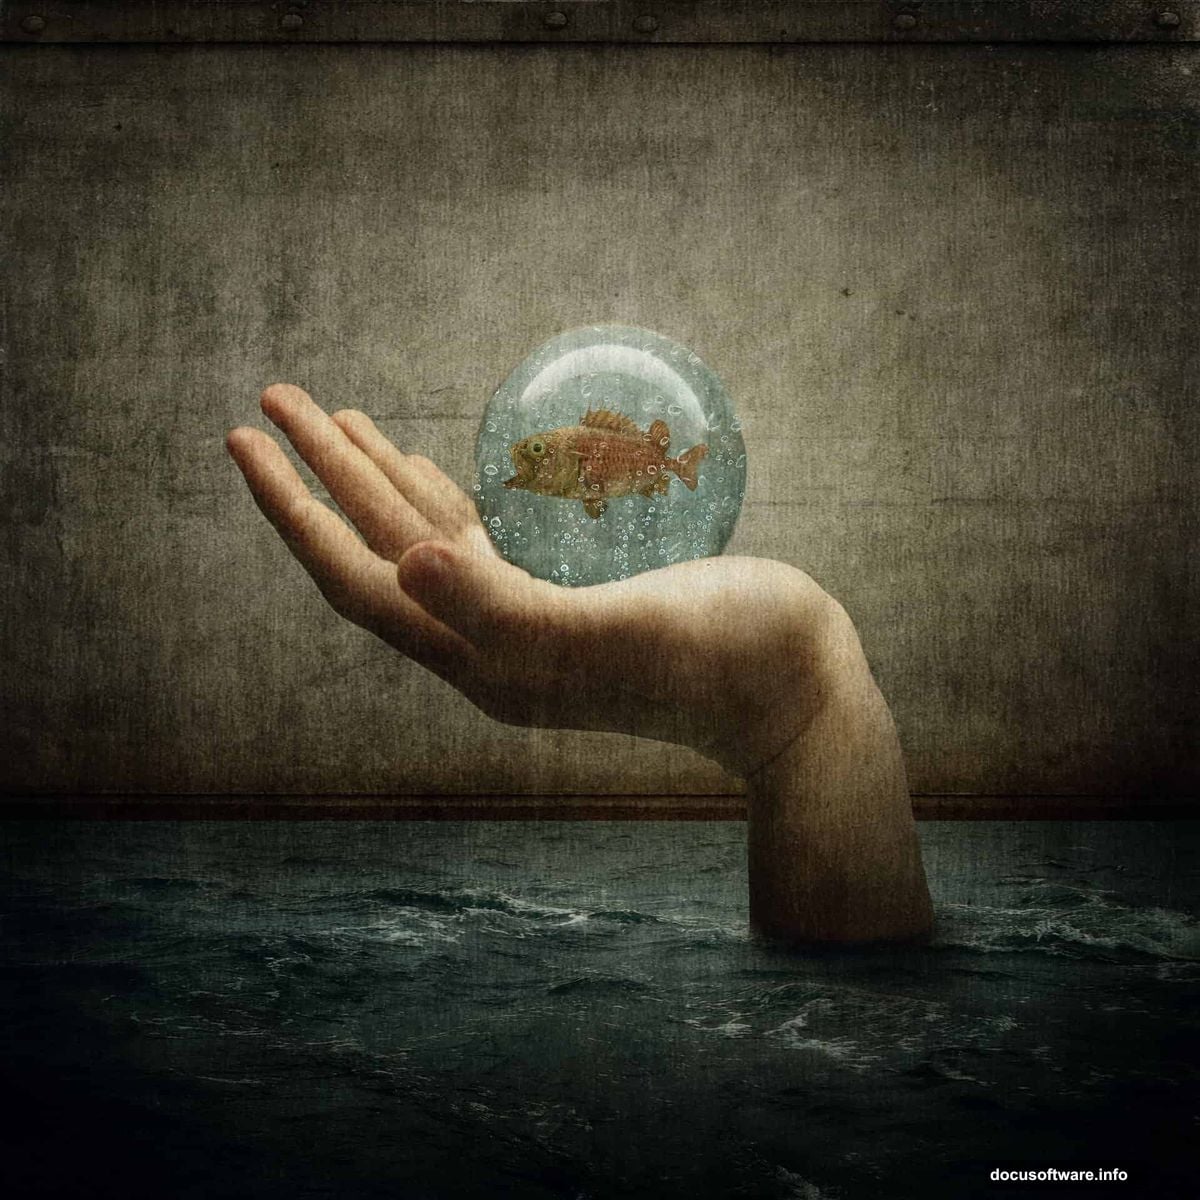
Photoshop lets you build impossible scenes that mess with reality. This tutorial shows you how to blend multiple stock photos into one disturbing image: a flooded room with a giant hand carrying a fish inside a glass sphere.
You’ll learn practical techniques that work for any photo manipulation project. Plus, these skills transfer to other composite work beyond this specific scene.
What You’ll Master in This Tutorial
The techniques here go beyond one project. You’ll get comfortable with core Photoshop tools that solve common compositing challenges.
Key Skills:
- Seamless image blending across multiple photos
- Transform tool mastery for perspective matching
- Brush tool techniques for natural lighting fixes
- Blending mode magic to place water inside glass
- Light and shadow enhancement for believable scenes
These fundamentals apply to any photo manipulation work. Once you nail them here, you’ll spot opportunities to use them everywhere.
Stock Photos You’ll Need
Gather these resources before starting. Having everything ready saves time and keeps your workflow smooth.
Required Images:
- Wall Texture (shadowh3)
- Stormy Sea (darkrose42 stock)
- Glass sphere/ball (LuckyStock)
- Scary Fish (xNickixstockx)
- Water on glass texture (deadenddoll stock)
- Grunge texture (e dina)
- Paper texture (Wojtar Stock)
- Metal texture (Wojtar Stock)
Download all assets first. Trust me, stopping mid-project to hunt for files kills your creative momentum.
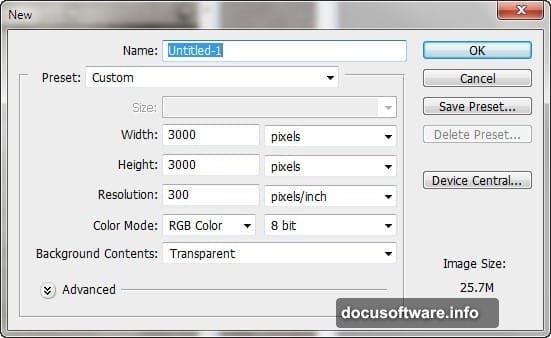
Setting Up Your Canvas
Start with a large canvas. You can always scale down later, but working big gives you flexibility for prints or detailed edits.
Canvas Settings:
- Width: 3000 pixels
- Height: 3000 pixels
- Resolution: 300 PPI
- Color Mode: RGB, 8-bit
- Background: Transparent
Go to File > New and plug in those numbers. The high resolution ensures crisp results even if you crop or resize later.
Building the Flooded Room Walls
The wall texture creates your scene’s foundation. So getting this right matters for everything that follows.
Open your wall texture file. Then activate the Move tool (press V) and drag it onto your canvas. It should land as a new layer automatically.
Rename this layer immediately. Double-click “Layer 1” text and change it to “wall”. This habit saves confusion when you’re juggling 20+ layers later.
Now activate the Transform tool (Ctrl/Cmd + T). You’ll need to reshape this texture to look like actual room walls with perspective. Resize and distort until it reads as walls receding into space.
The result should create a tunnel-like feeling. Dark edges, lighter center, walls that seem to go back into the distance.
Fixing the Wall Lighting
Raw textures rarely have perfect lighting out of the box. So we’ll paint shadows to match our imagined light source.
Create a new layer (Ctrl/Cmd + Shift + N) and name it “Darken Wall”. This non-destructive approach lets you adjust without ruining your original wall texture.
Brush Settings:
- Size: 1200px
- Hardness: 0%
- Opacity: 25%
- Flow: 100%
- Color: #000000 (pure black)
Paint shadows in the corners and edges. Build up darkness gradually with multiple soft strokes. Low opacity prevents harsh transitions.
The goal? Make the light feel like it’s coming from one direction, probably from where our giant hand will eventually appear.
Adding the Flood Water
Next up: turning this room into a flooded nightmare. The water needs to look like it’s actually sitting in the space, not just pasted on top.
Open your “Stormy Sea” stock photo. Drag it into your composition with the Move tool. Position it in the lower portion of your canvas where floor level would be.
Layer Setup:
- Rename to “water”
- Use Transform tool to match perspective
- Lower opacity temporarily to see wall edges beneath
- Adjust size and rotation until water sits naturally in space
The water shouldn’t just float there. It needs to interact with the walls, showing how it would actually pool in this room.
Blending Water with Walls
Here’s where blending modes prove their worth. They let elements interact naturally without tedious masking.
Select your water layer. Then try different blending modes from the dropdown menu in your Layers panel. Multiply often works well for water, making it appear transparent while keeping darker tones.
Fine-Tuning:
- Adjust layer opacity for realistic transparency
- Use a soft eraser or layer mask on hard edges
- Paint subtle shadows where water meets walls
- Add reflection hints on the water surface
The water should now look like it belongs in the scene, not like a sticker slapped on top.
Creating the Glass Sphere Effect
This part gets fun. We’ll make a glass ball that contains water and a fish, held by that giant hand.
Open your glass sphere stock photo. Drag it onto your canvas and position it where the hand will eventually hold it.
Sphere Setup:
- Rename layer to “glass ball”
- Use Transform to size appropriately
- Keep it proportionally large (this is supposed to be surreal)
Now for the magic: making water appear inside the glass. Open your “Water on glass” texture. Drag it over your sphere layer.
Here’s the key: set this water texture layer to a blending mode like Screen or Lighten. Suddenly, it looks like water trapped inside glass.
Layer Mask Technique:
- Add a layer mask to your water texture
- Paint black on the mask outside the sphere edges
- This clips the water effect to only show inside the ball
- Soft brush edges prevent harsh cutoffs
The sphere should now look like a glass container filled with liquid. Pretty cool, right?
Adding the Fish
Time to give our trapped fish some personality. Open your scary fish stock photo.
Fish Integration:
- Cut out the fish from its background (Select > Subject works great)
- Drag it into your composition
- Position inside the glass sphere
- Transform to appropriate size (smaller than the sphere, obviously)
The fish needs to look submerged in that water. So adjust its layer:
Fish Lighting:
- Reduce contrast slightly for underwater look
- Add subtle blue tint (Hue/Saturation adjustment)
- Paint soft shadows on the glass where fish blocks light
- Consider adding slight motion blur for trapped movement feel
The fish should look stressed and confined. That’s the disturbing part we’re going for.
Building the Giant Hand
This element sells the entire surreal concept. The hand needs to feel massive compared to the room.
Find a stock photo of a hand in a holding position. Drag it into your composition.
Hand Placement:
- Position fingers to cradle the glass sphere
- Use Transform to make it oversized and intimidating
- Angle it to match the perspective of your room
- Ensure lighting direction matches your scene
The hand should dwarf everything else. We want viewers uncomfortable with the scale.
Hand Refinement:
- Cut out cleanly from original background
- Match skin tone to your scene’s color palette
- Add shadows on fingers where they grip the sphere
- Paint highlights where light hits the hand
The hand shouldn’t look like it was photographed somewhere else. It needs to exist in this flooded room.
Matching Colors Across Elements
Nothing screams “bad photoshop” like mismatched colors. So we’ll unify everything now.
Create a Hue/Saturation adjustment layer above all your elements. Shift the overall hue toward your dominant color (probably murky greens or blues for this flooded room vibe).
Color Adjustments:
- Reduce saturation for grittier, more realistic look
- Shift hue slightly to create consistent atmosphere
- Use Curves adjustment for overall contrast
- Consider Color Lookup tables for instant mood
Every element should feel like it exists under the same lighting conditions. Test by squinting at your screen – colors should flow together, not fight each other.
Adding Atmospheric Effects
Flooded rooms have atmosphere. Literally. Water droplets, dust, murky air – these details sell realism.
Texture Layers:
- Drag in your grunge texture
- Set to Overlay or Soft Light blending mode
- Reduce opacity to subtle levels
- Position over entire composition
Add your paper texture similarly. These create aged, disturbed feelings.
Water Droplets:
- Use your “Water on glass” texture again
- Position copies around the scene
- Set to Screen mode at low opacity
- Suggests water everywhere, not just pooled on floor
The metal texture can add industrial grit to the walls. Experiment with blending modes until it enhances rather than overpowers.
Light and Shadow Refinement
Good lighting makes or breaks composite realism. Now we’ll push those shadows and highlights.
Create a new layer set to Overlay mode. Paint with white where light hits strongest – top of the sphere, highlights on the hand, reflections on water.
Shadow Layer:
- New layer set to Multiply mode
- Paint soft black in darkest areas
- Under the hand’s fingers
- Corners of the room
- Deep water areas
Build these up gradually. Multiple subtle layers beat one heavy-handed application.
Ambient Light:
- Add slight glow around the sphere (it’s the focal point)
- Paint rim lighting on the fish
- Enhance reflections where water meets walls
Lighting should guide the viewer’s eye toward the hand holding that fish-filled sphere.
Final Color Grading
Color grading ties everything together and sets the mood. This step transforms a collection of photos into one cohesive image.
Add a Color Balance adjustment layer. Push shadows toward blue/cyan for that underwater, cold feeling. Add slight warmth to highlights for contrast.
Grading Layers:
- Curves for overall contrast and tone
- Vibrance to enhance without oversaturating
- Selective Color to fine-tune individual color ranges
- Optional: Gradient Map for dramatic mood shifts
Don’t go overboard. The goal is disturbing but believable, not obviously filtered.
Sharpening and Finishing Touches
Almost done. Now we’ll add sharpness where it matters and polish the details.
Merge all layers to a new layer (Ctrl/Cmd + Alt + Shift + E). This creates a flattened copy while preserving your layer stack below.
Final Sharpening:
- Filter > Sharpen > Unsharp Mask
- Amount: 100-150%
- Radius: 1.0-1.5
- Threshold: 0
Apply this to your merged layer. Then use a layer mask to remove sharpening from areas that should stay soft (like out-of-focus background elements).
Detail Enhancement:
- Add slight vignette (darkened edges)
- Check for any floating pixels or rough cutouts
- Fix any color spill around masked elements
- Ensure all shadows point in consistent directions
Step back from your screen. Does anything jump out as wrong? Fix it now.
Exporting Your Creation
You’ve built something disturbing and surreal. Time to save it properly.
For Web:
- File > Export > Export As
- Format: JPEG
- Quality: 80-90%
- Resize if needed (1920px width works for most sharing)
For Print:
- Keep full 3000px resolution
- File > Save As > Photoshop (.PSD) for future edits
- File > Save As > TIFF for archival quality
Save your layered PSD file. You’ll want to revisit this later, either to refine it or reuse techniques from it.
What You Actually Learned
Beyond making one weird image, you’ve practiced essential photo manipulation skills. These techniques solve problems in any composite work.
Transferable Skills:
- Perspective matching across multiple photos
- Non-destructive lighting adjustments
- Blending mode mastery for natural integration
- Color grading for unified atmosphere
- Detail work that sells realism
The specific subject matter here is wild. But the approach applies to product photography, concept art, book covers, or any project requiring seamless photo blending.
Take these tools and build something even stranger next time. The technique matters more than the specific flooded room scenario.