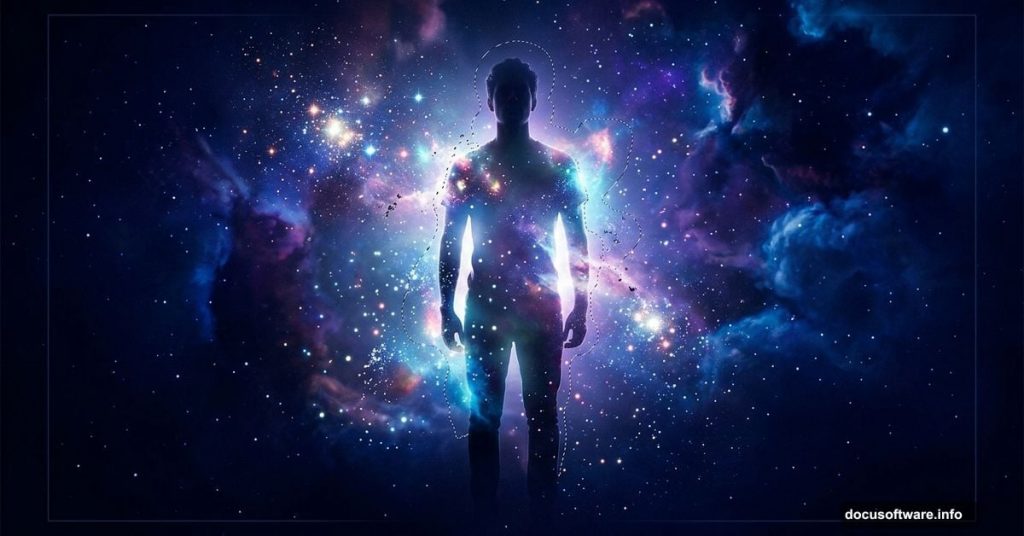
Ever look at a breathtaking piece of digital art and wonder how someone built an entire fantasy world from scratch? That’s exactly what photomanipulation does. It takes ordinary stock photos and transforms them into something completely unreal.
This tutorial walks you through the “Dreamer” photomanipulation technique. You’ll combine multiple stock images into one seamless, dreamlike scene using Photoshop’s most powerful tools. Think adjustment layers, masking, custom brushes, and smart blending.
Ready to build something that never existed before? Let’s go.
What You Need Before Starting
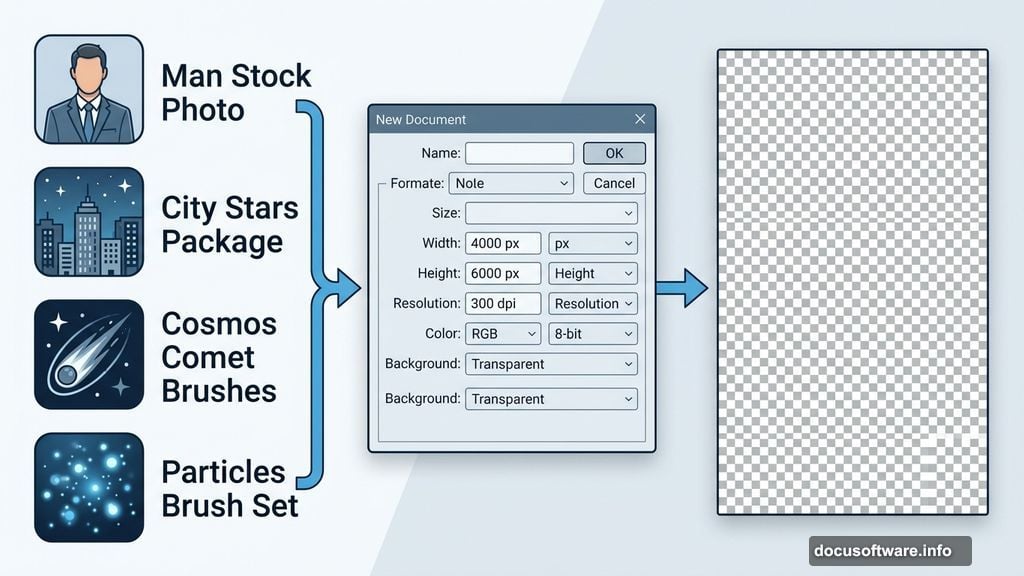
Gather these resources before opening Photoshop:
- Man stock photo
- City Stars Package
- Cosmos Comet Brushes
- Particles brush set
Having everything ready upfront saves a lot of frustration. Plus, you won’t need to hunt for files mid-workflow when you’re in a creative groove.
Step 1: Set Up Your Canvas
First, create a new document. Go to File > New and enter these exact settings:
- Preset: Custom
- Width: 4000 pixels
- Height: 6000 pixels
- Resolution: 300 dpi
- Color Mode: RGB Color, 8-bit
- Background Contents: Transparent
Why these dimensions? The 4000×6000 pixel size at 300 resolution gives you a high-quality, print-ready canvas. So you end up with an image that looks sharp whether it lives on screen or ends up printed large.
The transparent background also gives you maximum flexibility. You’re building layers from the ground up rather than painting over a solid color.
Step 2: Place Your Main Subject

Go to File > Place and select your Man stock photo. Drop it into the document.
This becomes your focal point for the entire composition. Everything else you add will build around this figure. So take a moment to think about placement before moving forward.
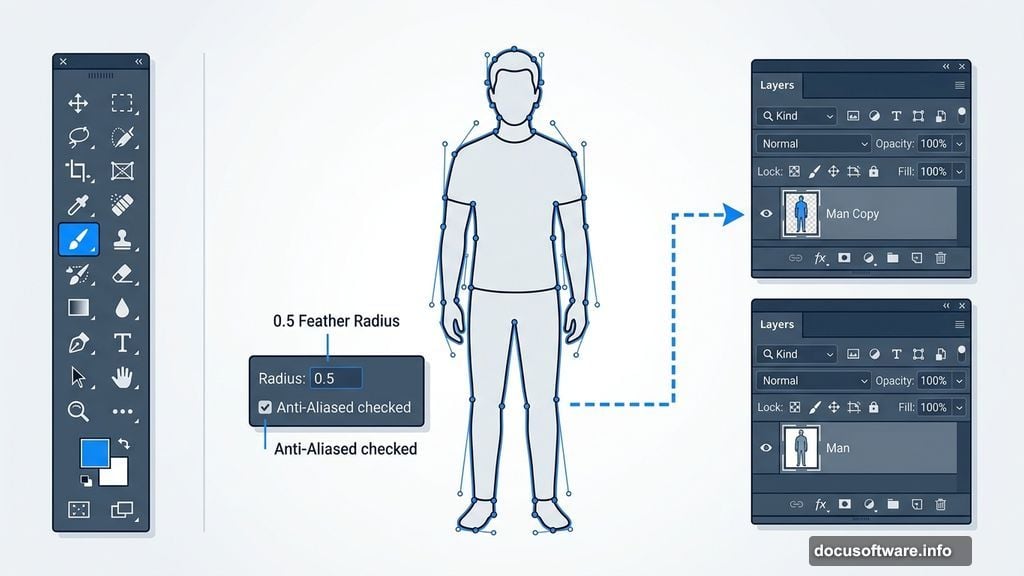
Step 3: Cut Out Your Subject with the Pen Tool
This step takes patience, but it makes all the difference in the final image.
Select the Pen Tool from your toolbar. Click where you want your selection to begin and hold down the mouse button. Your first anchor point appears. Then drag to set the curve of the line, which controls the slope of the path segment you’re drawing.
A solid general rule: extend your direction line about one-third of the distance toward your next anchor point. You can always adjust both sides of the direction line later, so don’t stress about perfection on the first pass.
Once you’ve traced around your subject, right-click and choose Make Selection. Set these values in the dialog:
- Feather Radius: 0.5
- Anti-Aliased: checked
- Operation: New Selection
Hit OK. Then press Ctrl + J to duplicate your selected subject onto a new layer. Label this layer “Man Copy.”
The slight feather radius of 0.5 softens the edges just enough to blend naturally with whatever background you place behind the figure. Too much feathering looks blurry. Too little looks harsh and cut out.
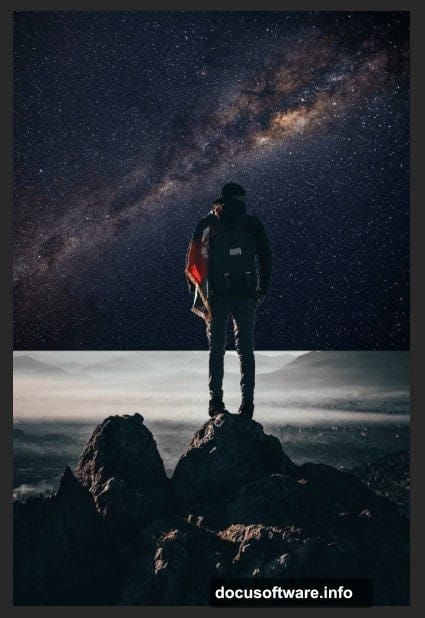
Step 4: Add the Stars Background
Select your original Man layer. Go to File > Place and bring in the Stars stock image.
Use the Transform Tool (Ctrl/Cmd + T) to position and size the stars image. Hold Alt + Shift while dragging a corner handle to scale proportionally from the center. Resize it to fill the background area nicely, matching the example composition.
Now change the Blend Mode to Soft Light and keep Opacity at 100%.
Soft Light is the magic here. Instead of just sitting on top of your image, the stars layer interacts with the layers below it. Bright areas get brighter. Dark areas get richer. The result feels atmospheric and integrated rather than pasted together.
To fine-tune positioning, you can drag inside the bounding box or type specific X and Y values in the options bar. The X value controls horizontal distance from the left edge. The Y value controls vertical placement from the top.
Step 5: Bring In the City
Open your City stock image separately. Select the Rectangular Marquee Tool (M) and drag over the area you want to use from that image.
Hold Shift while dragging to constrain your marquee to a perfect square if needed. Just remember to release the mouse button before releasing Shift to lock in that constrained shape.
This city element adds depth and context to the scene. Placed behind or around your subject, it starts building the environment that makes the whole composition feel like a real place that could exist somewhere.
Why This Technique Produces Such Rich Results
The real power in this workflow comes from how the layers interact rather than how they look individually.
The Pen Tool selection gives you clean, precise edges on your subject. The Soft Light blend mode on the stars layer adds mood without washing out other elements. And building on a transparent background means you control every single element independently.
Moreover, working at 4000×6000 pixels means you have room to crop, adjust, and experiment without losing quality. Many beginners work too small and then can’t resize their final image without it looking pixelated.
These aren’t just technical choices. They’re creative decisions that shape how the final piece feels. Dreamlike photomanipulation lives or dies on how believably you blend reality with imagination.
The tutorial continues with additional steps covering brush imports, further masking, and final color adjustments that pull the whole composition together. But these foundational steps establish the core workflow you’ll use throughout the entire piece.
Start experimenting with your own stock photos using these same techniques. The approach scales to almost any concept you can imagine.