
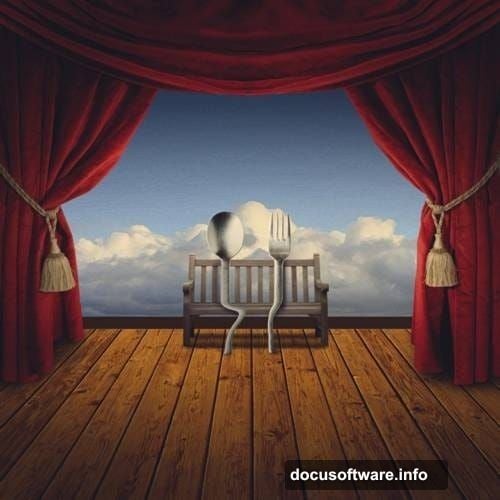
Want to build something dreamlike and strange? This tutorial walks you through creating a theatrical cutlery scene that Salvador Dali himself might appreciate.
You’ll learn how to construct a hardwood floor from scratch, position dramatic red velvet curtains, and compose surreal elements into a cohesive artwork. Plus, we’ll cover perspective correction, shadow enhancement, and color grading techniques that work across photo manipulation projects.
No advanced skills required. Just follow along step by step.
What You’ll Need Before Starting
Gather these free stock images before jumping in:
- Old wood texture for the floor
- Blue sky photograph for backdrop
- Red velvet curtain images
- Theater bench photograph
- Cutlery photograph (fork and spoon)
All images should be high resolution. Low-quality sources create muddy final results no matter how good your technique is.
Plus, make sure you’re working in Photoshop CS6 or newer. Earlier versions lack some features we’ll use later.
Set Up Your Canvas Properly
First things first. Create a new document with these exact specifications:
- Width: 3000 pixels
- Height: 3000 pixels
- Resolution: 300 pixels per inch
- Color Mode: RGB Color, 8-bit
- Background: Transparent
Why 3000×3000? That gives you flexibility to crop later without losing quality. Meanwhile, 300 DPI ensures print-ready output if you need it.
So hit File > New and plug in those numbers. Make sure Background Contents is set to Transparent. White backgrounds cause headaches when compositing later.
Build the Wooden Floor Foundation
Now let’s create that gorgeous hardwood floor effect.
Open your wood texture file. Then activate the Move tool by pressing V on your keyboard. Click and drag the texture onto your canvas.
Don’t worry about size yet. We’ll fix that next.
Resize and Position the Floor Texture
The texture needs proper dimensions to sell the illusion. Press Ctrl/Cmd + T to activate Transform mode.
You’ll see small squares appear around your texture. Those are transform handles. Grab the corner handles while holding Shift to resize proportionally.
Scale the texture until it covers the bottom third of your canvas. Keep the wood grain running horizontally for natural floor appearance.
Hit Enter to confirm the transformation.
Add Realistic Floor Perspective
Here’s where things get interesting. Real floors recede into the distance. Yours needs to do the same.
Activate Transform again with Ctrl/Cmd + T. But this time, right-click on the canvas to open the contextual menu.
Select Perspective from that menu. Now grab the bottom corner handles and drag them outward. This creates the illusion of depth as the floor stretches toward the viewer.
The top edge should stay narrow while the bottom expands wider. Experiment until it looks natural. Trust your eye more than measurements here.
Enhance Shadows on the Floor
Flat lighting kills realism fast. Let’s add dimensional shadows to the wood.
Create a new layer above your floor texture by pressing Ctrl/Cmd + Shift + N. Name this layer “Floor Shadows” to stay organized.
Then activate the Brush tool by pressing B. Make sure you’re using Photoshop’s default brush set before continuing.
If you don’t see the standard round brushes, right-click your canvas with the Brush tool active. Click the gear icon in the brush picker and select “Reset Brushes.”
Paint Natural Shadow Gradients
Set your foreground color to black. Then choose a large, soft round brush at about 30% opacity.
Paint gentle shadows along the edges where the floor meets walls or other elements. Build up darkness gradually with multiple brush strokes rather than one heavy application.
Shadows should be strongest in corners and lighten as they move toward the center. This mimics how light naturally falls in interior spaces.
Change your brush opacity as you work. Use 50% opacity for deep shadows and drop to 10% for subtle ambient shading.
Add the Blue Sky Backdrop
Time to build the background. Open your sky photograph and drag it onto the canvas with the Move tool (V).
Position the sky behind your floor layer in the layers panel. It should fill the upper two-thirds of your composition.
Scale the sky if needed using Transform (Ctrl/Cmd + T). Make sure you’ve got interesting cloud formations visible. Boring clear blue sky adds nothing to the drama.
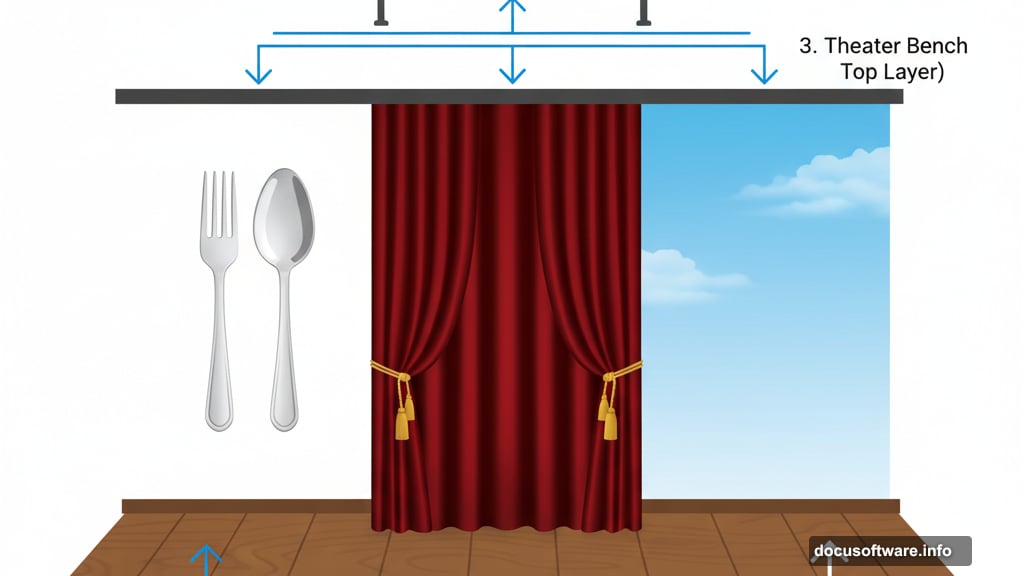
Create Theatrical Red Curtains
Now for the iconic theater curtains that frame everything.
Open your red velvet curtain images. You’ll probably need two separate curtain photos to create symmetrical left and right drapes.
Drag the first curtain onto your canvas. Position it along the left edge. Then flip it horizontally if needed by going to Edit > Transform > Flip Horizontal.
Repeat the process for the right curtain. Make sure both hang naturally and frame your composition symmetrically.
Blend Curtains with Soft Edges
Hard edges on the curtains destroy the illusion. Let’s fix that with layer masks.
Select your curtain layer and click the Layer Mask icon at the bottom of the layers panel. It looks like a rectangle with a circle inside.
Grab a large soft brush (B) with black as your foreground color. Paint along the curtain edges to fade them gently into the background.
This creates a natural light falloff effect. Plus, it helps integrate the curtains with the rest of your scene instead of looking pasted on.
Position the Theater Bench
Add your bench photograph to the composition. Place it in the foreground, sitting on your wooden floor.
The bench adds depth and gives viewers a sense of scale. Without it, everything floats in abstract space.

Make sure the bench perspective matches your floor perspective. If the angles don’t align, your brain screams “fake” even if you can’t consciously identify why.
Use Transform > Distort if you need to adjust the bench angle. Match its vanishing point to your floor’s vanishing point for cohesive geometry.
Add the Surreal Cutlery Elements
Here’s where Dali’s influence really shows up. Open your cutlery images.
You’ll want a fork and spoon positioned as if they’re characters on a stage. Think anthropomorphic posing. Give them personality.
I positioned my cutlery standing upright as if engaged in conversation. But experiment with your own arrangements. Surrealism thrives on unexpected compositions.
Scale your cutlery much larger than realistic proportions. The size contrast against the room creates that dreamlike quality Dali mastered.
Create Custom Shadows for Cutlery
Floating objects look terrible. Everything needs shadows anchored to the floor.
Create a new layer beneath your cutlery. Name it “Cutlery Shadows.”
Use the Brush tool (B) with black at low opacity. Paint shadows extending from the base of each piece of cutlery across the floor.
Shadows should stretch away from your light source. In this composition, light comes from above and slightly behind. So shadows fall forward toward the viewer.
Make shadows darker near the object and gradually lighter as they extend outward. Real shadows behave this way due to light diffusion.
Match Lighting Across All Elements

Inconsistent lighting is the number one giveaway of poor compositing. Every element must share the same light direction and quality.
Add a Curves adjustment layer above everything. Adjust the RGB curve to warm or cool your overall tone until all elements feel cohesive.
Then add individual Curves adjustment layers clipped to specific objects that need correction. Right-click a Curves layer and choose “Create Clipping Mask” to affect only the layer beneath it.
Brighten elements facing your light source. Darken elements facing away. This dimensional lighting sells the illusion that everything exists in the same space.
Add Atmospheric Depth with Gradient Maps
Gradient Maps are underrated for creating mood. Let’s add one now.
Create a new Gradient Map adjustment layer near the top of your layer stack. Choose a gradient that goes from deep blue-purple to warm yellow-orange.
Set this layer’s blend mode to Overlay or Soft Light at around 20-30% opacity. Adjust until you get that theatrical, slightly nostalgic color cast.
This technique unifies disparate photo sources by overlaying a consistent color palette across everything. It’s magical for photo manipulation work.
Enhance Drama with Vignette Effect
Vignettes focus attention toward your composition’s center. Let’s add one subtly.
Create a new layer at the top of your stack. Set its blend mode to Multiply.
Use a large, soft brush with black at low opacity. Paint around the outer edges of your canvas.
Build up darkness gradually. The goal is gentle focus direction, not obvious darkening. If viewers consciously notice your vignette, you’ve gone too heavy.
Final Color Grading Adjustments
Now let’s tie everything together with final color adjustments.
Add a Color Balance adjustment layer. Shift midtones slightly toward red and yellow for warmth. This amplifies the theatrical mood.
Then add a Vibrance adjustment. Increase Vibrance to about +20. Vibrance boosts muted colors without oversaturating already vibrant areas.
Finally, add a subtle Brightness/Contrast adjustment. Slight contrast increase makes colors pop and improves visual impact.
Sharpen for Maximum Impact
Almost done. Let’s sharpen the final image.
Flatten your image or create a stamp visible layer by pressing Ctrl/Cmd + Alt/Opt + Shift + E. This creates a new merged layer while preserving your layer stack below.
Go to Filter > Sharpen > Smart Sharpen. Use these settings:
- Amount: 80-100%
- Radius: 1.0-1.5 pixels
- Reduce Noise: 5-10%
Smart Sharpen beats regular Sharpen every time. It finds edges and enhances them without destroying smooth areas.
What Makes This Technique Work
Surrealism relies on realistic rendering of unrealistic scenarios. That’s the key insight from Dali’s work.
Your wooden floor, curtains, and lighting all follow realistic rules. But the oversized anthropomorphic cutlery breaks reality. That contrast creates the dreamlike quality.
So don’t skimp on the realistic elements. Perfect lighting, accurate shadows, and cohesive color grading make the impossible elements believable.
Common Mistakes to Avoid
Watch out for these pitfalls that tank photo manipulations:
Mismatched perspectives between elements destroy depth illusion. Every object needs consistent vanishing points.
Inconsistent lighting is even worse. Make sure light comes from one direction across all elements.
Plus, don’t forget shadows. Floating objects with no floor shadows look amateurish instantly.
Finally, avoid harsh edges where elements meet. Subtle blending via layer masks makes everything feel integrated rather than collaged.
Taking This Further
This technique adapts to countless subjects beyond cutlery. Try the same approach with:
- Oversized chess pieces in miniature rooms
- Giant flowers in urban landscapes
- Tiny people in normal-sized environments
- Floating objects defying gravity
The theater curtain framing device works for any surreal composition. It immediately signals “this is a performance” and primes viewers for the unexpected.
Experiment with different color palettes too. Cool blue-purple tones create mystery while warm reds amplify passion and drama.
Your imagination sets the only limit here. Dali proved that decades ago.