
Photoshop remains the go-to tool for photo manipulation. But most designers barely scratch the surface of what’s possible.
This tutorial walks through creating a romantic portrait photo manipulation using advanced techniques. You’ll learn quick masking, color matching, and nondestructive editing. Plus, these skills apply to countless other projects beyond this specific example.
Let’s dive into professional-level photo manipulation that transforms ordinary images into stunning artwork.
Remove Unwanted Elements Like a Pro
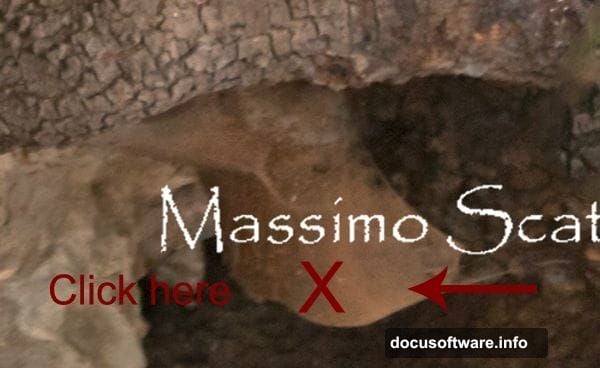
Watermarks and photographer tags often appear on stock images. The Clone Stamp Tool removes them cleanly.
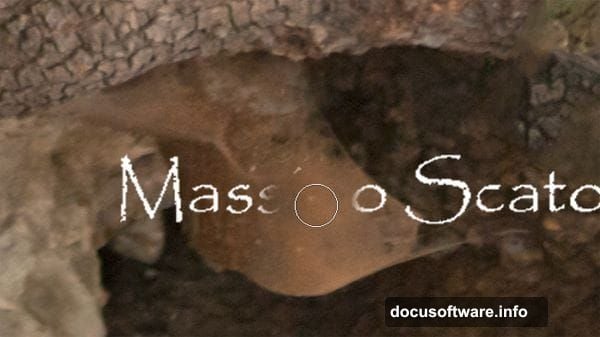
Here’s how it works. Select the Clone Stamp Tool from your toolbar. Hold ALT and click near the area you want to remove. A viewfinder appears showing what you’ll clone. Now brush over the unwanted element.
The key? Clone from multiple nearby areas. Don’t just pick one spot and brush everywhere. That creates obvious repetition. Instead, ALT-click frequently to sample different textures and colors. This makes the edit invisible.
For the tutorial example, the photographer’s tag sits at the bottom of the image. Clone stamp from the surrounding grass and texture. Work in small sections until the tag disappears completely.
Quick Selection Creates Perfect Cutouts
Traditional selection methods take forever. The Quick Selection Tool speeds things up dramatically.
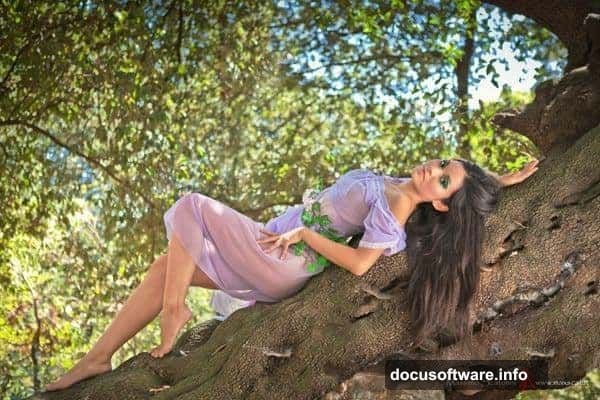
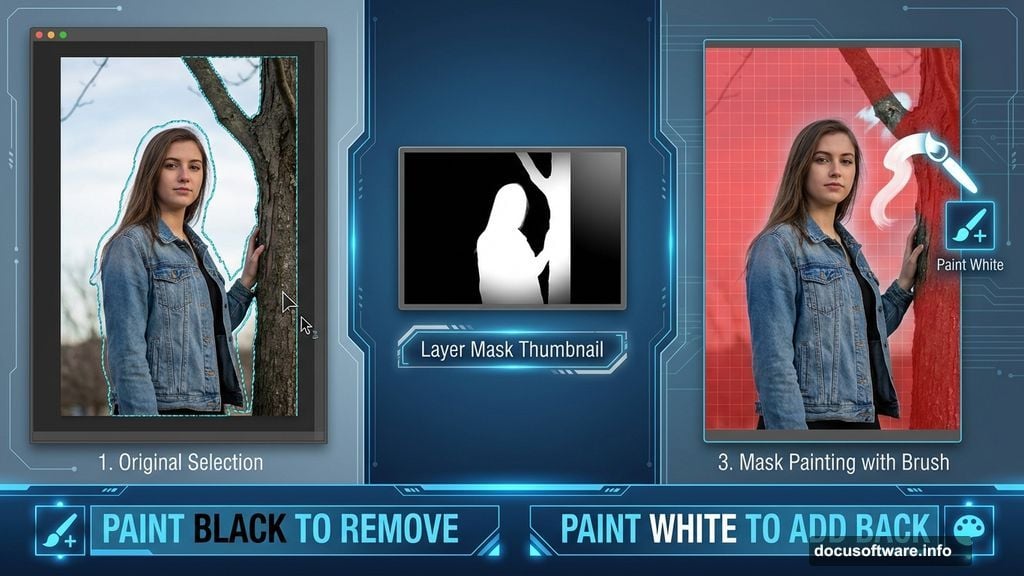
Click and drag over the subject you want to select. Photoshop automatically finds edges and expands the selection. For this portrait, select both the model and the tree she’s leaning against.
Your first pass won’t be perfect. That’s expected. The next step refines everything.
Click the Mask Button in your toolbar. Unwanted areas now appear colored red. Switch to a regular brush. Paint with black to remove areas from your selection. Paint with white to add them back.
This gives you pixel-perfect control. Zoom in on tricky areas like hair or intricate tree branches. Take your time getting the edges right.
Clipping Masks Hide Without Destroying
Once your selection looks good, create a clipping mask. This hides unwanted areas without deleting pixels.
Click the Clipping Mask button. The background disappears instantly. But here’s the advantage over deletion. You can always paint on the mask later to reveal hidden areas.
For example, you might hide the bottom of the image initially. Then realize you need part of it back. Just paint white on the mask. Those pixels reappear immediately.
This nondestructive workflow lets you experiment freely. Nothing gets permanently deleted. You can always change your mind later.
Layer Multiple Images for Depth
Great photo manipulations combine multiple images seamlessly. This tutorial uses four different stock photos together.
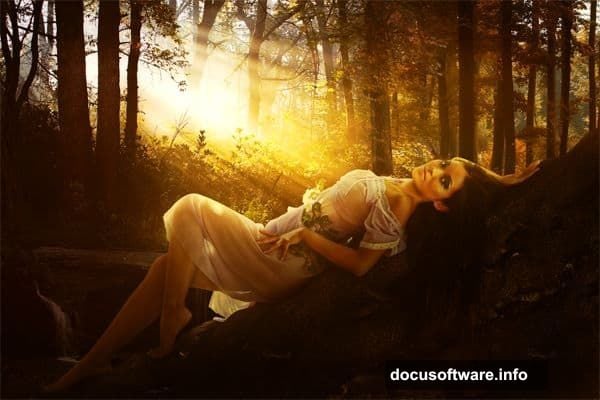
Start by placing your background image. The forest stock provides the overall environment. Then add the waterfall image as a separate layer. Position it where you want water to appear.
Use layer masks to blend these elements. Paint black on the mask to hide edges. Paint white to reveal areas. Gradually build up the scene by blending multiple layers together.
The autumn forest stock adds warm colors and additional depth. Place it behind your main subject. Adjust opacity to control how strongly it shows through.
Color Matching Unifies Everything
Different photos have different color temperatures. This looks obvious and fake when combined.
Color matching fixes this issue. Select the layer you want to adjust. Go to Image > Adjustments > Match Color. Choose your reference layer from the dropdown menu.
Photoshop analyzes both images and adjusts colors to match. The result? All your layers look like they belong in the same scene.
Sometimes the automatic match goes too far. Reduce the effect using the Intensity slider. Find the sweet spot where everything harmonizes without looking oversaturated.
Dodge and Burn Add Dimension
Flat lighting makes manipulations look fake. Dodging and burning create realistic depth and volume.
Create a new layer set to Overlay blend mode. Fill it with 50% gray. This neutral gray becomes invisible in Overlay mode.
Now paint with white to dodge (lighten) areas. Paint with black to burn (darken) them. This technique is completely nondestructive. You’re painting on a separate layer instead of directly on your image.
Focus on enhancing existing light and shadow. Don’t create light from nowhere. Instead, strengthen highlights that already exist. Deepen shadows in areas that are already dark.
For the portrait, dodge the model’s face to draw attention there. Burn the edges of the frame to create natural vignetting. This guides the viewer’s eye toward your subject.
Warm Color Grading Sets the Mood
Color grading transforms good manipulations into great ones. Warm tones create romantic, intimate feelings.
Add a Color Balance adjustment layer. Push the highlights toward yellow and red. This creates golden, sunset-like tones throughout your image.
Then add a Curves adjustment layer. Create a slight S-curve to increase contrast. This makes colors pop without looking overdone.

Finally, add a Photo Filter adjustment layer. Choose a warming filter like Orange or Deep Yellow. Set opacity around 20-30%. This unifies all your colors with a consistent warm glow.
Stack these adjustments at the top of your layer stack. They affect everything below, creating cohesive color throughout the entire piece.
Fine Details Make It Believable
Small details separate amateur work from professional results. Spend extra time on these finishing touches.
Check the lighting direction on all elements. Light should hit everything from the same angle. If your background shows sunlight from the left, your subject needs matching highlights on the left side.
Add subtle shadows where objects meet. The model’s feet should cast shadows on the ground. The tree trunk needs a shadow falling across the forest floor.
Color spill matters too. When light bounces off colored surfaces, it tints nearby objects. Add slight green tints to shadows near foliage. This makes everything feel like it exists in the same environment.
Save Your Work Nondestructively
Always work with multiple layers and adjustment layers. Never flatten until you’re completely finished.
Save your project as a PSD file. This preserves all layers, masks, and adjustments. You can return later to make changes without starting over.
Export final images as high-quality JPGs or PNGs. But keep that layered PSD file. Clients often request revisions. Having the layered file saves hours of reconstruction work.
Consider creating multiple versions with different color treatments. Export variations with warm tones, cool tones, and neutral colors. This gives you options when presenting to clients.
Photo manipulation combines technical skill with artistic vision. Master these techniques through practice. Start by following tutorials exactly. Then experiment with your own creative ideas. The tools remain the same regardless of subject matter.