
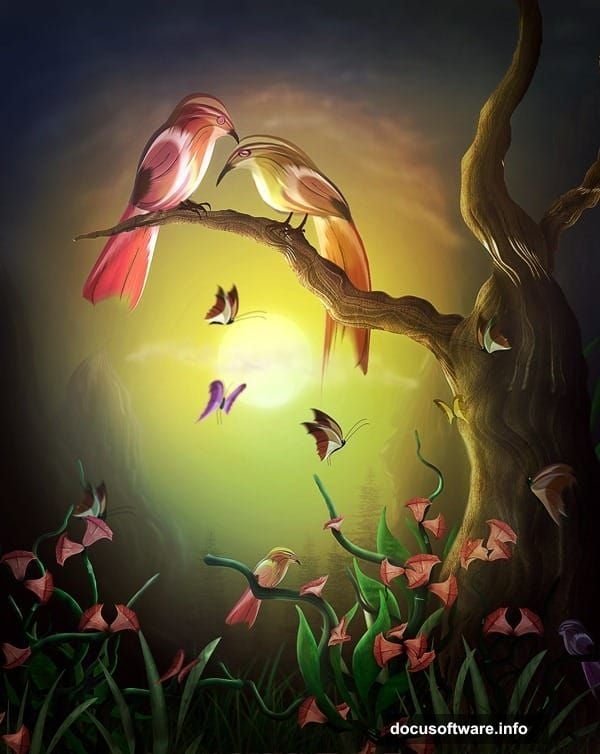
Digital art doesn’t require fancy equipment or expensive stock photos. Sometimes the most stunning artwork comes from unexpected sources.
This Photoshop painting tutorial proves that point perfectly. You’ll learn how to transform a simple umbrella photo into beautiful bird artwork. Plus, the techniques work for creating flowers, branches, and organic shapes from geometric objects.
Let’s break down how to paint gorgeous birds using basic Photoshop tools and creative thinking.
Extract Your Base Object Cleanly
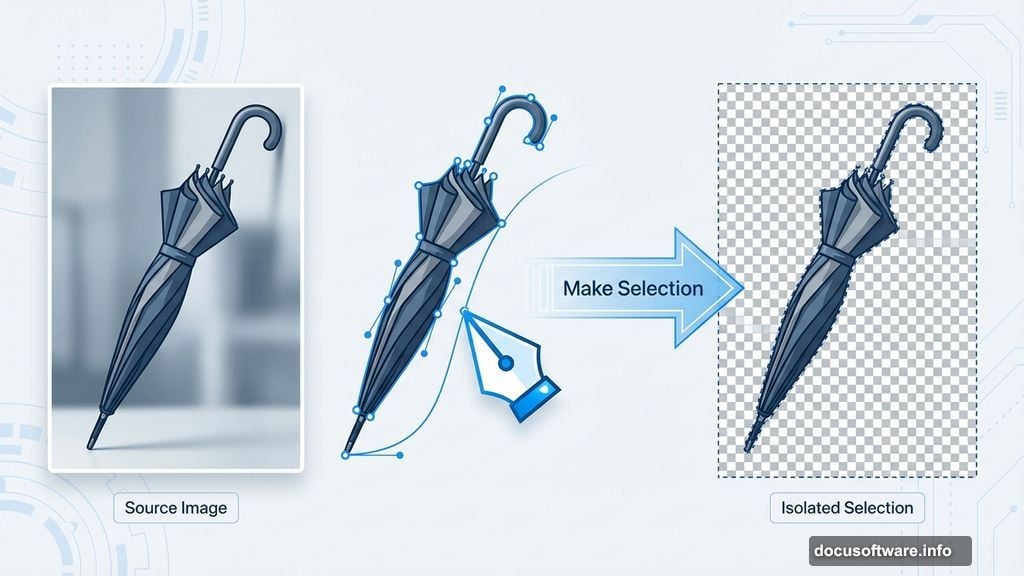
Start with a clear umbrella photo. The shape matters more than color since you’ll be transforming it completely.
Grab the Pen Tool from your toolbar. Click along the umbrella’s edge to create anchor points. Keep clicking to trace the entire outline until your path closes.
Right-click the completed path. Select “Make Selection” from the menu. Now hit Shift+Ctrl+I to inverse your selection. Press Delete to remove the background.
This clean extraction gives you a transparent object ready for manipulation. The cleaner your initial cutout, the better your final artwork looks.
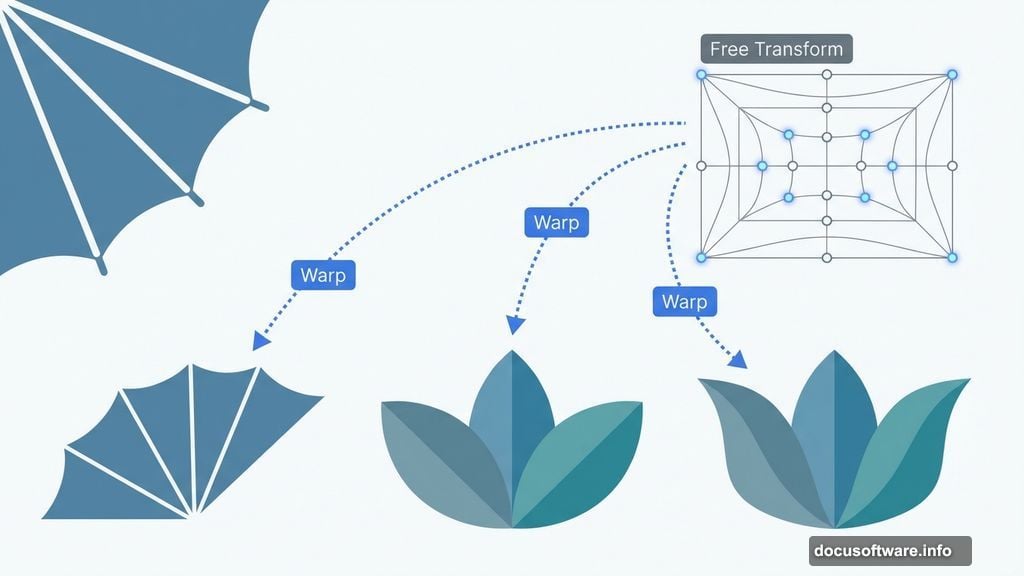
Warp Shapes into Organic Forms
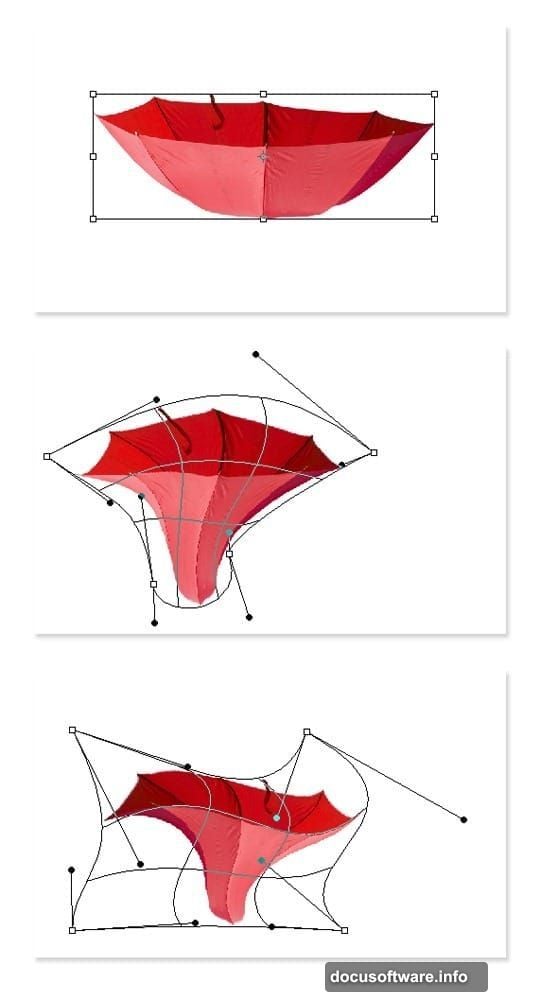
Here’s where creativity kicks in. Duplicate your umbrella layer several times.
Hit Ctrl+T to activate Free Transform. Right-click and choose “Warp” from the menu. Small control points appear around your image.
Click and drag these points to reshape the umbrella. Push and pull until you see flower petals emerge. The umbrella’s segments become natural petal divisions.
Duplicate again and warp differently for variety. Each warped copy becomes a unique flower shape. In fact, you can create 4-5 distinct flower forms from one umbrella photo.
This technique works because umbrellas already have natural divisions. Those segments translate perfectly into petals and organic shapes.
Add Depth with Dodge and Burn
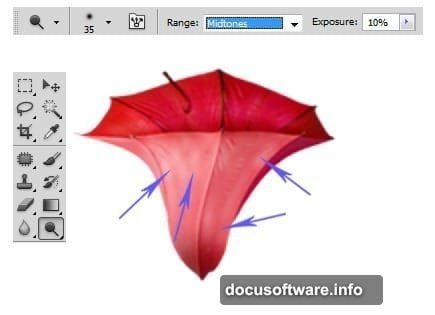
Flat shapes look boring. So let’s add dimension using two classic tools.
Select the Dodge Tool. Set your range to “Highlights” and exposure around 30%. Brush over areas that should catch light. Focus on petal edges and centers.

Switch to the Burn Tool. Set range to “Shadows” with similar exposure. Darken areas where shadows naturally fall. Concentrate on petal bases and overlapping sections.
This dodge-and-burn technique creates realistic lighting. Your flat umbrella pieces suddenly look three-dimensional. Plus, the subtle shading makes flowers appear alive rather than cut-out.
Work gradually. Multiple light passes beat one heavy application. Build up your shadows and highlights slowly for natural results.
Transform Umbrella Handles into Branches
The umbrella’s stick becomes your twig system. Cut out just the handle using selection tools.
Duplicate this stick element multiple times. Merge your duplicates into one layer. Then duplicate that merged layer as many times as needed for your branch structure.
Rotate and scale each stick piece differently. Arrange them to create natural-looking branches. Overlap pieces where branches split.
Use the same dodge-and-burn approach here. Add highlights along one side of each branch. Burn shadows on the opposite side. This creates cylindrical depth.
Moreover, vary the thickness. Use Free Transform to make some branches thinner at the ends. Natural branches taper as they extend.
Build Your Bird Bodies
Now comes the fun part. Those warped umbrella shapes become bird bodies.
Take your flower shapes and warp them again. This time aim for rounded, plump forms. Birds have curves, so push and pull until you see a body taking shape.
Duplicate and flip shapes for symmetry. One warped piece becomes the chest. Another forms the back. Overlap them carefully to create a complete bird silhouette.
Don’t worry about perfection yet. Focus on getting the basic proportions right. You’ll refine details later with painting techniques.
The umbrella’s original texture adds visual interest. Those fabric lines become feather textures with minimal effort.
Create Feathers from Umbrella Segments
Individual umbrella panels make perfect feathers. Separate a single wedge-shaped section.
Duplicate it many times. Arrange these duplicates in overlapping rows. Start from the tail and work forward. This mimics how real feathers layer.
Scale pieces smaller as you move toward the head. Wing feathers should be longer and more prominent. Tail feathers fan out naturally.
Use Warp again on individual feathers. Add slight curves so they don’t look identical. Real birds have organic variation in feather placement.
Then dodge and burn each feather individually. This tedious step makes all the difference. Shadows between feathers create separation and depth.
Paint Beaks and Eyes
Switch to the Brush Tool for facial details. Create a new layer above your bird.
Pick a warm orange or yellow for the beak. Paint a triangular shape. Use a hard-edged brush for clean lines.
For eyes, start with a dark circle. Add a smaller white dot for the highlight. This simple technique brings birds to life instantly.

Keep facial features simple. Overdetailing makes artwork look busy. A few strategic marks suggest features better than perfect rendering.
Blend Colors for Natural Feathers
Create a new layer set to Overlay blending mode. This lets you add color without destroying underlying texture.
Pick natural bird colors. Blues, greens, and warm browns work beautifully. Use a soft brush at low opacity.
Build color gradually. Layer multiple passes of different hues. This creates depth and visual interest.
Also, vary color intensity. Make some feathers brighter, others more muted. Natural birds have color variation across their bodies.
Don’t cover everything uniformly. Let some original umbrella texture show through. This adds realism and prevents artwork from looking too smooth.
Add Background Elements
Your birds need context. Create simple flowers and foliage using the same umbrella transformation technique.
Warp umbrella sections into leaf shapes. Arrange them around your composition. Use smaller, less detailed elements in the background.
This creates depth through selective focus. Foreground birds stay detailed. Background elements remain softer and simpler.
Apply a slight blur to distant elements. Go to Filter > Blur > Gaussian Blur. Use a small radius like 1-2 pixels. This enhances the depth effect.
Polish with Final Adjustments
Almost done. Now refine the overall image with adjustment layers.
Add a Curves adjustment layer. Boost contrast slightly by creating an S-curve. This makes colors pop and details stand out.
Try a Color Balance layer. Add warmth to highlights and coolness to shadows. This subtle touch increases visual appeal.
Finally, add a slight vignette. Create a new layer filled with white. Use the Eraser with a huge, soft brush to clear the center. Set this layer to Multiply at low opacity.
These finishing touches unify your composition. They make all elements feel like they belong together rather than separate pieces.
Why This Technique Matters
Traditional digital painting requires drawing skills and expensive tablets. This umbrella method bypasses those barriers completely.
You’re essentially photo-bashing with extreme transformations. The umbrella provides texture, structure, and form. Your job is creative manipulation rather than creation from scratch.
Moreover, this teaches valuable Photoshop fundamentals. Pen Tool selection, Free Transform, Warp, and blend modes all get practiced. These skills transfer to countless other projects.
Most importantly, it proves that creativity beats expensive resources. One umbrella photo becomes dozens of artwork elements. That’s the power of thinking differently about source material.
The technique works for more than birds. Try creating insects, fish, or abstract designs. Any photo with regular patterns can transform into unexpected artwork.
Start experimenting. Find everyday objects with interesting shapes or textures. Then push Photoshop’s tools to their limits. You’ll surprise yourself with what’s possible.