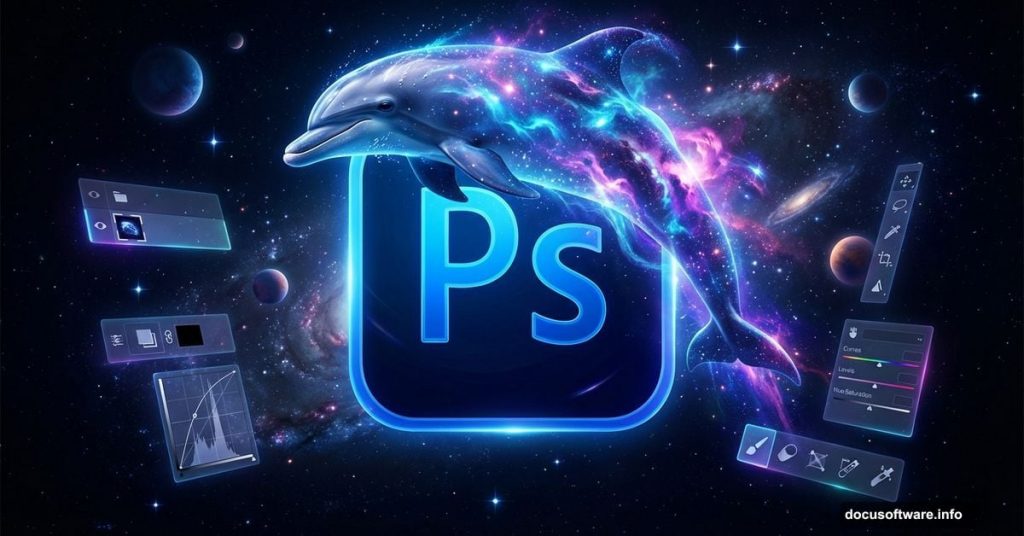
Want to build otherworldly digital art that looks professional? This space dolphin tutorial breaks down the exact process.
Most Photoshop beginners struggle with blending multiple images seamlessly. Plus, creating realistic sci-fi effects seems impossibly complex. But the truth is simpler than you think.
You just need the right layering techniques and adjustment tricks. Let me show you how professional digital artists build fantasy scenes step by step.
Gather Your Source Images First
Before touching Photoshop, collect all the images you’ll need. This space scene requires seven key elements.
You’ll need two different ground textures. Why two? Because blending multiple landscapes creates depth and realism. One ground image rarely provides enough detail.
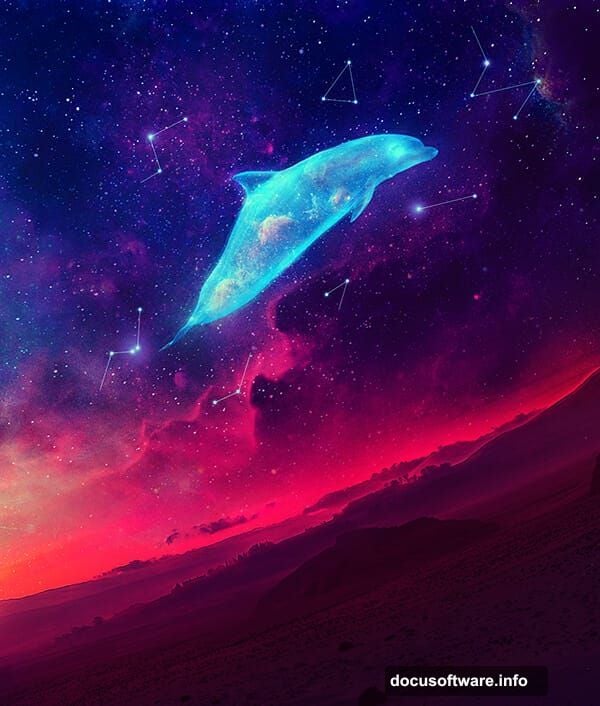
Also grab a dramatic sky photo. Then find three separate nebula images for those glowing space effects. Finally, get a high-quality dolphin photo with clear details.
Pro tip: Choose images with similar lighting angles. This makes blending much easier later. Mismatched lighting screams “bad photomontage” instantly.
Set Up Your Canvas Properly
Create a new document sized 1530×1888 pixels. Fill it with pure white as your base.
Why white? Because it helps you see how colors blend as you work. Plus, white backgrounds make transparency issues obvious immediately.
Now drag your first ground image onto the canvas using the Move Tool (press V). Here’s the critical step most tutorials skip: Convert this layer to a Smart Object right away.
Smart Objects let you edit non-destructively. So you can adjust things later without losing quality. That flexibility saves massive headaches during complex projects.
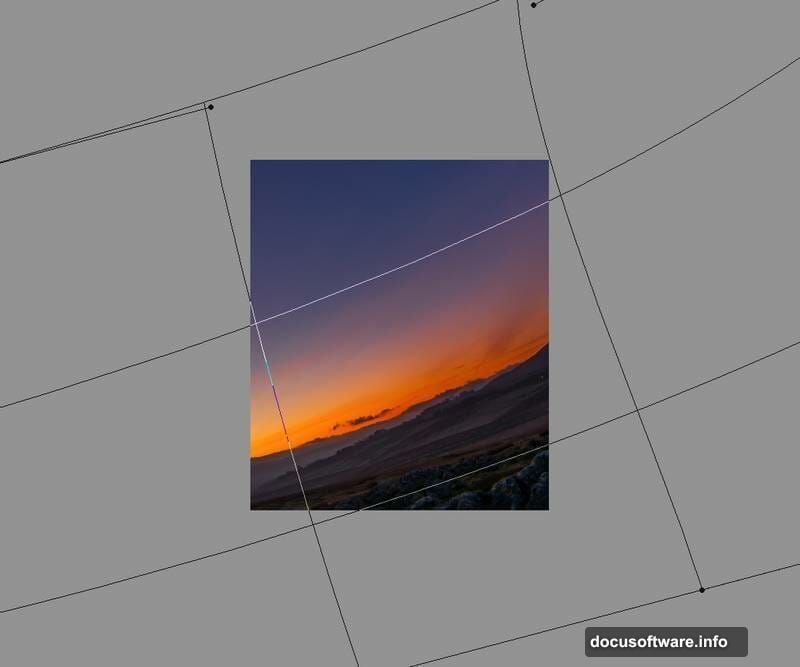
Warp Your Landscape Into Shape
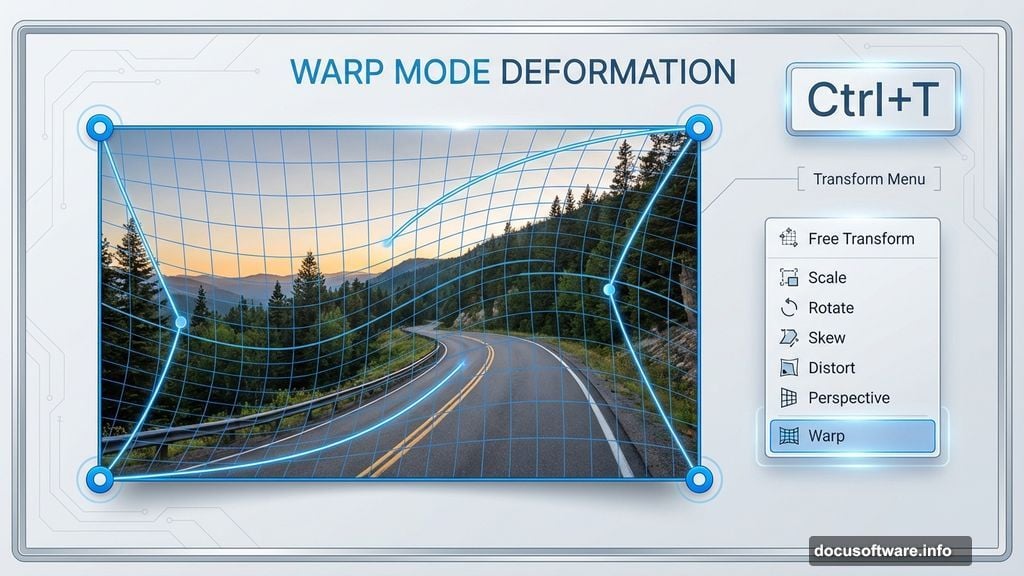
Press Ctrl+T to activate Free Transform. But don’t stop there. Right-click and switch to Warp mode.
This tool lets you push and pull the image into any shape. Drag the corners and edges until your landscape fits the composition perfectly. Think of it like stretching clay.
The Warp mode gives you precise control that regular transforms can’t match. Moreover, it helps blend perspectives from different source photos seamlessly.
Take your time here. Getting the base perspective right makes everything else easier.
Sharpen Ground Details Without Overdoing It
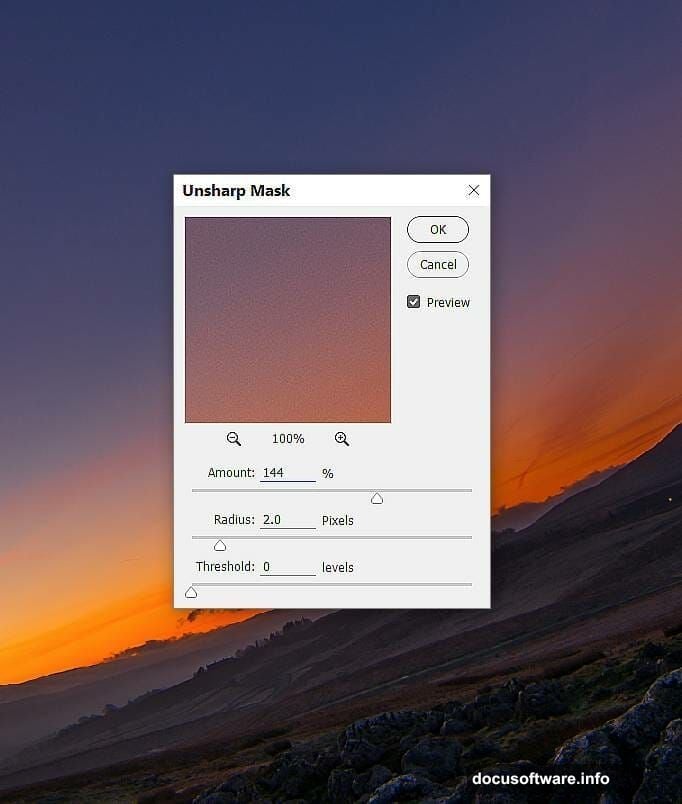
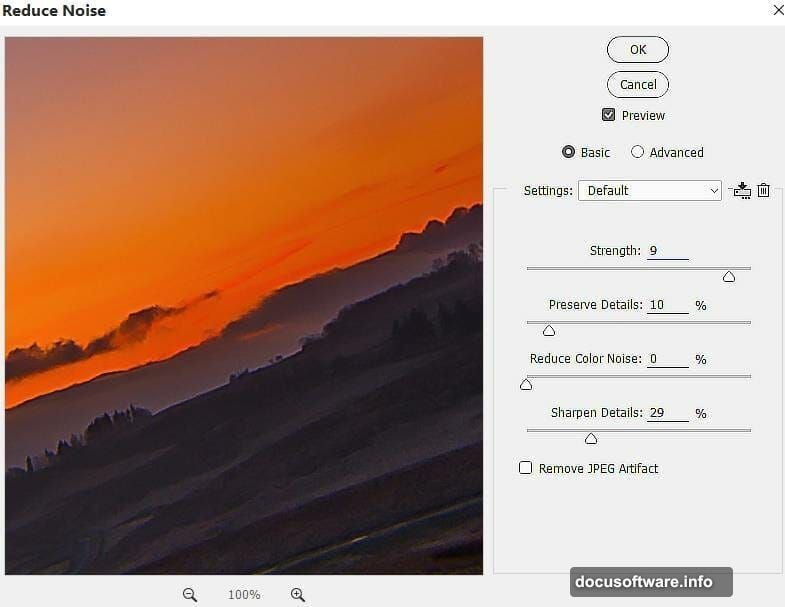
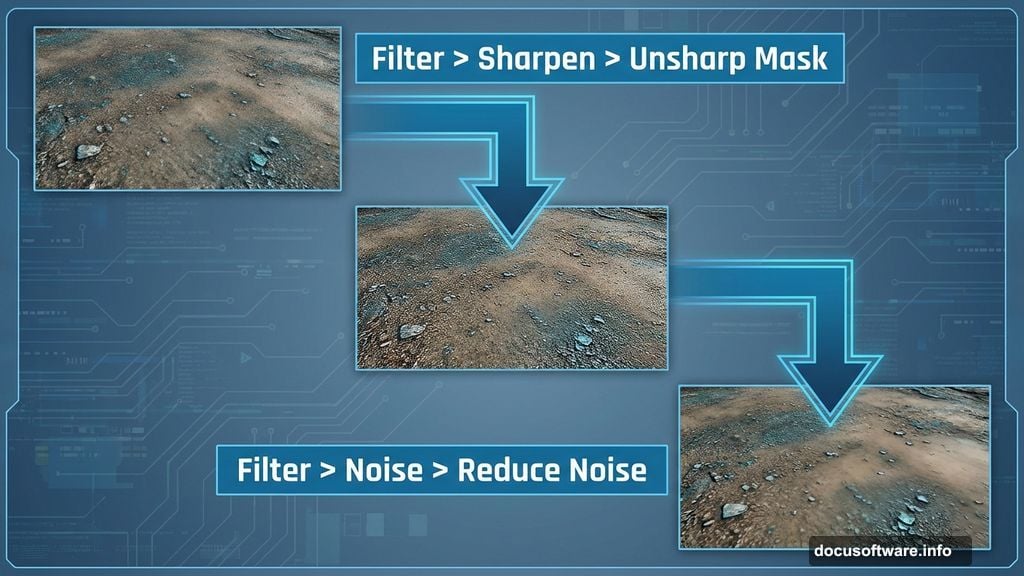
Navigate to Filter > Sharpen > Unsharp Mask. This filter brings out crisp details in your ground texture.
But here’s the catch. Too much sharpening creates weird halos and artifacts. So use restraint with the settings.
Start with moderate values. You can always apply more sharpening later if needed. However, you can’t easily undo excessive sharpening without starting over.
Next, go to Filter > Noise > Reduce Noise. This step cleans up any graininess the sharpening might have emphasized. The combination of sharpening plus noise reduction creates clean, detailed textures.
Balance Colors With Adjustment Layers
Add a Color Balance adjustment layer by clicking Layer > New Adjustment Layer > Color Balance. Set this as a Clipping Mask so it only affects your ground layer.
Tweak the Midtones and Highlights sliders. Push them toward warmer tones for that alien planet atmosphere. But don’t go overboard. Subtle adjustments look more realistic.
Now grab the Brush Tool (press B). Select a soft round brush with black color. Paint on the adjustment layer’s mask to reduce the color effect in specific areas.
This selective application creates natural variation. Real landscapes don’t have uniform coloring everywhere. So neither should your digital ones.
Blend Multiple Grounds Seamlessly
Place your second ground image above the first one. Use Ctrl+T with Warp mode again to adjust its perspective and shape.
Click the mask icon at the bottom of the Layers panel. This adds a layer mask. Then select a soft black brush and paint away the sky and horizon from this second ground layer.
The key to believable blending? Feather your brush edges significantly. Hard edges scream “Photoshop job.” Soft, gradual transitions look natural.
Also, vary your brush opacity. Start at 30-40% opacity and build up slowly. This gives you fine control over exactly how much of each layer shows through.
Fix Perspective Issues With Clone Stamp
Create a new layer above your ground images. Set it as a Clipping Mask.
Activate the Clone Tool by pressing S. This tool copies pixels from one area to another. Use it to fix any perspective mismatches between your two ground layers.
Hold Alt and click to sample from the correct area. Then paint over the problem spots. The Clone Tool essentially grafts matching details from one part of your image to another.
This retouching step makes different source images look like they belong together. It’s tedious but absolutely necessary for professional results.
Darken Specific Areas With Curves
Add a Curves adjustment layer and set it as Clipping Mask. Pull down the curve line to darken your second ground layer.
Why darken? Because creating depth requires shadow variation. Flat lighting looks fake in fantasy scenes.
But only darken the second ground layer. Keep your foreground brighter to establish clear depth separation. This guides the viewer’s eye naturally through your composition.
Play with the curve shape. Subtle S-curves often work better than straight diagonal lines. They preserve contrast while adjusting overall brightness.
Add Warmth With Strategic Color Balance
Create another Color Balance adjustment layer. This time, push values toward warmer oranges and yellows.
Warm colors suggest sunlight or atmospheric glow. They make alien landscapes feel more inviting and less hostile. Plus, warm tones contrast beautifully against the cool blues you’ll add with space elements later.
Again, use the layer mask to control where these color adjustments appear. Paint away the effect in areas that should stay cooler or more neutral.
Position Your Sky Backdrop
Open your sky image. Use the Rectangular Marquee Tool (press M) to select just the sky portion. You don’t want any ground elements from this image.
Drag this selection to the top of your canvas. It should sit behind all your ground layers. Then press Ctrl+T to rotate and scale the sky until it fits your composition.
The sky provides crucial atmospheric context. It tells viewers whether this scene happens at dawn, dusk, or under alien stars. Choose wisely based on the mood you want.
Build Your Space Effects Layer by Layer
This is where the magic happens. Adding stars and nebula effects transforms a landscape into a space scene.
First, place your stars image. Set its blend mode to Screen or Lighten. This makes the black background disappear while keeping the bright star points visible.
Then add your first nebula image. Again, experiment with blend modes. Screen, Add, and Lighten all work well for glowing space effects. Each creates slightly different looks.
Position additional nebula images strategically. They should cluster around your focal point – the dolphin you’ll add next. This guides viewer attention exactly where you want it.
Fantasy scenes thrive on strategic layering. Each element contributes to the overall atmosphere without overwhelming the composition. So take breaks and assess your progress with fresh eyes.
These Photoshop techniques work for any sci-fi or fantasy piece. Master them once and you’ll use them forever.