
Photoshop remains the industry standard for photo editing and digital art creation. Yet most designers barely scratch the surface of what it can do.
These 11 proven techniques will transform your workflow. Plus, they work whether you’re editing portraits, creating composites, or building sci-fi artwork from scratch.
Let’s dive into methods that actually save time and improve results.
Set Up Your Canvas Right
Starting with proper dimensions matters more than most people realize. Create a 3000×2000 px document for high-resolution work that looks sharp at any size.
Fill your background with white instead of transparent. This simple step prevents color shifts and makes adjustments easier to preview. Plus, it gives you a clean base for building complex compositions.
For gradient backgrounds, use the Radial Gradient tool with complementary colors. Try pairing #6ec1d6 with #c9eff7 for a clean technological feel. Drag from center outward, but keep your line short for subtle color transitions.

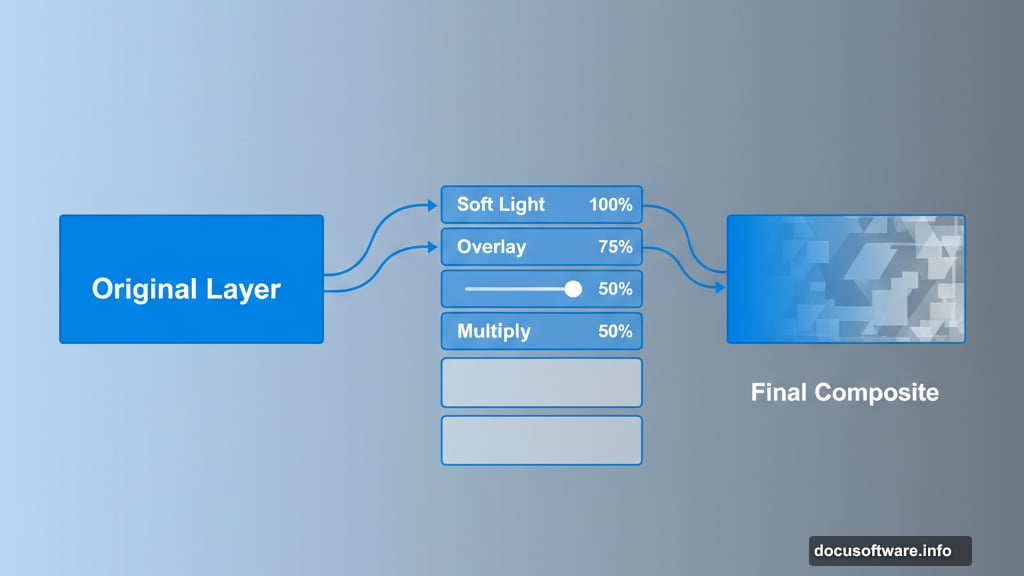
Master Layer Blending Modes
Soft Light mode at 100% opacity transforms how texture layers interact. It preserves underlying details while adding depth and complexity to your composition.
Instead of erasing elements you don’t want, change layer opacity first. This non-destructive approach lets you fine-tune the effect without permanent changes. Moreover, you can always dial intensity up or down later.
Overlay and Multiply modes work brilliantly for adding shadows and highlights. But Soft Light excels at blending multiple background elements naturally. That’s why professional compositors rely on it for seamless integration.
Remove Unwanted Elements Cleanly
The Rectangular Marquee Tool handles text removal faster than cloning. Select the unwanted text area, then fill with a sampled color from nearby pixels.
Use the Eyedropper Tool (I) to grab the exact color you need. This ensures your fill matches surrounding tones perfectly. In fact, this technique works better than Content-Aware Fill for geometric shapes and text.
For organic elements, layer masking beats erasing every time. Add a mask to your layer, then paint with a soft black brush to hide unwanted areas. You can always reveal them again by painting with white.
Create Professional Cutouts
The Pen Tool delivers cleaner selections than any automatic method. Yes, it takes longer to learn. But the precision pays off when you need crisp edges on complex subjects.
For hair and soft edges, combine the Pen Tool with brush refinement. Cut out the main subject cleanly, then use Select and Mask to refine tricky areas. This hybrid approach gives you both speed and quality.
After cutting out your subject, place it on a new background layer. Then check edges at 100% zoom to catch any color fringing or rough spots that need cleanup.
Change Colors Without Destroying Detail
Create a new layer set as a Clipping Mask above your subject. Paint with your target color, then change the layer mode to Color at 60% opacity.
This technique preserves all underlying texture and lighting information. So lips, fabric, or any other element maintains its natural appearance while shifting hue. Plus, you can adjust opacity to control intensity.
For larger color changes, use Hue/Saturation adjustment layers instead. But for subtle shifts or specific small areas, the Clipping Mask method works faster and gives more control.
Remove Features Seamlessly
Copy a clean skin area using the Lasso Tool and Ctrl+C. Paste it onto a new Clipping Mask layer above your subject. Then use Free Transform (Ctrl+T) with Warp mode to bend the copied area over the feature you want to hide.
This method beats healing or cloning for eyebrows, tattoos, or other distinct features. The copied area already matches skin tone and texture perfectly. You just need to shape it correctly.
Adjust opacity if the pasted area looks too obvious. Sometimes 80-90% opacity blends more naturally than full strength.
Build Depth with Adjustment Layers
Curves adjustment layers control contrast and brightness across your entire composition. Increase the curve to brighten your image, but don’t stop there.

Use the layer mask to paint light only where you want it. Black brush strokes on the mask remove adjustment effects locally. This lets you create natural-looking light falloff and guide viewer attention.
For sci-fi compositions, brighten the center while keeping edges darker. This creates depth and makes your subject pop against the background. Moreover, it mimics how light behaves in real environments.
Smart Brush Work Saves Time
Soft round brushes with low hardness (0-10%) blend seamlessly into surrounding areas. But sometimes you need harder edges for mechanical elements or sharp details.
Switch brush hardness on the fly by right-clicking and adjusting the Hardness slider. This workflow tweak saves constant trips to brush settings panels.
For repeated brush strokes, set your Opacity to Pen Pressure in brush settings. This gives tablet users natural control over stroke intensity without manual opacity adjustments.
Layer Organization Prevents Chaos
Name your layers immediately after creating them. “Layer 47” tells you nothing when you return to a project weeks later. “Background texture” or “Subject shadows” helps you find what you need instantly.
Use layer groups (Ctrl+G) to organize related elements. Group all background layers together, then create separate groups for your subject, effects, and adjustments. This structure makes complex documents manageable.
Color-code layer groups for quick visual reference. Right-click any layer group and assign a color. Blue for backgrounds, red for subject elements, yellow for effects creates clear visual organization.
Master the Transform Tools
Ctrl+T activates Free Transform, but right-clicking reveals its real power. Warp mode lets you bend and stretch elements to match perspective or wrap around curved surfaces.
For precise rotations, type exact degree values in the options bar instead of dragging. 45°, 90°, and 180° rotations often look more professional than eyeballed angles.
Hold Shift while transforming to maintain proportions. Hold Alt to transform from the center point. These modifier keys give you precision that mouse dragging alone can’t match.
Non-Destructive Workflow Wins
Every permanent change limits your options later. Use adjustment layers instead of direct image adjustments. Work with layer masks instead of erasing pixels. Keep original layers intact even when you think you won’t need them.
This approach takes more layers initially. But it saves massive time when clients request revisions or you want to try different variations. Plus, it lets you experiment freely without fear of destroying your work.
Smart Objects take non-destructive editing even further. Convert important layers to Smart Objects before applying filters. This lets you modify or remove filters later without starting over.
Practice Builds Speed and Skill
These techniques work across all Photoshop projects, from simple retouching to complex composites. But knowing them isn’t enough. You need to practice until they become automatic.
Start small. Pick one technique and use it in every project this week. Then add another. Within a month, these methods will feel natural instead of forced.
The difference between amateur and professional Photoshop work often comes down to workflow, not creativity. Master efficient techniques, and you’ll have more time and energy for the creative decisions that actually matter.