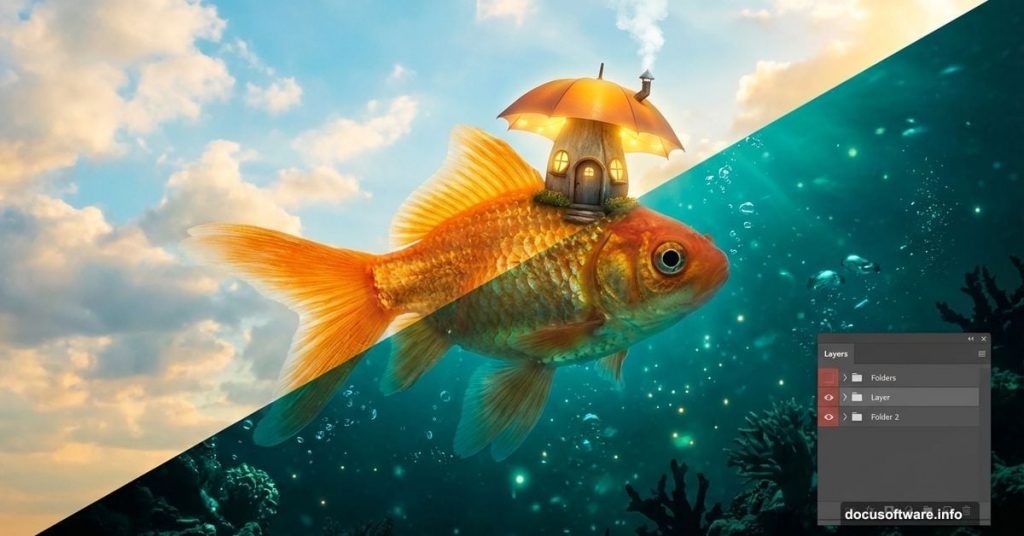
Want to create stunning underwater fantasy scenes? This tutorial walks you through building a dreamlike image featuring a giant fish with an umbrella house.
You’ll learn practical compositing techniques that work for any surreal photo manipulation project. Plus, we’ll cover adjustment layers, masking, and blending modes that professional designers use daily.
Let’s dive in.
Gather Your Assets First
Before opening Photoshop, collect these resources:
- Sky photograph for the upper atmosphere
- Noise texture for underwater depth
- Large fish image (high resolution works best)
- Umbrella photo for the house structure
- Window, chimney, and smoke elements
- Tree, bubbles, and bird images for details
Pro tip: Download alternative umbrella options in case your first choice doesn’t blend well. Having backups saves time later.
Build the Base Environment
Create a new document at 2000×2200 pixels. Fill it with white to start fresh.
Open your sky image. Use the Rectangular Marquee Tool (M) to select just the sky portion. Then drag it onto your canvas with the Move Tool (V). Position it at the top.
Now adjust the sky’s color. Go to Layer > New Adjustment Layer > Hue/Saturation. Set it as a Clipping Mask. Reduce Saturation to -35. This makes the sky feel more ethereal and less realistic.
Next, add a Color Balance adjustment layer. Keep it as a Clipping Mask too. Adjust the Midtones settings to introduce cooler tones. This helps the sky blend with the underwater section you’ll create next.
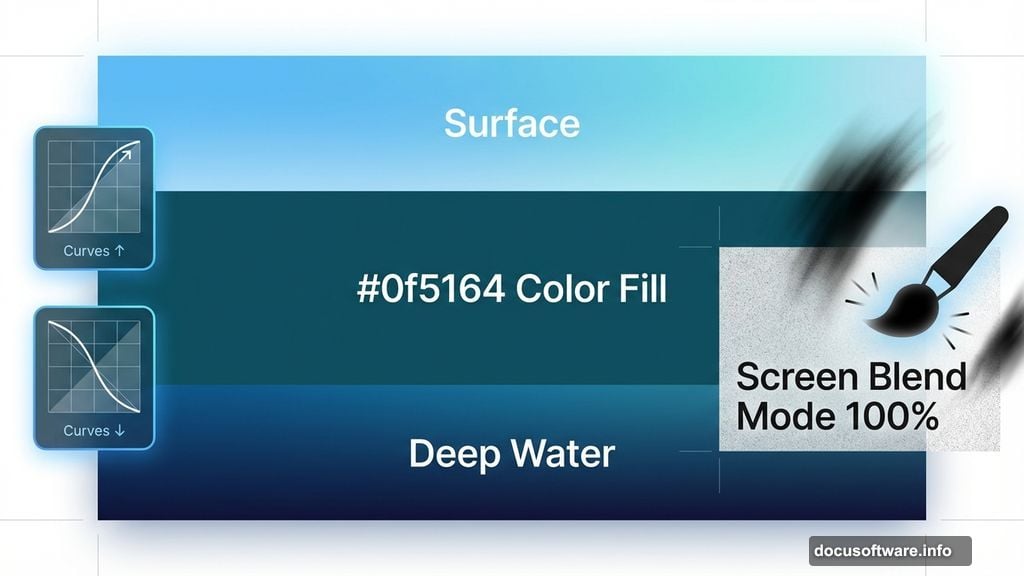
Create the Underwater Section
This step establishes your underwater world. Create a Color Fill layer and choose #0f5164 (a deep teal blue).
Use the Rectangular Marquee Tool to select the lower portion of your canvas. Click the mask icon at the bottom of the Layers panel. This masks the color to just the underwater area.
The result should show sky on top and underwater blue below. Make sure the transition between them feels natural. You can adjust the mask edge if needed.
Add Depth with Lighting
Underwater scenes need believable light behavior. Make a Curves adjustment layer to brighten the top of the underwater section. This simulates light filtering down from above.
Select the layer mask. Grab a soft round Brush (B) with black color. Paint over the bottom area to maintain shadows there. This contrast creates depth.
Create another Curves adjustment layer. This time, darken the overall underwater area slightly. Real underwater environments lose light quickly as you go deeper.
Introduce Texture with Noise
Open your starry noise texture. Add it to the underwater portion. Change the blend mode to Screen at 100% opacity.
This adds particles and atmosphere. However, it’s too strong initially. Add a mask to this layer. Use a soft black brush to reduce opacity selectively. Focus on keeping texture in the mid-tones while reducing it in shadows and highlights.
Make a Hue/Saturation adjustment layer next. Desaturate the noise completely. This prevents the texture from competing with your main subject colors.
Add Your Hero Fish
Isolate the fish from its original background. Use the Pen Tool or Select and Mask for clean edges. Position the fish in the middle of your underwater area.
Scale it large enough to dominate the composition. The fish should feel like the star of your scene.
Create a Color Fill layer set as a Clipping Mask. Pick #125e72 (matches your underwater tone). Lower opacity to 50%. This helps the fish integrate with the environment by adding a color wash.
The fish should now feel like it belongs in the water instead of looking pasted in.
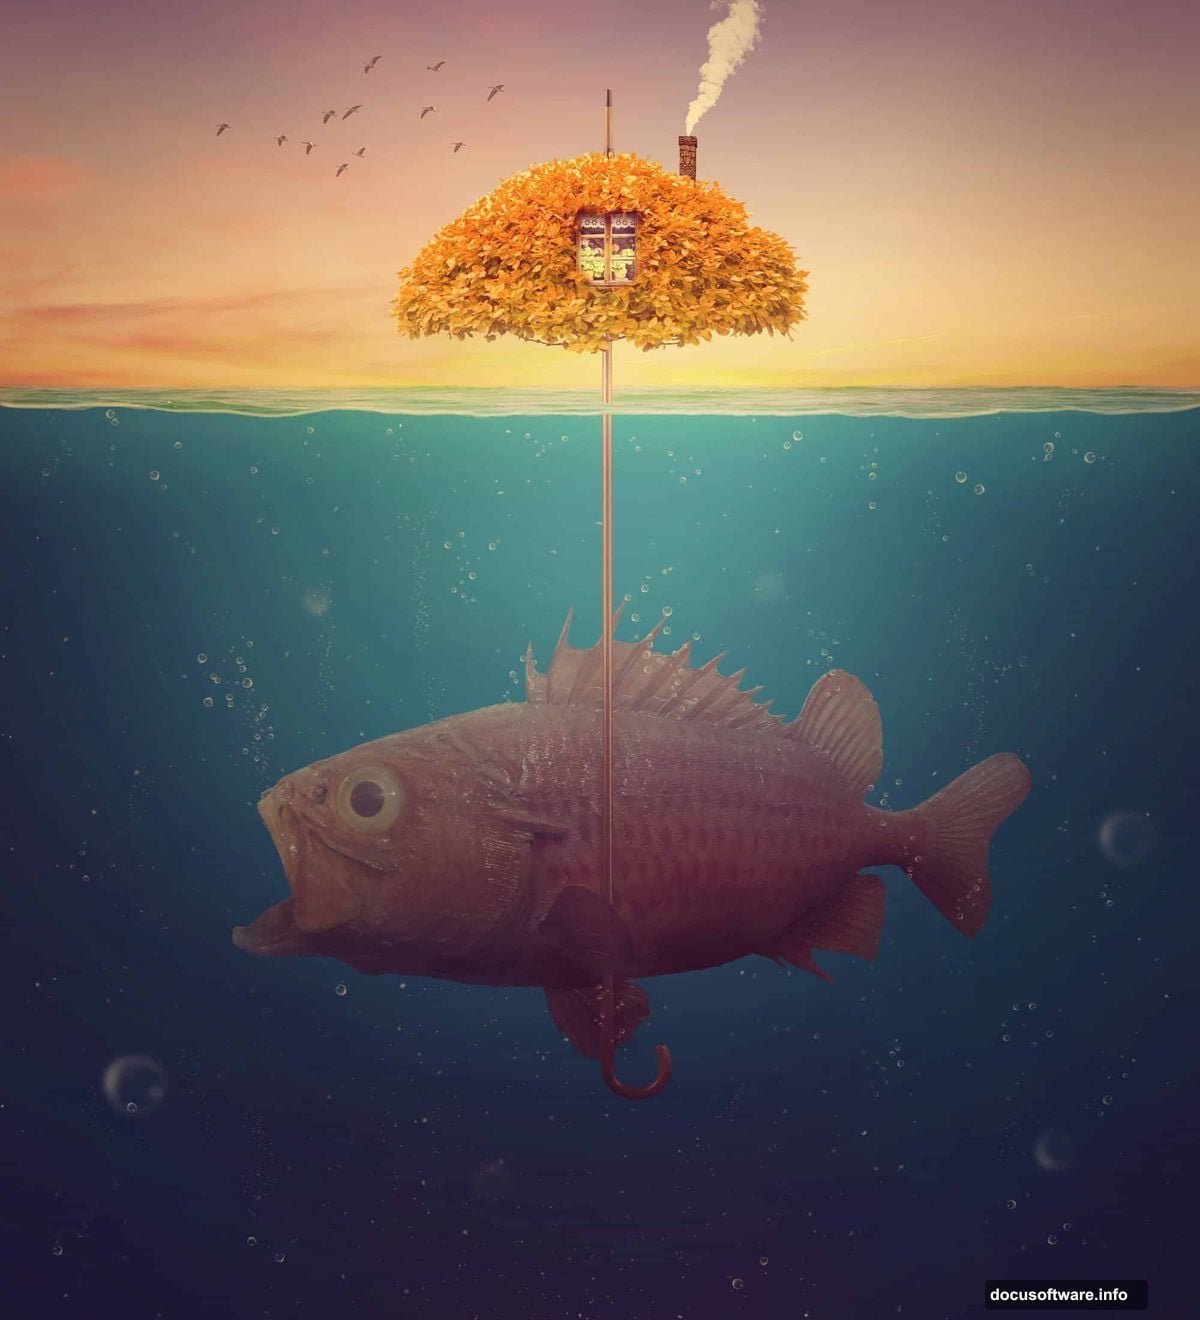
Build the Umbrella House Structure
This is where the surreal element kicks in. Import your umbrella image. Position it on top of the fish as if the fish is wearing it like a house.
Use Free Transform (Ctrl+T / Cmd+T) to adjust the umbrella’s size and angle. It should look stable yet whimsical.
Add adjustment layers to match the umbrella’s colors to the underwater palette. Hue/Saturation and Color Balance work well here. Remember to set them as Clipping Masks so they only affect the umbrella.

Add Architectural Details
Import your window image. Scale it down and position it on the side of the umbrella. This makes the umbrella feel inhabitable.
Use layer masks to blend the window edges. Paint away hard transitions with a soft brush. The window should look built into the umbrella, not stuck on top.
Add the chimney next. Place it at the umbrella’s peak. Again, use masks to blend the base where it meets the umbrella surface.
Import smoke coming from the chimney. Set the smoke layer to Screen blend mode. Adjust opacity until it looks natural. Real smoke underwater would dissipate quickly, so keep it subtle.
Create Atmospheric Elements
Add bubble images throughout the scene. Vary their sizes and positions. Underwater scenes need bubbles for realism.
Use Screen or Lighten blend modes for the bubbles. Adjust individual bubble opacities so some feel closer while others fade into the distance.
Import your tree image. Position it growing from the umbrella structure. This adds another surreal touch. Use the same color matching techniques you applied to other elements.

Introduce Life with Birds
Add birds swimming or floating near the fish. Yes, underwater birds feel strange. That’s the point. Surreal art embraces impossibilities.
Position birds at different depths. Use Gaussian Blur on distant birds to create depth of field. Closer birds stay sharp while far ones blur slightly.
Adjust bird colors to match the underwater environment. They should have the same color cast as everything else.
Final Color Corrections
Create a Curves adjustment layer affecting the entire composition. Boost contrast slightly in the midtones. This makes the image pop.
Add a Color Lookup adjustment layer. Browse through the preset options. Many create interesting color grades quickly. Try Moonlight, Teal Orange, or Horror Blue.
If the effect is too strong, reduce the Color Lookup layer opacity. Aim for enhancement, not transformation.
Polish the Lighting
Make another Curves adjustment layer. This time, focus on highlights. Brighten the area where light enters from above.
Use the layer mask to restrict this brightening to the upper middle section. This reinforces your main light source.
Create one final Curves adjustment layer. Darken the corners and edges of your composition. This vignette effect draws eyes toward your central fish character.
Add Finishing Touches
Import leaf brush images or use leaf brushes. Scatter leaves through the water. They add movement and detail.
Vary leaf sizes, opacities, and rotations. Some should be sharp, others blurred. This creates a sense of motion and depth.
Finally, step back and review your work. Look for areas that feel disconnected. Add subtle color washes or adjust masks to improve blending.
Lessons That Transfer
This tutorial teaches skills beyond one project. You learned to:
- Build complex compositions from multiple images
- Use adjustment layers for non-destructive editing
- Master masking for seamless blending
- Control light and depth in surreal scenes
- Balance realism with fantasy elements
These techniques apply to any photo manipulation work. Practice them regularly and they become second nature.
Your Creative Freedom
The tutorial provides a framework, not rigid rules. Swap the fish for a whale. Replace the umbrella with a lighthouse. Add mermaids instead of birds.
Surreal art thrives on experimentation. Use this project as a foundation, then push it in unexpected directions. The technical skills remain the same regardless of your creative choices.
Save your work frequently. Complex composites involve many layers. Don’t lose hours of progress to a crash.
Most importantly, have fun. Digital art should spark joy, not stress. If something isn’t working, try a different approach. Photoshop offers multiple paths to any result.