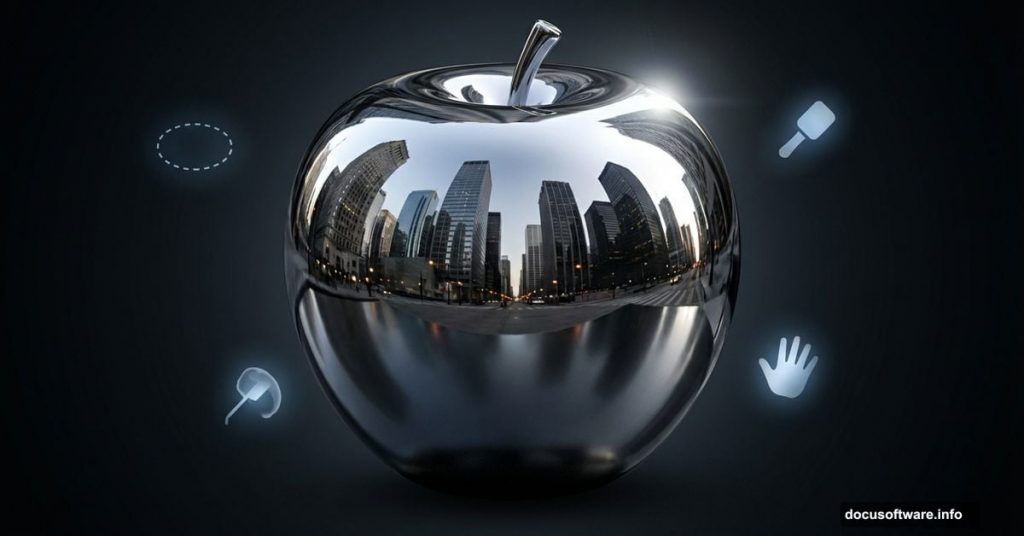
Want to turn ordinary fruit into polished chrome? This technique teaches warping, dodge-and-burn shading, and metallic reflections that look genuinely real.
Most Photoshop tutorials skip the details that separate amateur composites from professional work. Not this one. You’ll learn precise selection methods, symmetry corrections, and lighting tricks that make metal surfaces convincing.
Plus, these skills transfer directly to product visualization, concept art, and commercial design work. Master metallic rendering once and apply it everywhere.
What You’ll Need Before Starting
Grab these resources first. You’ll use them throughout the tutorial.
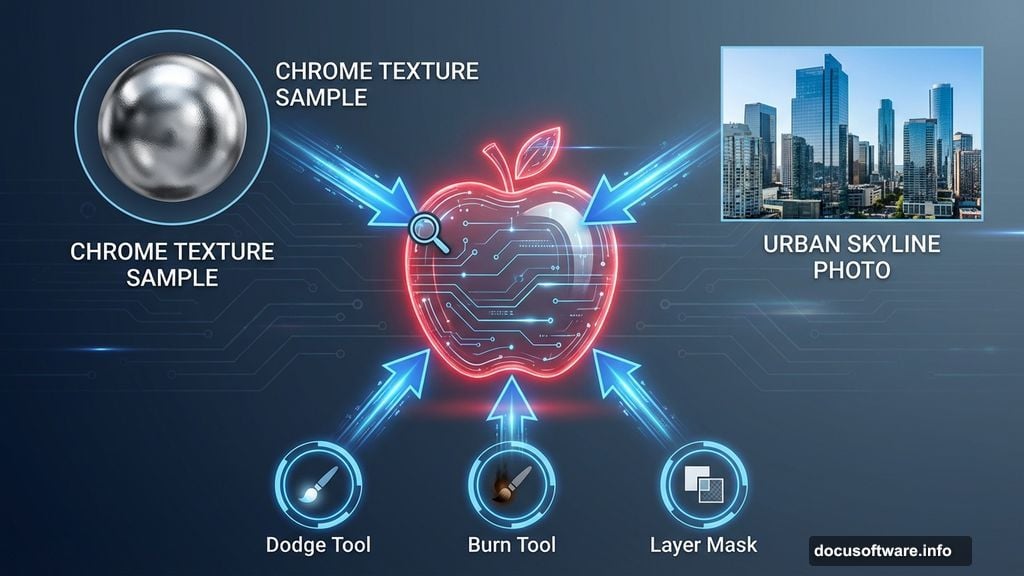
Required images:
- Chrome ball reference photo (for base texture)
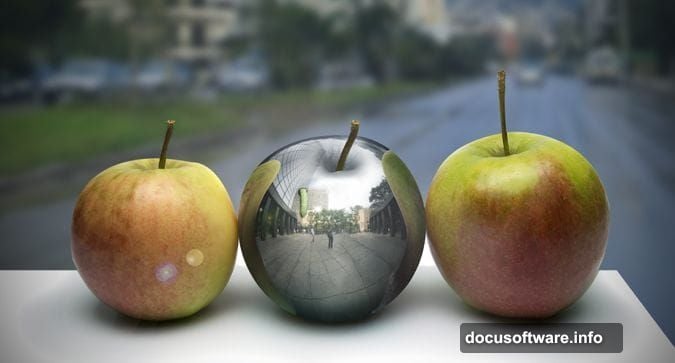
- High-resolution apple images (at least two angles)
- Urban skyline photo (for environmental reflections)
- Optional: Sun or light source images for highlights
Photoshop tools you’ll use:
- Elliptical Marquee Tool for perfect circular selections
- Free Transform with flip and warp capabilities
- Layer masks for non-destructive editing
- Dodge and Burn tools for metallic shading
- Clipping masks for precise layer control
Most photographers already have apple reference shots. But finding good chrome sphere images proves tricky. Look for metallic balls with minimal distortion and even lighting across the surface.
Fix Your Chrome Ball Base First
Start with a chrome ball image. Sounds simple. But most reference photos contain imperfections that ruin the metallic effect.
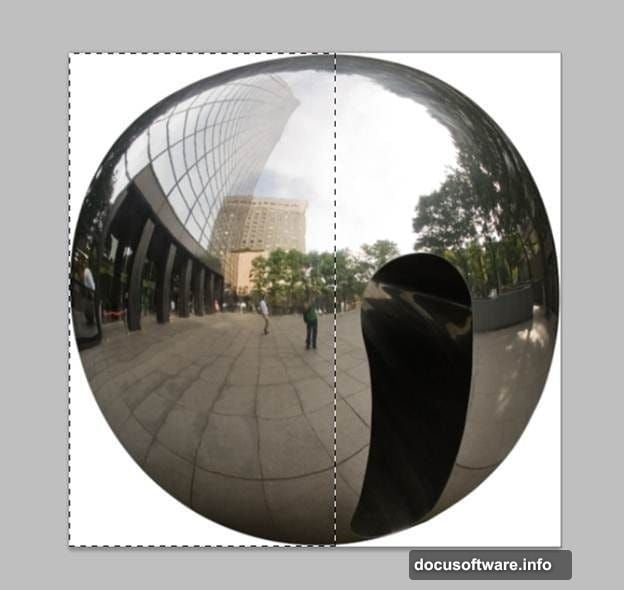
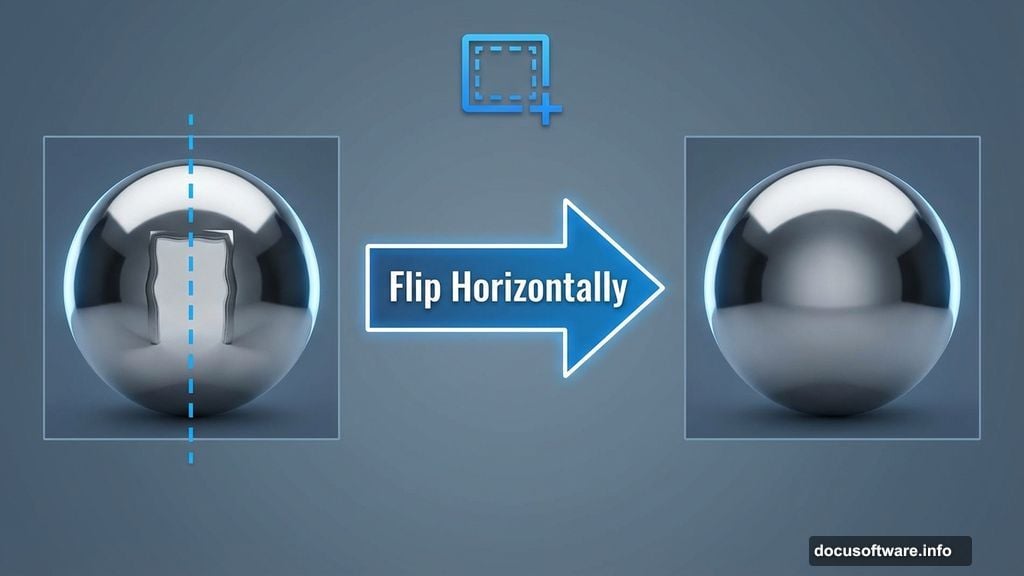
The best chrome ball image I found had one major flaw. A door reflection right in the middle destroyed the sphere’s symmetry. So before building the apple, fix this problem using a mirroring technique.
Create a perfect sphere:

Open your chrome ball file. Select the Elliptical Marquee Tool. Hold Shift while dragging to maintain a perfect circle around the ball. Press Ctrl + C to copy, then Ctrl + N for a new document.
Here’s something clever. Photoshop automatically sizes the new document to match your selection dimensions. Just click OK. Then paste with Ctrl + V.
Now examine your ball closely. Find the cleanest half without major imperfections. In my case, the left side looked pristine while the right showed that door reflection.
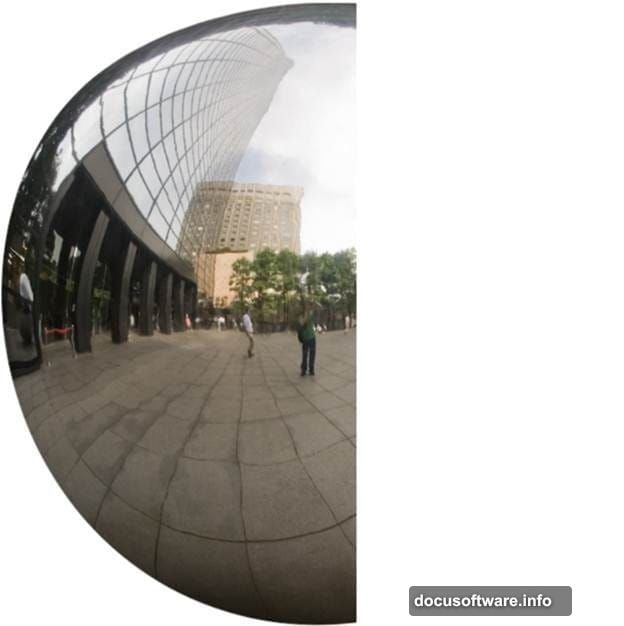
Mirror the good half:
Select the Rectangular Marquee Tool. Make a selection covering only the clean left half of the sphere. Click the ball layer and press Ctrl + J to copy that selection onto a new layer.
Press Ctrl + T to enter Free Transform. Right-click and choose Flip Horizontally. Hold Shift and drag the flipped half to cover the damaged right side.
This mirroring technique works brilliantly for any symmetrical object. Use it on faces, architecture, or product photography. One good half can save an otherwise unusable image.
Lock Layers with Clipping Masks
Add a layer mask to your flipped half layer. Go to Layer > Layer Mask > Reveal All. Then hold Alt and click between the flipped layer and original ball layer in your Layers palette.
This creates a clipping mask. The flipped half becomes visible only through the pixels below. So even if your positioning wasn’t pixel-perfect in the previous step, the clipping mask handles the cleanup automatically.
Your chrome ball now looks seamlessly symmetrical. No visible seam where the halves meet. This perfect sphere becomes your metallic texture source.
Warp Your Apple Into Shape
Open a high-quality apple image. Use the Pen Tool or Quick Selection Tool to isolate the apple from its background. Precision matters here because you’re building a foundation for metal wrapping.
Copy your isolated apple and paste it into your chrome ball document. Scale the apple layer to roughly match your intended final size. Keep it non-destructive by using Free Transform (Ctrl + T) and holding Shift to maintain proportions.
Apply metallic displacement:
Here comes the magic. You’ll wrap chrome texture around the apple shape using Displacement Maps. But first, create a grayscale depth map of your apple.
Duplicate your apple layer. Desaturate it completely (Shift + Ctrl + U). Then adjust Levels or Curves to increase contrast. Lighter areas represent raised surfaces while darker areas show depth.
Save this grayscale version as a PSD file. You’ll reference it shortly. Name it “apple_displacement.psd” or something equally obvious.
Return to your chrome ball layer. Duplicate it and place it above your color apple layer. Right-click the chrome duplicate and choose “Create Clipping Mask” to constrain the chrome to your apple shape.
Add Convincing Surface Reflections
Metal reflects its environment. A chrome apple sitting on a table would show the room, ceiling lights, and nearby objects. Without these reflections, your metal looks fake and lifeless.
Build environmental reflections:
Open your urban skyline image. Select an interesting section with buildings, sky, and varied tones. Copy and paste it into your main document.
Position the skyline layer above your chrome-wrapped apple. Set the blend mode to Screen or Overlay initially. Experiment until reflections look natural but not overwhelming.
Add a layer mask to the skyline reflection layer. Use a soft brush to paint away reflections where they shouldn’t appear. Typically, you’ll keep stronger reflections on the apple’s upper surfaces and sides facing the light source.
The key to believable metal? Multiple subtle reflection layers. Real chrome captures reflections from many directions simultaneously. So add 2-3 different environmental reflection layers at varying opacities.
Dodge and Burn for Dimension
Even with perfect reflections, your apple might look flat. Dodge and Burn tools add the subtle light gradations that make metal surfaces pop three-dimensionally.
Create a new layer above your chrome apple. Set its blend mode to Overlay. This layer becomes your dedicated dodge-and-burn workspace.
Highlight the curves:
Select the Dodge Tool. Set Range to Highlights and Exposure around 10-15%. Paint along the apple’s upper edge where light hits strongest. Build highlights gradually with multiple strokes rather than one heavy application.
Then switch to the Burn Tool. Keep similar settings but adjust Range to Shadows. Darken the apple’s underside and any natural recesses. Real metal shows dramatic value shifts between lit and shadowed areas.
Pay special attention to the apple’s stem cavity and bottom curve. These areas receive less direct light and should read significantly darker. The contrast between these shadows and your bright highlights creates convincing metallic depth.
Polish the Final Details
Small refinements separate good work from great. Zoom in and examine edges, reflections, and lighting consistency.
Check your light source:
Does everything point to the same light direction? If your main highlight suggests top-right lighting, environmental reflections should match. Inconsistent light sources destroy believability instantly.
Adjust individual reflection layers if needed. Sometimes rotating a reflection layer slightly improves the angle and makes it feel more natural within your composition.
Refine the edges:
Metal edges catch light differently than centers. Add a thin bright line along the apple’s rim using a small, hard brush on your dodge-and-burn layer. This rim light makes the apple feel like it’s genuinely reflecting its environment.
Conversely, check for any harsh selection edges where chrome meets transparency. Smooth these with a 1-2 pixel feather or by painting carefully on layer masks.
Why This Technique Matters for Designers
Learning metallic rendering opens dozens of commercial applications. Product visualizations, concept art, advertising mockups—they all require convincing material rendering.
Plus, the skills transfer. Master chrome and you understand how light interacts with reflective surfaces. That knowledge applies to glass, water, polished wood, and virtually any shiny material.
The displacement mapping technique alone proves invaluable. Wrap any texture around any organic shape using the same fundamental process. You’re not just learning to make a metal apple. You’re learning universal texturing principles.
Practice these steps multiple times with different objects. Try a chrome orange, then a metal skull, then an entire reflective landscape. Each iteration sharpens your eye for lighting subtleties and reflection behavior.
The difference between amateur and professional Photoshop work often comes down to these details. Anyone can slap a chrome texture on an object. But making that chrome feel physically present in a space? That requires understanding light, reflection, and careful layer blending.
Keep experimenting. Try different lighting scenarios. Place your metal apple in various environments. Each variation teaches something new about how metallic surfaces behave under different conditions.