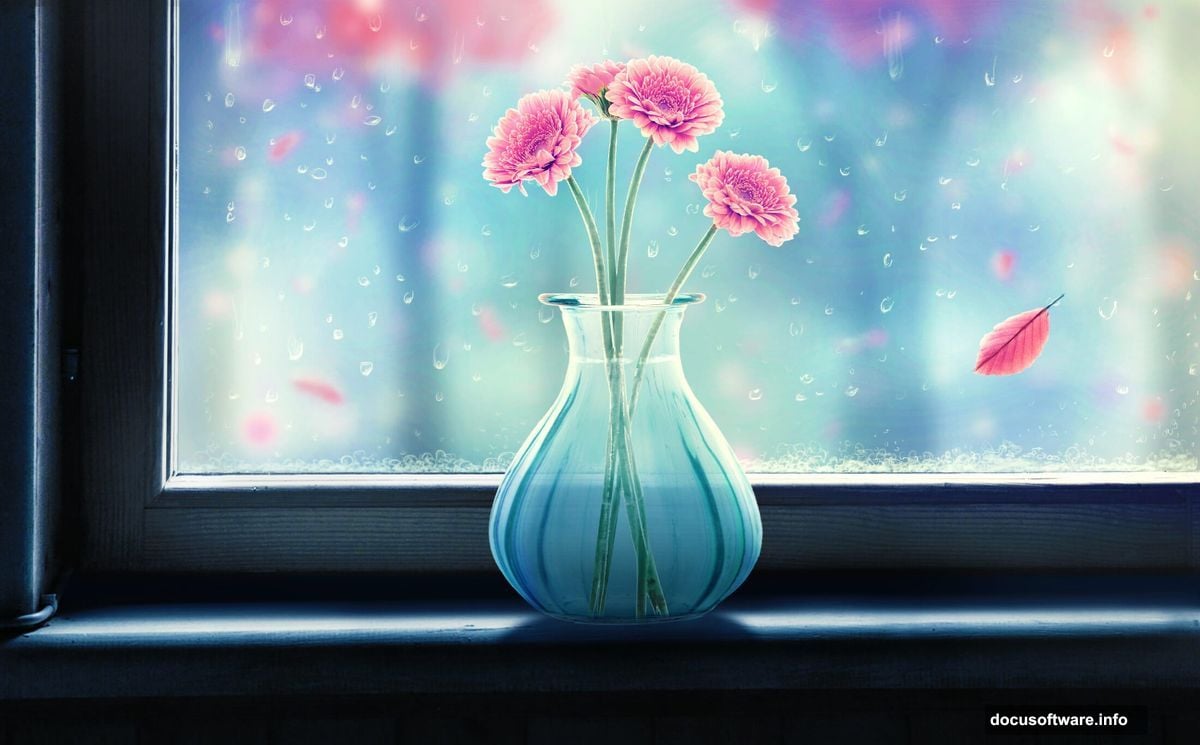
Want to create a moody rainy window scene in Photoshop? This tutorial walks you through every step, from building the window frame to painting realistic raindrops.
You’ll learn practical techniques that work for any photo manipulation project. Plus, the methods I’m sharing here apply to tons of other creative scenarios beyond just rainy windows.
Let’s dive into building this atmospheric scene from scratch.
Set Up Your Canvas and Background
Start by creating a new document in Photoshop. Go with 2200 x 1366 pixels for plenty of working room.
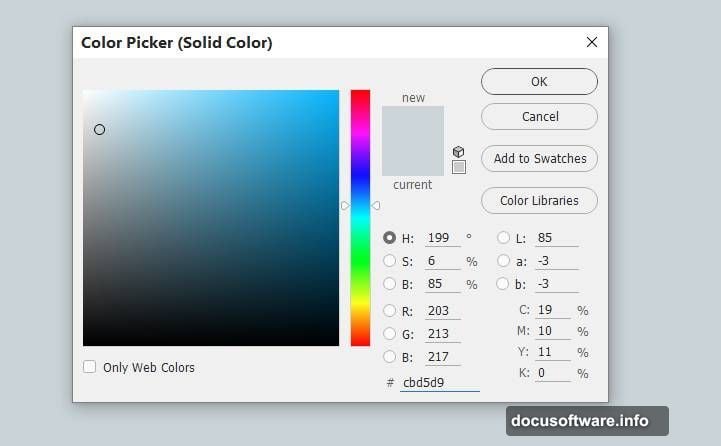
Fill your canvas with white initially. Then create a new fill layer by going to Layer > New Fill Layer > Solid Color. Pick the color #cbd5d9 for a subtle, overcast sky tone.
This color sets the mood right away. It mimics that soft, diffused light you see on rainy days. Moreover, it gives you a neutral base that won’t fight with the colors you add later.
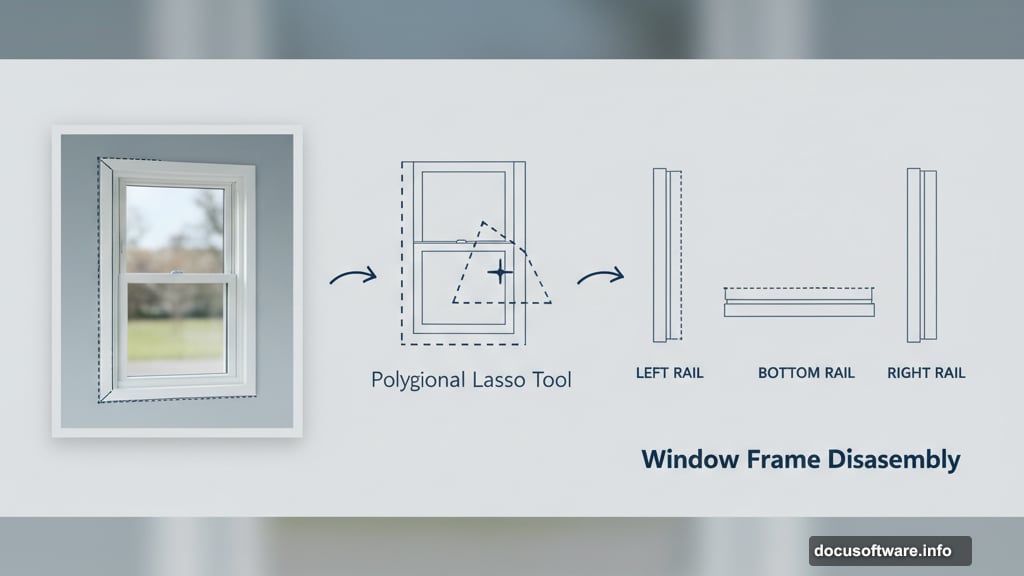
Build the Window Frame
Open your window image and grab the Polygonal Lasso Tool (L). Select the frame parts on both sides of the window carefully.
Drag these sections into your main canvas using the Move Tool (V). Position them to show just the left and lower frame portions.
Here’s where attention to detail matters. Use the Polygonal Lasso Tool again to select the rail on the left frame from your original image. Add it to the left side of your main document.
Now grab the rail part from the bottom of the window frame. Duplicate this layer and move the copy to the right side.
Clean Up Frame Details
Add a layer mask by clicking the second icon at the bottom of the Layers panel. Select a hard round brush with black color.
Use this brush to remove small unwanted details on the upper part of the rail. The mask lets you hide elements without permanently deleting them.
Next, select the rail part from the right side of the original frame. Add it to complete the right side of your window rail.
This step-by-step building approach gives you precise control. Plus, it’s way easier than trying to select the entire window frame at once.
Balance the Lighting
Create a new Curves Adjustment Layer and set it as a Clipping Mask. This targets only the rail part layer beneath it.
Increase the light and contrast slightly. The goal is making this section match the rest of the window frame.
Why does this matter? Different parts of your source image probably have different lighting. So you need to unify them manually for a believable result.
Make a new layer and select the Clone Tool (S). Use it to fix any remaining unwanted details on the window frames.
The Clone Tool is your best friend for cleanup work. It samples pixels from one area and paints them onto another, perfect for removing blemishes or filling gaps.
Fill Window Frame Gaps
Use the Rectangular Marquee Tool (M) to select a section from the lower part of the window frame. Hit Ctrl+C to copy it.
Create a new layer on top of your existing layers. Hit Ctrl+V to paste the copied section here.
Move this piece to the right to cover any holes or imperfections on the right side of the window frame. This technique is faster than painting details from scratch.
Paint the Background Through the Window
Now comes the creative part. You’ll paint what’s visible through the window panes.
Select several colors that suggest an overcast outdoor scene. Think muted greens, grays, and blues. Use soft brushes with varying opacity to build up layers of color.
Don’t worry about precision here. Rainy day views are naturally blurry and indistinct. So loose, impressionistic strokes actually look more realistic than sharp details.
Keep your brush strokes varied. Change the size and opacity frequently to create depth and atmospheric perspective.
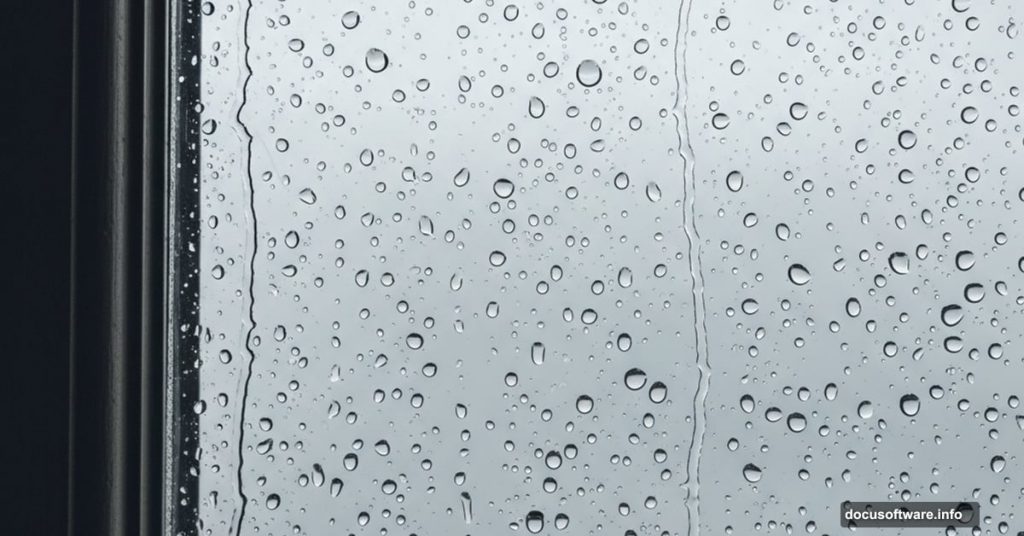
Create Realistic Raindrops
Raindrops on glass have a specific look. They catch light and create tiny distortions in whatever’s behind them.
Start by creating a new layer for your raindrops. Select a small, hard brush and paint individual droplets in white or light blue.
Vary the sizes significantly. Real rain creates drops of all different sizes on windows. Some are tiny specks, others are large streaks running down the glass.
Add a slight Gaussian Blur to soften the edges. Then adjust the layer opacity to around 60-70% so the drops feel translucent rather than opaque.
For extra realism, create a second raindrop layer. Use a lower opacity and smaller brush size for these. This creates the illusion of drops at different distances from the viewer.
Import and Position the Leaf
Open your leaf image and select it carefully. Use the Quick Selection Tool or Pen Tool depending on the background complexity.
Drag the leaf into your main composition. Position it on the window as if it stuck there during the rain.
The leaf adds a natural storytelling element. It suggests wind, wetness, and the chaotic beauty of a rainstorm.
Adjust the leaf’s color and lighting using adjustment layers. It should look like it’s sitting on the wet glass, not floating in front of it.
Add the Vase and Flowers
Bring in your vase image and position it on the window sill. This anchors your composition and adds a homey, intimate feel.
Select your flower images next. Arrange them naturally in the vase, varying heights and angles.
Real flower arrangements aren’t perfectly symmetrical. So embrace some randomness here. Let a few flowers lean or droop slightly.
Use adjustment layers to match the lighting across all elements. Everything should feel like it exists in the same space, lit by the same diffused window light.
Paint the Water in the Vase
Create a new layer for the water. Use a soft brush with a light blue or clear color.
Paint gently where the water level would be in the vase. Keep it subtle because glass and water are both translucent.
Add a thin white highlight along the top edge of the water line. This tiny detail makes a huge difference in selling the illusion.
Consider adding a slight reflection of the flowers in the water. Just a hint is enough to suggest the surface.
Fine-Tune with Adjustment Layers
Now it’s time to unify everything. Create a Curves adjustment layer affecting all layers below it.
Adjust the curve to enhance the overall mood. For a rainy scene, you might want to push the midtones slightly darker and add a touch more contrast.
Add a Color Balance adjustment layer next. Push the highlights slightly toward cool blues to reinforce that rainy day feeling.
Try a Hue/Saturation adjustment layer too. Slightly desaturating the entire image often makes photo manipulations look more cohesive and realistic.
Add Final Atmosphere Effects
Create a new layer set to Overlay or Soft Light blending mode. Use a large, soft white brush at very low opacity.
Paint gently over areas where light would naturally pool, like the center of the window. This mimics the way diffused light spreads through rainy window glass.
Make another new layer. Fill it with a light gray and add Filter > Noise > Add Noise. Set the amount to around 2-3%.
Lower this layer’s opacity to 5-10%. This subtle grain makes digital paintings feel less sterile and more photographic.
Understanding Layer Masks vs Erasing
Throughout this tutorial, I’ve recommended layer masks over erasing. Why does this matter?
Layer masks are non-destructive. If you hide something with a mask and later decide you need it back, just paint white on the mask to reveal it again.
Erasing is permanent. Once you delete those pixels, they’re gone unless you undo immediately.
This flexibility becomes crucial in complex projects. You’ll inevitably change your mind about composition elements, so keeping your options open saves hours of rework.
Why This Technique Works for Other Projects
The methods in this tutorial extend far beyond rainy windows. You’ve learned fundamental photo manipulation skills that apply everywhere.
Building complex objects from multiple source images teaches careful selection and positioning. Balancing lighting across disparate elements is essential for any composite work.
The raindrop painting technique works for any glass or water effect. The atmospheric painting methods apply to any background or environment creation.
Essentially, you’ve learned a complete workflow for photo manipulation projects. Start with structural elements, add details, paint atmospheric effects, then unify everything with adjustments.
This scene captures a specific mood through careful attention to lighting, color, and small details. The soft colors suggest calm. The raindrops add energy. The flowers introduce life and warmth.
That’s what makes photo manipulation powerful. You’re not just copying reality, you’re crafting an emotional experience. Each element serves the story you’re telling.
Take these techniques and experiment. Try different weather conditions, times of day, or interior scenes. The skills you’ve practiced here will serve you across countless creative projects.