
Photoshop lets you build impossible worlds. No camera captures what you can create with layers, masks, and smart selection techniques.
This tutorial shows you how to stack human heads into surreal, eye-catching compositions. You’ll need just two stock photos and solid mastery of Photoshop’s core tools. Plus, the techniques work for any version from CS6 onward.
Let’s transform a simple portrait into something memorably strange.
What You’ll Actually Learn
This isn’t about following steps blindly. Instead, you’ll master practical skills that apply to countless projects.
You’ll get comfortable with precision path selection using the Pen tool. You’ll understand how layer masking creates seamless composites. And you’ll see how grouping and color correction tie everything together.
The stacked head effect looks complex. But it breaks down into repeatable techniques you’ll use again and again.
Gather Your Source Images First
You need two specific stock photos to follow along exactly. Look for “Rural Self Portrait” by ColinBroug and “Cloud II” by avanzero on stock photo sites.

Or substitute your own portrait and background. Just make sure your portrait has clean lighting and a neutral expression. The background should complement your final vision without overwhelming it.
Download both images before opening Photoshop. Having everything ready prevents workflow interruptions later.
Crop Your Portrait for Maximum Impact
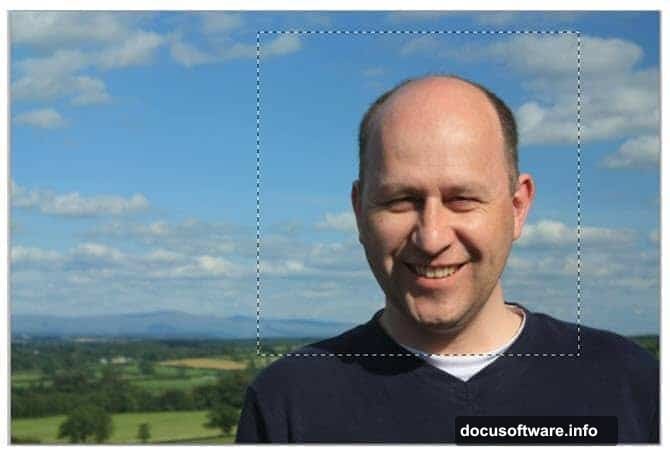
Open your portrait photo in Photoshop. Grab the Rectangular Marquee tool from the toolbar.
Draw a selection around the head and shoulders. You want a tight crop that focuses attention on facial features. Include enough shoulder area to ground the composition naturally.
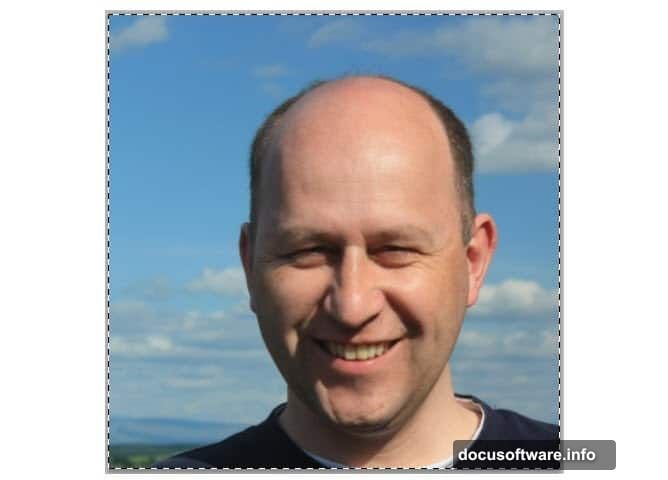
Now go to Image > Crop. This commits your selection and removes everything outside it. Hit Ctrl+D to deselect. You’ve created a close-up that’ll work perfectly for the effect.
Cut Out the Subject Precisely
Switch to the Pen tool. This gives you pixel-perfect control over selection edges.
Carefully trace around the entire head and shoulder outline. Take your time at the hairline and jaw. Precision here determines how professional your final result looks.
When you complete the path, right-click it. Choose “Make Selection” from the menu. Click OK to transform your path into an active selection.
Press Ctrl+J to copy the selected area onto a new layer. Now your subject sits isolated from the background, ready for manipulation.
Mark the Head Slice Location
Here’s where things get surreal. You’ll create the illusion of sliced head sections.
Select the Ellipse tool. Draw an oval path that crosses horizontally through the middle of the head. This marks where you’ll “cut” the head later.
The bottom edge should follow the nose bridge naturally. Use the Direct Selection tool to adjust anchor points until the curve looks organic. Real heads aren’t perfect circles, so neither should your path be.
Build Dimensional Thickness
A flat slice looks fake. You need visible thickness to sell the illusion.
Hold Alt and drag your ellipse path to duplicate it. While the second path is selected, click “Subtract from Shape Area” in the options bar.
Press Ctrl+T to transform the second path. Scale it down slightly and center it inside the first path. This creates a rim effect that mimics actual thickness.
The gap between paths determines how thick your head slice appears. Wider gaps create chunkier sections. Narrower gaps look more delicate.
Convert Paths to Working Selections
Open the Paths panel from Window > Paths if it’s not visible. Click the “Load path as selection” button at the bottom.
Your rim cut path transforms into marching ants. This selection defines exactly what you’ll duplicate next.
Switch back to the Layers panel. You’re ready to create the actual stacked effect.
Duplicate and Organize Layers
With your rim selection active, press Ctrl+J. This copies the selected rim area to a new layer.

Now duplicate your full head layer too. You’ll need multiple copies to build the stack effect convincingly.
Hide the original background layer and rim cut layer. You’re working only with duplicated elements now. This keeps your original intact in case you need to restart.
Stack Multiple Head Sections
Drag your full head layer to the top of the layer stack. This becomes the uppermost head in your final composition.
Select the rim cut path again from the Paths panel. Load it as a selection just like before.
Here’s the secret: You’ll repeat this duplication process multiple times. Each duplicate gets positioned slightly below the previous one. This creates the stacked, separated head illusion.
Aim for 4-6 head sections total. Too few looks incomplete. Too many becomes cluttered and loses impact.
Add Depth with Layer Arrangement
Position each duplicated head section progressively lower in the composition. Leave visible gaps between sections so viewers clearly see the separation.

The gaps should feel consistent but not identical. Natural variation makes the effect more believable. Think of how a sliced loaf of bread never has perfectly even spacing.
Use the Move tool to nudge sections into perfect alignment. Hold Shift while moving to constrain motion vertically. This prevents accidental horizontal shifts that break the illusion.
Enhance with Shadow and Light
Raw stacked layers look flat. You need shadows where sections would naturally cast them.
Create a new layer between each head section. Set its blend mode to Multiply. Use a soft black brush at 20-30% opacity to paint subtle shadows along the top edge of each lower section.
Similarly, add highlights to the bottom edge of upper sections. Create another layer set to Screen mode. Paint with white at low opacity where light would naturally hit.
These small touches add crucial dimensionality. They transform obvious photo manipulation into something that almost could exist.
Integrate the Background
Remember that cloud photo? Now’s when it matters.

Place your cloud image below all head layers. This creates surreal context for your impossible subject.
Adjust the cloud layer’s opacity if it competes too strongly with your main subject. You want atmospheric support, not distraction. Around 70-80% opacity often works well.
Consider adding a subtle blur to the background. Go to Filter > Blur > Gaussian Blur. A radius of 3-5 pixels pushes the clouds back spatially while keeping them recognizable.
Unify with Color Correction
Your portrait and background probably have different color temperatures. This breaks immersion immediately.
Create a Curves adjustment layer above everything. Adjust the RGB curve slightly to match the background’s overall tone. Small changes make big differences.
Add a Color Balance adjustment layer too. Shift midtones toward whatever color dominates your background. If your clouds are warm and golden, add yellow and red to your portrait layers.
These corrections tie disparate elements into a cohesive whole. They’re the difference between “nice Photoshop trick” and “compelling surreal art.”
Final Polish and Export

Zoom out to view your complete composition. Look for inconsistencies in lighting, color, or spacing.
Fix any rough selection edges using a small soft eraser at low opacity. Clean up stray pixels that break the illusion.
When satisfied, flatten your image or save a layered PSD for future edits. Export a high-resolution JPEG for sharing.
Why This Technique Matters Beyond the Effect
You didn’t just learn to stack heads. You practiced fundamental compositing skills that apply to every Photoshop project.
Precise path selection with the Pen tool. Layer mask creation for seamless blending. Strategic use of adjustment layers for color unity. These techniques appear in product photography, digital painting, web design, and professional retouching.
Master these foundations, and no Photoshop challenge intimidates you. The surreal head stack is just one application of endlessly versatile skills.
So experiment with your own portraits. Try different numbers of sections. Test alternative backgrounds. Break the rules once you understand them.
The only real limit is your willingness to explore.