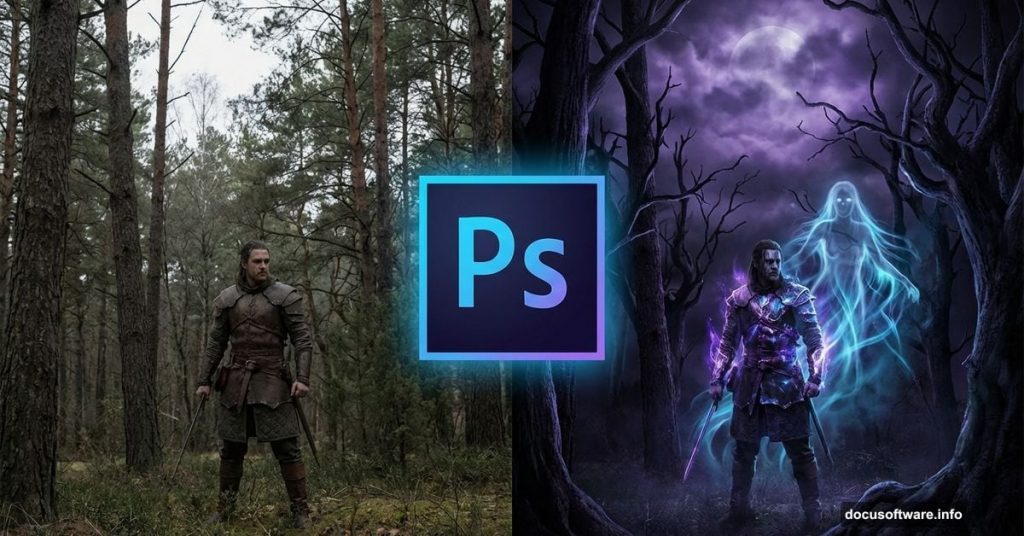
Want to create a dark, symbolic fantasy scene? This gothic photo manipulation tutorial walks you through building a haunting composition featuring a brave warrior and his spectral counterpart.
You’ll learn practical techniques for nighttime conversions, atmospheric effects, and symbolic storytelling through digital art. Plus, you’ll discover how to turn ordinary stock photos into a cohesive dark fantasy scene.
This tutorial works best with Photoshop CS5 or newer. A pen tablet helps but isn’t required.
What You’ll Actually Learn
This isn’t just about placing images on a canvas. You’ll master several crucial photo manipulation skills that apply to any dark fantasy project.
First, you’ll learn color manipulation techniques that transform day scenes into moody nighttime settings. Then you’ll discover how to paint realistic light and shadow that makes composite elements feel connected. Finally, you’ll add atmospheric glows and smoke effects that create depth and drama.
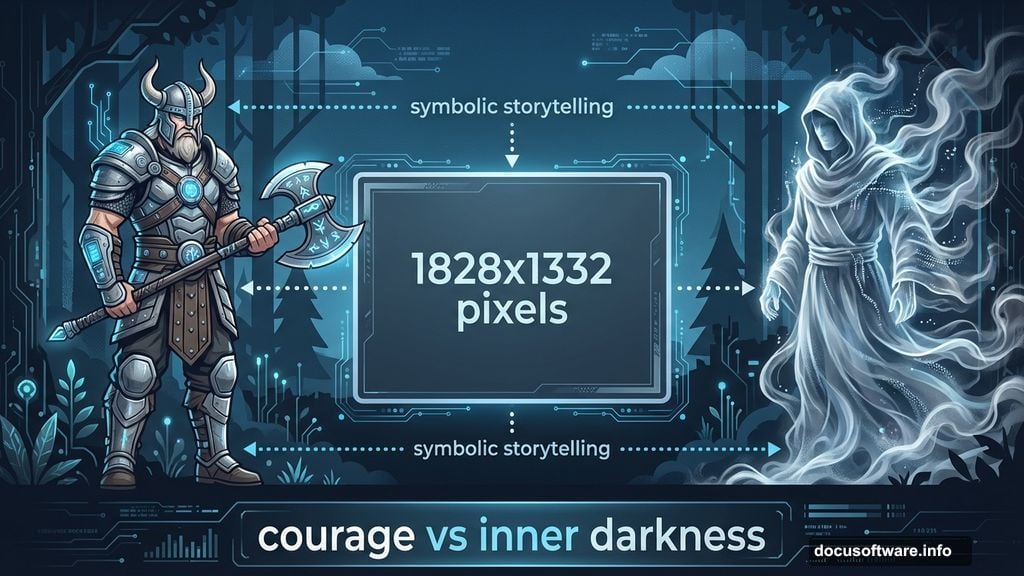
The warrior and ghostly monk behind him create powerful symbolism. One represents courage and action. The other suggests inner darkness or past demons. Your viewers will interpret the meaning differently, which makes this composition compelling.
Gather Your Resources First
Before starting, download these stock images. You’ll need forest scenery, a grim reaper figure, a Nordic warrior, smoke effects, and celestial backgrounds. The tutorial uses specific stocks that work together tonally.
Make sure you have commercial use rights for any stocks if you plan to sell or display your final work. Most stock sites clearly label usage rights.
Build Your Canvas Foundation
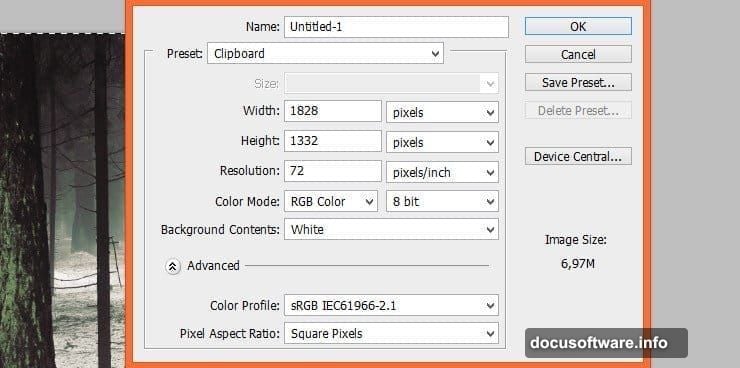
Start by creating a new file measuring 1828×1332 pixels. This size works well for web display while maintaining enough resolution for detailed work.
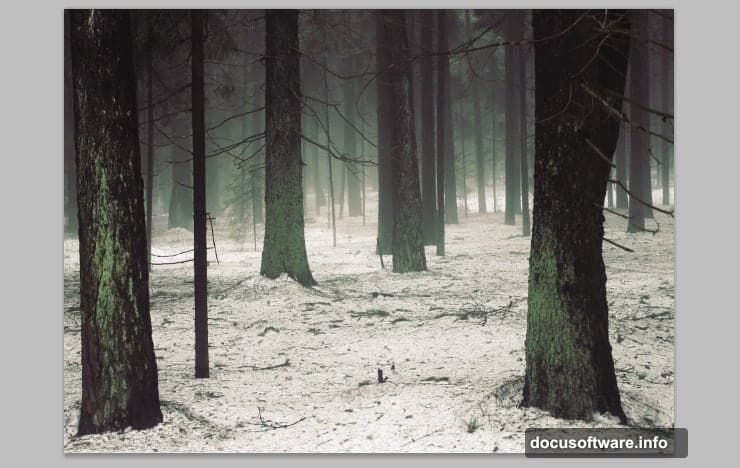
Next, place your forest stock image. Simply drag it from your folder and drop it into the center of your canvas. This becomes your environmental foundation.
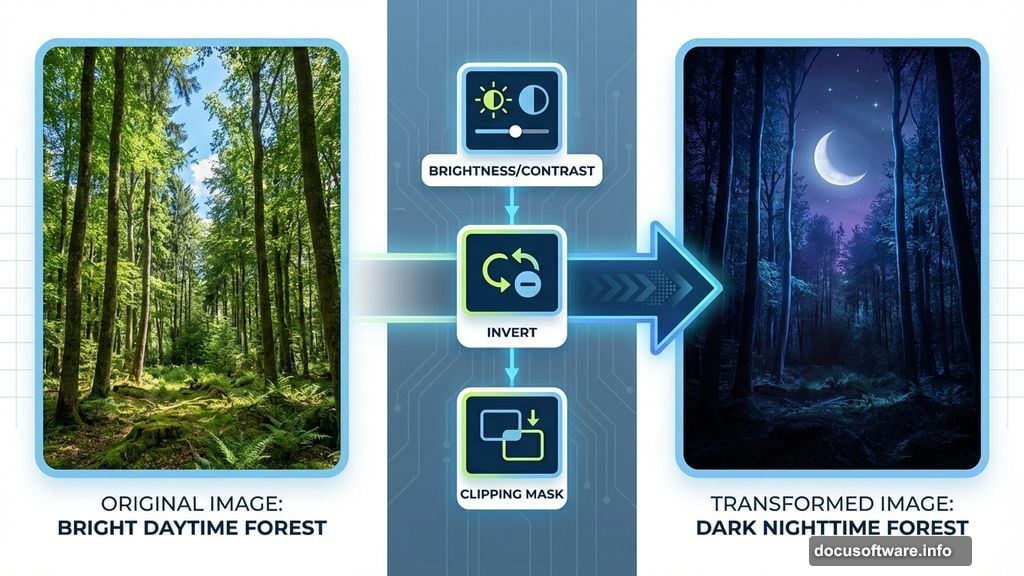
Now comes the fun part. You’ll transform this daytime forest into a dark, moody nighttime scene using adjustment layers.
Convert Daylight to Nighttime
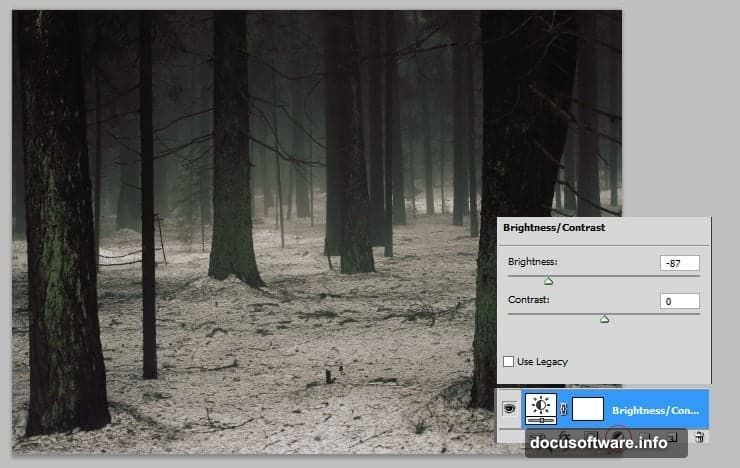
Add a Brightness/Contrast adjustment layer. This non-destructive technique lets you darken the scene dramatically while preserving the ability to tweak settings later.
Reduce brightness significantly and boost contrast slightly. The forest should feel mysterious and dark, not just dim. Experiment with the sliders until you achieve a properly moody atmosphere.
This single adjustment creates the foundation for your gothic mood. Everything else builds on this darkness.
Add Your Ghostly Smoke Element
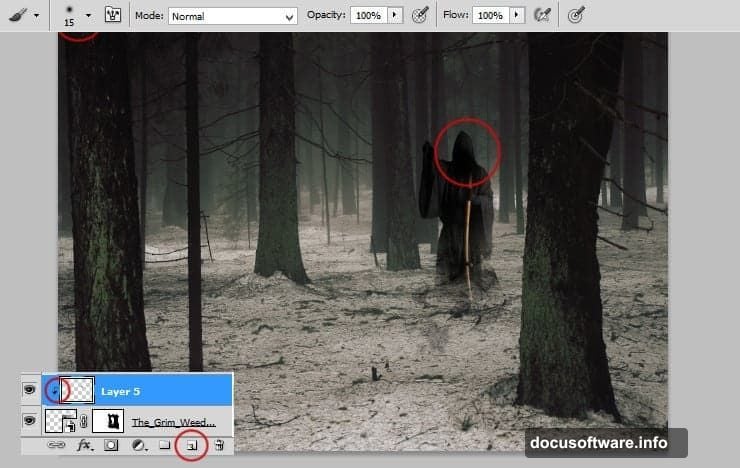
Place your first smoke stock and transform it to fit your composition. This smoke will become the ghostly monk’s ethereal form.
Here’s where things get interesting. Add an Invert adjustment layer and create a clipping mask so it only affects the smoke. This reverses the tones, making dark smoke appear light and ghostly.
Then change the smoke layer’s blending mode to Multiply. This removes lighter areas while keeping darker tones visible. The smoke starts looking supernatural rather than just smoky.
Use a large, soft brush to mask the top of the smoke where it will connect with your grim reaper figure. Blend it gradually so the transition feels organic.
Integrate the Dark Monk Figure
Place your grim reaper stock and carefully mask it using a hard round brush for crisp edges. Switch to a larger, softer brush for the bottom of his robes where they should blend with the smoke.
This creates the illusion that the figure emerges from or dissolves into smoke. The effect suggests something not entirely physical.
Add a new layer with a clipping mask and paint subtle highlights on the monk’s face using a soft brush. These highlights should match your scene’s lighting direction.
Balance Exposure and Contrast
If your monk figure looks overexposed compared to the dark forest, fix it with adjustment layers. Add Levels and Brightness/Contrast adjustments, both clipped to affect only the monk.
Reduce exposure to match the environmental darkness. The figure should feel like it belongs in this nighttime forest, not like it was shot in daylight and pasted in.
Small tonal adjustments make huge differences in believability. Take time to get these right.
Position Your Warrior Hero
Now place your Nordic warrior stock. Position him prominently in the foreground, facing or aware of the ghostly presence behind him.
Mask the warrior carefully, paying special attention to hair and weapon edges. These details matter for realism.
The warrior represents courage and determination. His solid, physical presence contrasts with the ethereal monk behind him. This visual contrast reinforces your symbolic storytelling.
Match the Warrior’s Lighting
Your warrior needs similar lighting treatment as the monk. Add clipped adjustment layers to darken and adjust his tones to match the nighttime environment.
Paint shadows on the side of his body facing away from any light sources. Then add subtle highlights where moonlight or magical glow might catch his armor or skin.
These lighting adjustments integrate him into the scene. Without them, he’ll look cut out and pasted regardless of how clean your masking is.
Create Atmospheric Depth With Additional Smoke
Add more smoke stocks throughout the composition. Use different blending modes like Screen, Lighten, or Overlay to create varied atmospheric effects.
Some smoke should appear in front of your subjects, creating depth. Other smoke elements work behind them, adding mysterious background atmosphere.
Vary the opacity of different smoke layers. Not everything needs to be fully visible. Subtle atmospheric elements often work better than obvious ones.
Add Magical Light Sources
Create new layers set to Screen or Linear Dodge blending modes. Paint glowing light sources using soft brushes with low opacity.
These glows might represent magical energy, moonlight filtering through trees, or supernatural phenomena. Place them strategically to draw attention to your main subjects.
Build up glows gradually with multiple low-opacity strokes. This creates more realistic, natural-looking light than painting it all at once.
Paint Environmental Lighting
Add a new layer and paint broad lighting across your entire scene. This unified lighting ties all elements together.
Use a very large, soft brush with extremely low opacity. Paint multiple passes, building up subtle lighting that suggests moonlight or ambient magical glow.
This environmental lighting is subtle but crucial. It’s what transforms separate stock images into a cohesive scene.
Enhance Colors for Gothic Mood
Add Color Balance or Hue/Saturation adjustment layers affecting your entire composition. Push colors toward cooler tones like blues and desaturated greens.
Gothic atmospheres rarely feature warm, vibrant colors. Cooler, muted tones create the mysterious, slightly unsettling mood you want.
Experiment with different color adjustments until you achieve your desired emotional impact. Colors influence mood more than most beginners realize.
Add Celestial Background Elements
Place your celestial background stocks behind all other layers. These add cosmic or otherworldly atmosphere to your scene.
Use blending modes like Screen or Lighten so these backgrounds show through without completely replacing your forest. Lower their opacity for subtlety.
These cosmic elements reinforce the supernatural theme without overwhelming your main subjects.
Final Shadow and Highlight Painting
Create a final layer on top of everything else. Set it to Overlay blending mode with reduced opacity.
Paint with black to deepen shadows in areas that should recede. Paint with white to enhance highlights that should advance toward the viewer.
This final dodge and burn pass adds depth and dimension. It’s the polish that elevates good work to great work.
Sharpening and Final Adjustments
Once you’re satisfied with your composition, flatten a copy or create a merged layer on top. Apply subtle sharpening using Unsharp Mask or Smart Sharpen.
Make any final color or contrast tweaks. Sometimes you’ll notice issues in the finished piece that weren’t obvious during construction.
Save your work in multiple formats. Keep a layered PSD for future adjustments, but also export a flattened JPEG for sharing.
Common Mistakes to Avoid
Many beginners place all their images at full opacity and wonder why nothing looks integrated. Always adjust opacity and use blending modes to make elements interact.
Another common error is inconsistent lighting direction. If your warrior has light from the left but your monk is lit from the right, viewers will notice something feels wrong even if they can’t articulate why.
Finally, don’t skip the atmospheric elements like smoke and glows. These “extras” are actually essential for creating believable fantasy scenes.
The Symbolism Behind the Composition
This piece tells a story through visual symbolism. The brave warrior represents conscious strength and determination. The ghostly monk behind him might symbolize past mistakes, inner demons, or the darkness that follows heroism.
Viewers will interpret the relationship between these figures differently. Some might see the monk as a threat the warrior must face. Others might see it as a protector or guide. This ambiguity makes the piece more engaging.
Symbolic compositions encourage viewers to spend more time with your work, trying to decode its meaning. That’s powerful storytelling through visual art.
Creating gothic photo manipulations requires patience and attention to lighting consistency. But the dramatic results make the effort worthwhile.
Start with strong stock images that share similar lighting conditions. Build your composition in layers, adjusting each element to match the overall mood. Then add atmospheric effects that unify everything into a cohesive scene.
Most importantly, don’t rush the lighting and shadow work. That’s what transforms separate images into believable integrated scenes. Take your time painting light and dark areas that make sense together.