Ever wanted to blend reality and fantasy in a single image? Photo manipulation lets you build impossible worlds using everyday tools.
This tutorial walks you through creating an eerie lakeside scene. We’ll layer water textures, blend backgrounds seamlessly, and add atmospheric effects. Plus, you’ll learn techniques that work for any mystical or fantasy composition.
By the end, you’ll have a complete workflow for professional photo manipulation.
What You’ll Need Before Starting
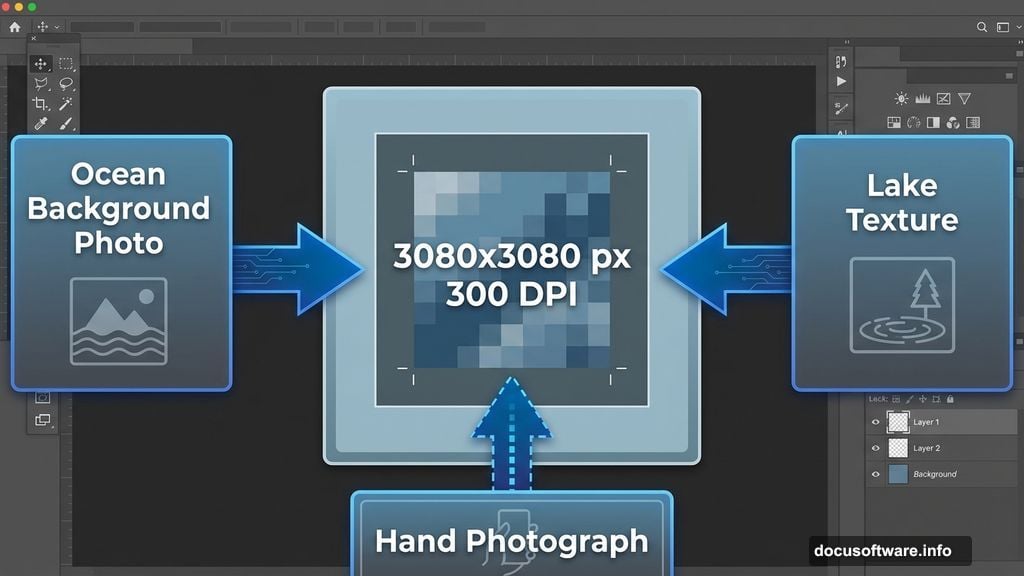
First, gather your resources. You’ll need four main elements for this project.
Required images:
- Ocean background photo
- Lake texture with water and sky
- Hand photograph (any pose works)
- Cloud brush set for atmosphere
Also, make sure you’re working in Photoshop CC or CS6. Earlier versions might lack some adjustment layer features we’ll use.
Download all images before opening Photoshop. That saves time switching between windows later.
Set Up Your Canvas Properly
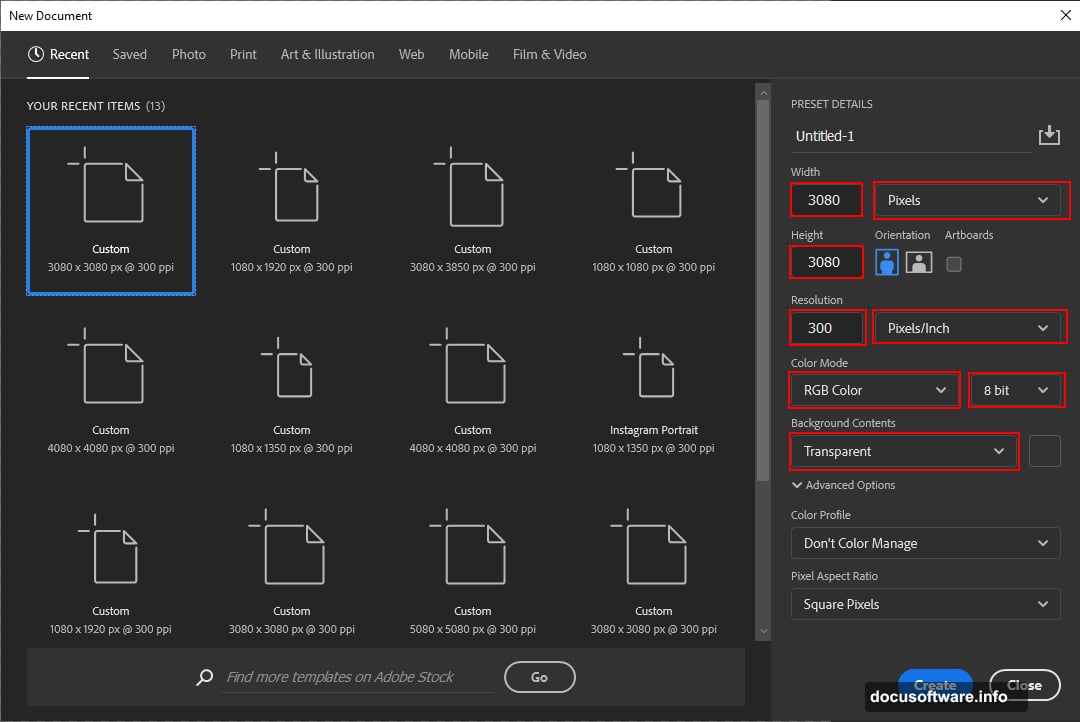
Open Photoshop and create a new document. Go to File > New and enter these exact settings.

Document specifications:
- Width: 3080 pixels
- Height: 3080 pixels
- Resolution: 300 DPI
- Color Mode: RGB Color 8-bit
- Background: Transparent
Why these dimensions? Square formats work perfectly for social media and print. Plus, 300 DPI ensures crisp quality even when printed large.
Hit Create. Now you’ve got a blank canvas ready for manipulation.
Build the Water Foundation
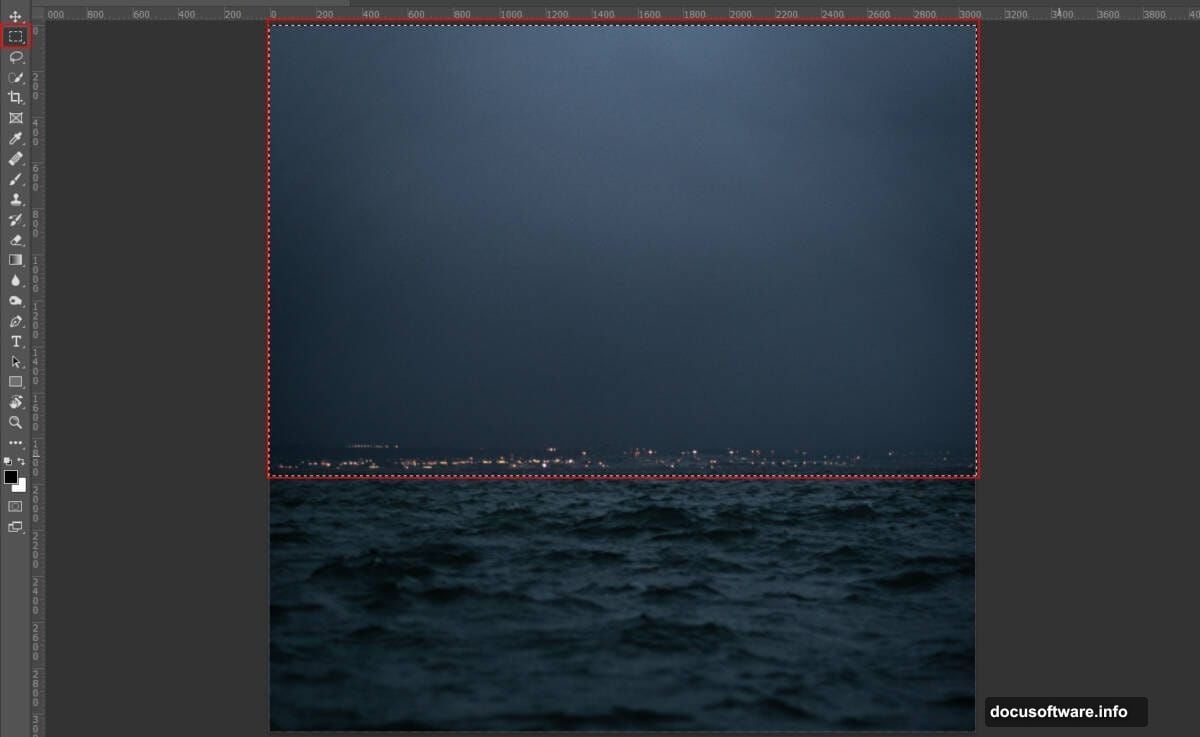
Next, place your ocean background. Go to File > Place Embedded and select your ocean image.
The image appears with transform handles. Hold Alt + Shift together and drag a corner to resize proportionally. In Photoshop CC, Alt alone locks proportions automatically.
Position the ocean to fill most of your canvas. Then press Enter to commit the placement.
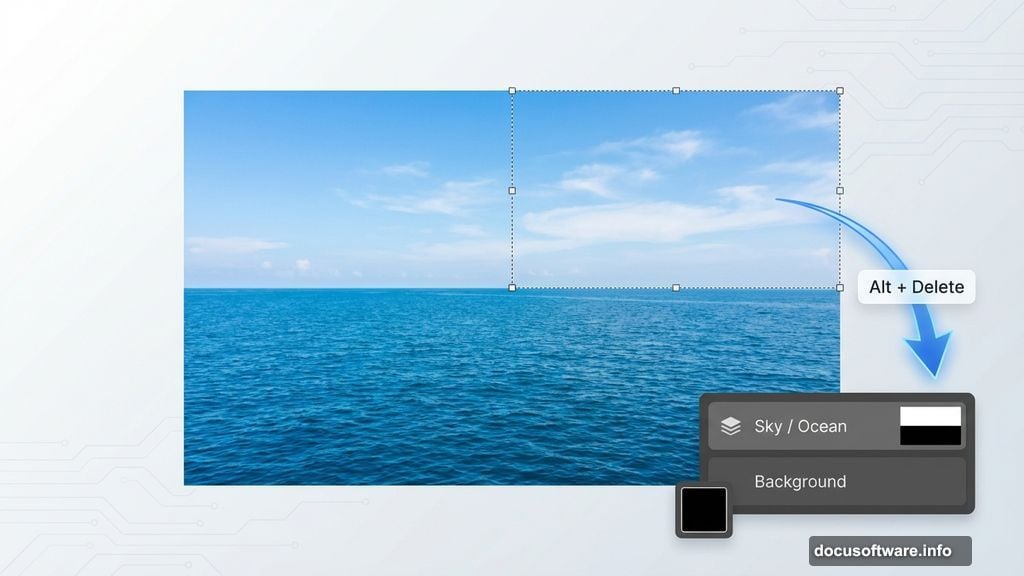
Create a layer mask by clicking the mask icon at the bottom of your Layers panel. Now grab the Rectangular Marquee Tool (press M).
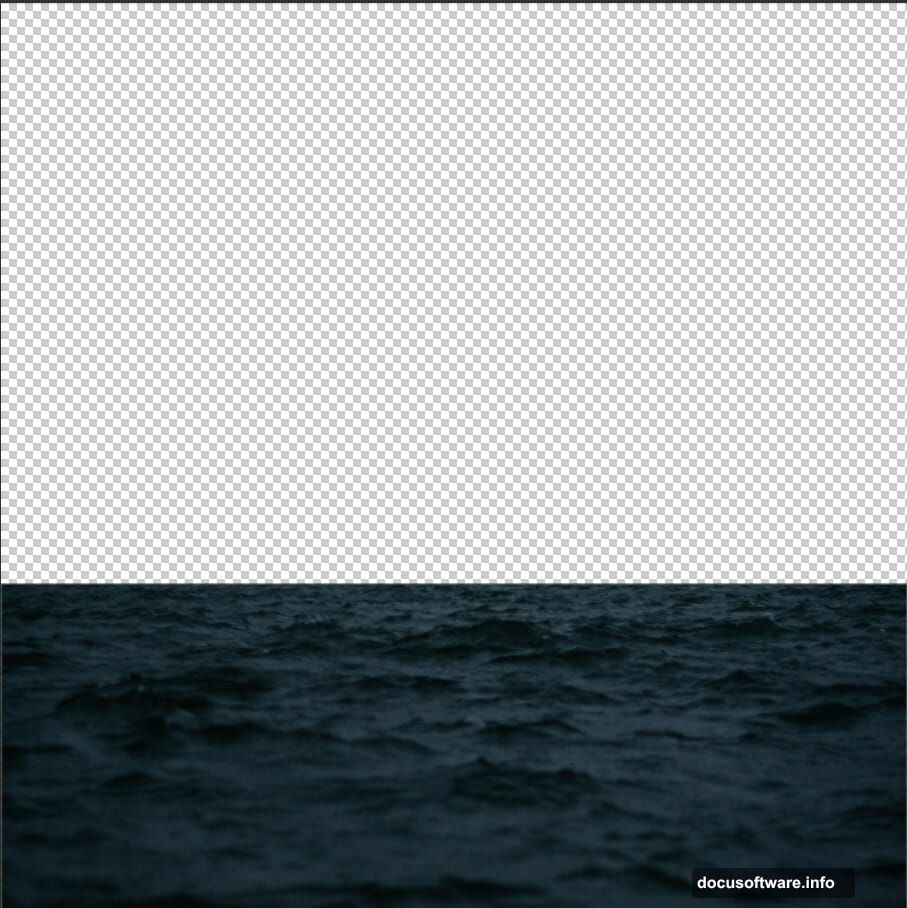
Select the sky portion you want to remove. With your layer mask active and black as your foreground color, press Alt + Delete. The selected area disappears cleanly.
This technique beats erasing because masks stay editable. You can always refine edges later.
Add Color Correction to Ocean Layer
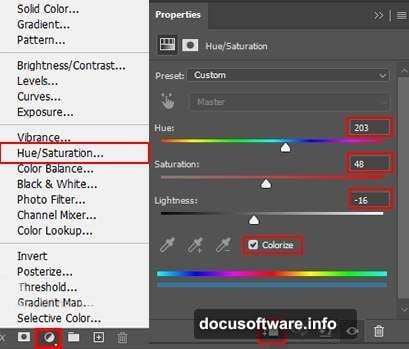
Time to adjust the ocean’s mood. Click the Adjustment Layer icon and choose Hue/Saturation.
Drag the Saturation slider left to desaturate slightly. Mystical scenes work better with muted colors. Try reducing saturation by 20-30%.
Moreover, shift the Hue slider to add subtle color tints. A slight blue or teal shift enhances the eerie atmosphere.
Right-click the adjustment layer and select “Create Clipping Mask.” This applies the effect only to your ocean layer below.
Layer the Lake Texture
Now bring in your lake image. Use File > Place Embedded again and select the lake photo.
Transform and position it above your ocean layer. The lake should overlap with ocean water to create depth.
Create another layer mask. Use the Rectangular Marquee Tool to select areas you don’t need—usually birds in the sky or excess water edges.
Delete selected areas by pressing Alt + Delete with the mask active. Remember, black hides and white reveals in layer masks.
Blend modes help here too. Try setting your lake layer to “Multiply” or “Overlay” at 50% opacity. Experiment until water textures merge naturally.
Balance Lake Layer Colors
Add a Color Balance adjustment layer. Clip it to your lake layer like before.
Adjust these sliders:
- Shadows: Push toward Cyan and Blue
- Midtones: Add slight Magenta for mystical purple tones
- Highlights: Keep neutral or add faint Yellow
These shifts unify your lake with the overall scene. Furthermore, they create that otherworldly atmosphere we’re after.
Don’t go extreme. Subtle adjustments look more realistic than oversaturated fantasy colors.
Fine-Tune with Hue and Saturation
Stack another Hue/Saturation adjustment above Color Balance. Clip it to the lake layer.
Drop Saturation by 15-20% to match your ocean layer’s mood. Then adjust Hue slightly if colors still clash between layers.
Pro tip: Toggle adjustment layers on and off using the eye icon. This shows before/after comparisons instantly. That way you catch overcorrections early.
Add Depth with Curves Adjustment
Curves give you precise control over tonal ranges. Add a Curves adjustment layer and clip it to your lake.
Click the center of the diagonal line and drag down slightly. This darkens midtones without crushing blacks.
Then click the upper portion and drag up gently. That brightens highlights for contrast.
The result? More dimensional water with visible depth. Plus, the contrast makes your scene pop visually.
Extract and Place the Hand
Open your hand image in a separate document. Grab the Pen Tool (press P).
Carefully trace around the hand’s outline. Click to create anchor points at each direction change. Curved edges need more points for smooth paths.
When your path closes, right-click inside it and select “Make Selection.” Set Feather Radius to 0.5 pixels for slightly soft edges.
Now press Ctrl/Cmd + J to duplicate your selection onto a new layer. Copy that layer (Ctrl/Cmd + C) and paste it into your main composition (Ctrl/Cmd + V).
Position the hand where it creates the most impact. Usually low in the frame works best, as if rising from water.
Blend the Hand Naturally
The hand probably looks too clean against your moody background. Fix that with layer adjustments.
First, add a Hue/Saturation adjustment clipped to the hand layer. Desaturate by 30-40% to match your scene’s color scheme.
Next, add Curves clipped to the hand. Darken it overall so it doesn’t stand out harshly. The hand should feel like part of the environment, not pasted on top.
Finally, use a soft brush at 20% opacity with black paint. Gently brush the hand’s base where it meets water. This creates a natural fade suggesting partial submersion.
Add Atmospheric Mist Effects
Load your cloud brushes into Photoshop. Go to Window > Brushes, click the menu icon, and select “Load Brushes.”
Create a new layer above everything. Set foreground color to light gray or white.
Select a soft cloud brush. Paint mist around your hand and across the water surface. Vary brush size and opacity for natural-looking fog.
Layer blend modes transform basic brushwork. Try Overlay, Soft Light, or Screen modes at 30-50% opacity. Each creates different atmospheric effects.
Build mist gradually with multiple layers. That gives you control to adjust individual fog elements later.
Apply Final Polish with Camera Raw
Flatten your image or create a merged copy (Ctrl/Cmd + Alt + Shift + E). This preserves your layers while creating a flattened version.
Go to Filter > Camera Raw Filter. This opens powerful finishing tools.
Adjust these sliders:
- Clarity: Increase by 10-15 for sharpness
- Dehaze: Reduce slightly to maintain mystical softness
- Vibrance: Boost by 5-10 for richer colors
- Vignette: Darken edges to focus attention centrally
Camera Raw also lets you adjust temperature. Cooler temperatures enhance eerie moods while warmer tones soften the scene.
Click OK when satisfied. Your manipulation now has professional-level finish.
Refine Edge Details
Zoom to 100% and inspect edges where elements meet. Look for harsh transitions or obvious compositing.
Use a small soft eraser at 10-20% opacity to feather any rough edges. This works especially well where the hand meets water or where mist overlaps other elements.
Also check color consistency. If any element still looks out of place, add targeted Hue/Saturation or Color Balance adjustments.
Small refinements separate amateur composites from professional work. So take time here.
Save Your Work Strategically
Save two versions of your file. First, save the PSD with all layers intact (File > Save As > Photoshop).
Then save a flattened JPEG or PNG for sharing (File > Export > Export As). This creates a smaller file perfect for posting online.
Keep your layered PSD forever. That lets you revisit and modify the composition later without starting over.
Key Techniques You Just Learned
This tutorial taught you core photo manipulation skills that apply to countless projects.
You now know how to:
- Layer multiple images convincingly
- Use adjustment layers for non-destructive editing
- Create and refine layer masks
- Extract objects with the Pen Tool
- Add atmospheric effects with custom brushes
- Apply professional finishing with Camera Raw
These techniques work for fantasy portraits, surreal landscapes, or any composite imagery. Moreover, the layer-based workflow stays flexible throughout your creative process.
The mystical lakeside scene serves as practice. But the real value lies in mastering these fundamental manipulation methods.
Photo manipulation rewards patience and experimentation. Don’t fear trying different blend modes, adjustment combinations, or brush effects. Sometimes happy accidents create the best results.
Keep practicing with new images and concepts. Each project builds your technical skills and creative vision together.