Photoshop‘s blending options pack serious creative power. But most tutorials overcomplicate them.
Today you’ll learn a straightforward workflow that transforms basic shapes into striking textured graphics. We’re building a hummingbird with smoke effects, but these techniques work for any subject. Plus, you’ll discover my go-to methods for injecting vibrant color into flat compositions.
This tutorial requires Photoshop CS3 or newer. Grab your assets and let’s start blending.
What You’ll Need
Before diving in, gather these resources:
Essential Assets:
- Hummingbird reference photo (Shutterstock or any stock site)
- Smoke images (Shutterstock, Free Stock Photo Exchange, or DeviantArt)
- Concrete texture for background (Shutterstock or free alternatives)
- Metal textures (CGTextures offers excellent quality)
- Bokeh texture matching your color scheme
Here’s the thing about stock photos. You don’t need premium assets to nail this effect. The bird reference simply guides your shape work and won’t appear in the final result. So free alternatives work perfectly fine.
Build Your Canvas Foundation
Start with a document that gives you room to work. I prefer large dimensions with high resolution because it makes scaling easier later. However, use whatever size runs smoothly on your machine.

Canvas Setup:
Create a new document with generous dimensions. This gives you flexibility for future edits without losing quality.
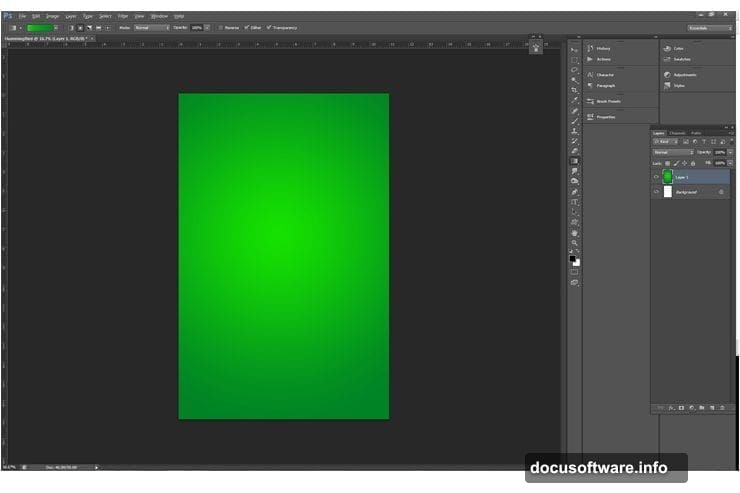
Layer the Background Gradient
Make a new layer (Shift+Control+N on Windows, Shift+Command+N on Mac). Now apply a green gradient from light to dark.
Color Values:
- Light green center: #14dc02
- Dark green edges: #008325
This gradient seems subtle now. But trust me, it creates crucial focal depth when we add textures later. The gradient guides your viewer’s eye toward the center without shouting about it.
Add the Concrete Texture
Import your concrete texture as a smart object. Smart objects let you scale down and back up without destroying resolution. Crucial for when you inevitably change your mind.
Settings for Concrete Layer:
- Blending mode: Soft Light
- Opacity: 27%
- Position: Center coverage across entire image
The soft light mode blends the texture naturally with your gradient base. At 27% opacity, it adds visual interest without overwhelming your composition.
Stack Additional Textures
Repeat the texture process for your next two background elements. Each texture should cover the complete image area.
Key Principle:
Rotate through different blending modes at various opacities. Find what looks right for your specific composition. Remember, backgrounds enhance your subject rather than competing with it.
I also applied a black and white adjustment (Adjustments > Black and White) set to Auto. This tones down the textures just enough to keep them supportive rather than distracting.
Organize Your Layers
Once you’re satisfied with your background, group everything together. Select all background layers using Shift and clicking each one. Then hit Control+G (Command+G on Mac) or go to Layer > Group Layers.
Pro Tip:
Color-code your groups by right-clicking and selecting a color at the bottom. This keeps complex projects manageable when you’re juggling dozens of layers.
Import Your Bird Reference
Bring in your hummingbird reference image. Position it where you want your final bird to sit. This reference guides your shape work but won’t appear in the finished piece.
Why This Matters:
Working from reference ensures your bird shape looks natural. Even abstract graphics benefit from real-world proportions.
Create the Bird Shape
Now comes the fun part. Use the Pen Tool to trace your bird’s outline. Take your time here because this shape becomes your foundation.
Pen Tool Technique:
Click to create anchor points around your bird’s silhouette. The Pen Tool takes practice, but it’s worth mastering. Smooth curves make or break the final result.
Fill your path with a solid color. Pick something that contrasts with your background so you can see what you’re doing.
Apply Layer Styles
Right-click your bird layer and select Blending Options. This opens Photoshop’s layer style dialog where the magic happens.

Start With These Settings:
- Bevel and Emboss: Adds dimensional depth
- Inner Shadow: Creates volume within the shape
- Gradient Overlay: Introduces color variation
I recommend starting with these three effects. Then experiment with different values until you find what looks good for your specific composition.
Add Metal Texture
Import one of your metal textures. Position it above your bird shape layer. Then create a clipping mask (Alt+Control+G on Windows, Option+Command+G on Mac).
What Clipping Masks Do:
The metal texture now only shows within your bird shape boundaries. This technique lets you apply complex textures while maintaining clean edges.
Set the metal texture’s blending mode to Overlay or Soft Light. Adjust opacity until it looks natural. Around 40-60% usually works well, but trust your eyes over arbitrary numbers.
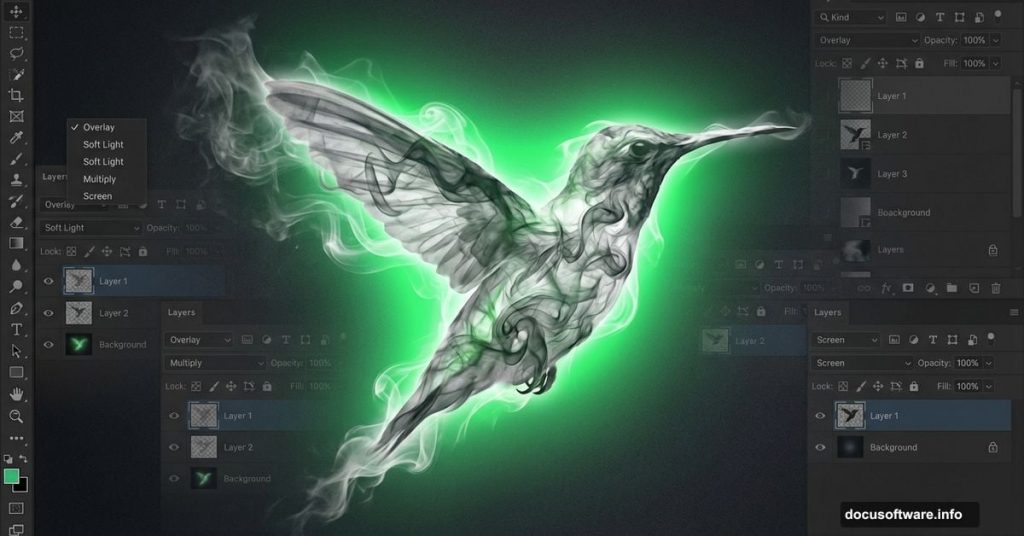
Integrate Smoke Elements
Import your smoke images on layers above your textured bird. Position them around the edges where you want the effect to appear.
Smoke Blending Technique:
Set smoke layers to Screen blending mode. Screen mode makes black areas transparent while preserving lighter tones. Perfect for smoke integration.
Use layer masks (Layer > Layer Mask > Reveal All) to blend smoke edges smoothly. Paint with a soft black brush on the mask to hide areas. Paint with white to reveal them again.
Enhance Color Vibrancy
Your composition might look flat at this stage. Let’s fix that with adjustment layers.
Color Boost Strategy:
- Add a Hue/Saturation adjustment layer
- Increase saturation by 15-25%
- Add a Curves adjustment layer
- Create a slight S-curve for contrast
These adjustments make colors pop without looking oversaturated or artificial. The S-curve particularly adds punch by deepening shadows and brightening highlights.
Add the Bokeh Layer
Import your bokeh texture. Position it above everything else except your bird and smoke.
Settings for Bokeh:

- Blending mode: Screen
- Opacity: 20-40%
- Position: Concentrate toward edges
Bokeh adds visual interest in negative space. It fills empty areas without cluttering your focal point. Keep it subtle though. Too much bokeh overwhelms rather than enhances.
Refine Edge Details
Zoom in and examine your bird’s edges. Use a small, soft eraser to clean up any rough transitions between the bird and smoke elements.
Edge Softening:
Create a new layer. Sample colors from your bird and smoke using the Eyedropper (I key). Paint soft transitions where elements meet. This technique blends digital edges into something more organic.
Final Adjustments
Almost done. Now step back and evaluate your overall composition.
Final Tweaks:
- Adjust any layer opacities that feel too strong
- Fine-tune your color balance if needed
- Add a subtle vignette using Curves
- Sharpen your bird layer slightly (Filter > Sharpen > Smart Sharpen)
The vignette subtly darkens edges and reinforces center focus. Keep it gentle, around 10-15% opacity on a Curves adjustment layer.
Why This Technique Works
Blending modes transform simple shapes into complex graphics. But the real power comes from layering multiple effects thoughtfully.
Each element we added serves a specific purpose. The gradient provides depth. Textures add visual interest. Smoke creates movement. Bokeh fills space. Together they build something greater than individual parts.
Most importantly, this workflow stays flexible. Every element sits on its own layer, ready for adjustment. Change your mind about colors? Tweak one adjustment layer. Want different smoke? Swap the image without rebuilding.
That’s the beauty of non-destructive editing. You maintain creative freedom throughout the entire process.
Keep Experimenting
These settings work for my composition. Yours might need different values. So experiment with blending modes, opacities, and effects.
Try the same workflow with different subjects. A wolf. A geometric shape. Abstract forms. The technique adapts to whatever you’re creating.
Photoshop’s blending options offer nearly unlimited possibilities. You just discovered one pathway. Now explore and find your own combinations that create exactly what you envision.