
Want to create jaw-dropping fantasy art in Photoshop? This stone tiger composite tutorial shows you exactly how to blend textures, manipulate fire, and build professional-looking fantasy scenes.
You’ll learn practical techniques that work for any composite project. Plus, these methods apply to countless creative projects beyond this specific design.
Let’s break down how to transform a simple panther photo into an epic stone creature wreathed in mystical flames.
Gather Your Source Images First
Before touching Photoshop, collect your stock images. You’ll need a panther photo, rock textures, sky background, fire elements, and various stone textures.
Finding quality stock photos makes or breaks your composite. Look for high-resolution images with clear lighting. The panther should have visible details you can work with later.
Most stock sites offer free images for practice projects. Just remember to check usage rights if you plan to share your final work commercially.
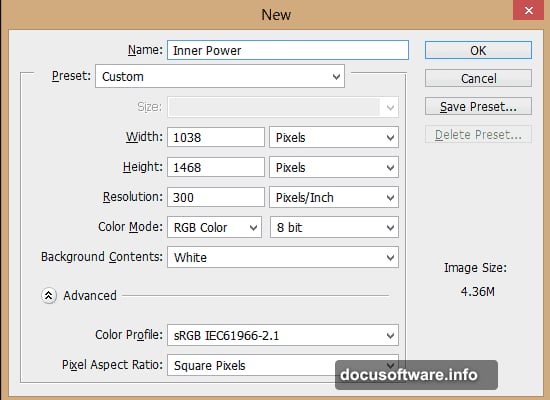
Set Up Your Canvas Properly
Start by creating a new document in Photoshop. Go to File > New and set dimensions to 1038px width by 1468px height. Set resolution to 300 pixels per inch for print-quality output.

Why these specific dimensions? This portrait orientation works well for vertical compositions. Plus, the high resolution ensures crisp details when you add textures later.
However, feel free to adjust canvas size based on your needs. These measurements simply provide a good starting point for this project.
Build Your Background Foundation
Place your sky stock image first by selecting File > Place. Photoshop automatically converts placed images to smart objects, which preserves quality during transformations.
Resize the sky to fill your canvas. Then place your rock formation image the same way. Name this layer “Rock Back” to keep your workspace organized.
Now comes the masking part. Select the Pen tool and set mode to “Path.” Carefully trace around the rock formation you want to keep.
Master the Pen Tool Selection
Right-click your path and choose “Make Selection.” Set Feather Radius to 1 pixel for slightly soft edges. This prevents harsh cutout lines that scream “amateur composite.”
In the Layers panel, click “Add layer mask” with your Rock Back layer selected. The mask hides everything outside your selection, leaving only the rock visible.
This non-destructive workflow lets you adjust the mask later. Never permanently erase pixels unless absolutely necessary.
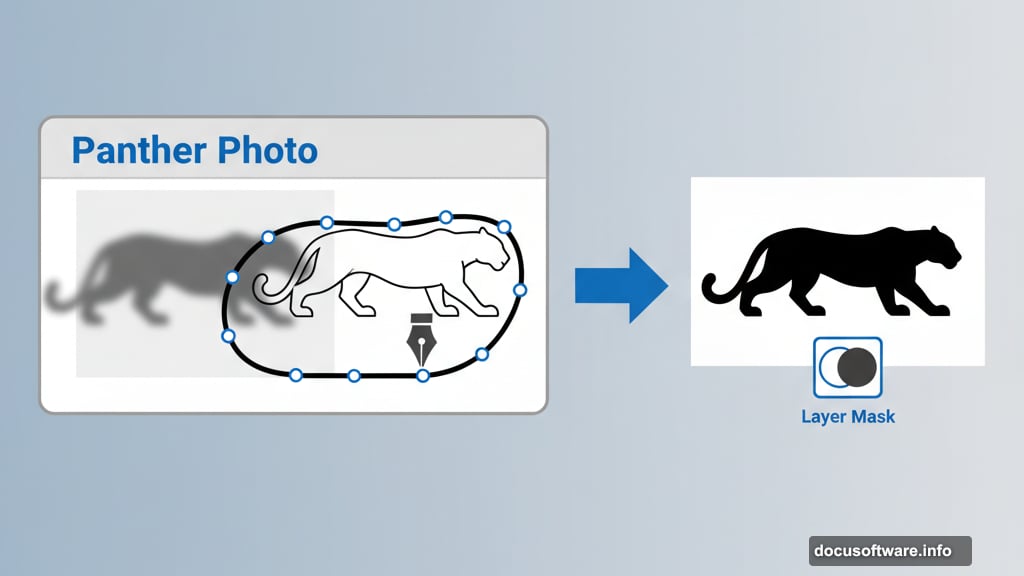
Extract Your Tiger Subject
Place the panther stock image next. Use the Pen tool again to trace carefully around the animal. Take your time here because this selection matters most.
Make your selection and add a layer mask. Your panther should now sit cleanly against the background without distracting elements.
If edges look too sharp, paint with a soft black brush on the mask. This softens transitions between subject and background organically.
Create Depth with Duplicate Rocks
Select your Rock Back layer and duplicate it by pressing Ctrl+J (Cmd+J on Mac). Move this duplicate layer above your tiger layer.
Flip it horizontally by going to Edit > Transform > Flip Horizontal. This creates additional rock elements that frame your composition differently.
Duplicate the rock layer again and rename it “Rock Shadow.” Move this layer under the main rock layer for depth.
Add Realistic Shadow Elements
Rasterize your Rock Shadow layer by right-clicking and selecting “Rasterize Layer.” Then go to Layer > Layer Mask > Apply to permanently merge the mask.
Right-click the Rock Shadow layer and select “Blending Options.” Enable Color Overlay with these settings: Normal blend mode, black color, 100% opacity.
Go to Filter > Blur > Box Blur and set radius to 10 pixels. Finally, lower the layer opacity to 50%. This creates a believable shadow that grounds your rocks.
Apply Stone Textures to the Tiger
Here’s where your composite gets interesting. Place your first stone texture above the tiger layer. Set the blend mode to Overlay or Soft Light.
Right-click the texture layer and choose “Create Clipping Mask.” This restricts the texture to only show on the tiger layer below. The texture won’t spill onto your background.
Experiment with different textures and blend modes. Multiply works great for darker, grittier stone. Screen brightens and adds highlights.
Blend Multiple Texture Layers

Don’t stop at one texture. Stack multiple stone textures with different blend modes and opacities. This creates depth and complexity that single textures can’t achieve.
Lower opacity on some layers to let underlying details show through. Use layer masks to hide textures from specific areas like eyes or teeth.
The goal is making the tiger look genuinely carved from stone, not just overlaid with a flat texture. Vary your approach across different body parts.
Paint in Light and Shadow
Create a new layer above your textured tiger. Set blend mode to Overlay. Paint with white where light hits and black where shadows deepen.
This technique sculpts your stone tiger with light. Focus on natural light direction from your sky background. Shadows should fall consistently across all elements.
Use a soft brush at low opacity. Build up lighting gradually rather than applying it all at once. Subtle changes look more convincing than dramatic ones.
Add Blue Fire Elements
Now for the dramatic fire. Place your first fire stock image and position it near the tiger. Set blend mode to Screen to make black areas disappear.
Use Color Balance or Hue/Saturation adjustment layers to shift fire from orange to blue. Clip these adjustments to only affect the fire layer below.
Duplicate and position multiple fire elements around your tiger. Vary their sizes and opacities for natural-looking flames that don’t all look identical.
Enhance Fire with Additional Elements
Layer different fire stocks together using Screen blend mode. This creates more complex, dynamic flames than single images provide.
Mask away fire sections that don’t fit. Paint black on layer masks to hide portions while keeping others visible. This gives you total control over flame placement.
Add slight motion blur to some fire layers. Go to Filter > Blur > Motion Blur with small angle and distance settings. This suggests movement without overdoing it.
Match Colors Across Elements
Create a Color Lookup adjustment layer at the top of your layer stack. Try different presets until you find one that unifies your color palette.
Lower the Color Lookup opacity if the effect feels too strong. Subtle color grading beats heavy-handed adjustments every time.
Add a Curves adjustment layer to fine-tune brightness and contrast. Lift shadows slightly and pull down highlights for a more stylized fantasy look.
Polish with Final Adjustments
Add a subtle vignette by creating a new layer, filling it with black, and masking the center. Set blend mode to Soft Light at 20-30% opacity.
Create a Sharpening layer by merging all visible layers to a new layer (Ctrl+Alt+Shift+E). Apply Smart Sharpen filter carefully. Don’t oversharpen or your composite looks unnatural.
Finally, add a subtle noise texture over everything. This helps disparate elements feel like they belong in the same photograph.
Common Mistakes to Avoid
Don’t rush your pen tool selections. Sloppy masks immediately reveal amateur work. Take time to trace accurately around complex areas.
Avoid over-texturing your subject. Too many texture layers at full opacity creates muddy, unclear details. Less often means more in compositing work.
Watch your light direction. If light comes from the right in your background, it should hit subjects from that same direction. Inconsistent lighting breaks immersion instantly.
Export Your Final Composite
Save your working file as a PSD to preserve all layers. Then export a flattened version as high-quality JPG for sharing online.
For print work, export as TIFF or high-quality PNG. Remember that 300 DPI resolution matters for physical output but wastes file size for web-only use.
Keep your layered file organized with clear names. Future you will thank present you when you need to make adjustments later.
Take These Techniques Further
These methods apply far beyond stone tigers. Try applying textures to other animals or objects. Experiment with different color schemes for fire elements.
Practice makes perfect with compositing. Your first attempts might look rough. But each project teaches you something new about blending elements convincingly.
Start building a library of textures and stock images for future projects. Quality source materials save countless hours compared to searching during active projects.
The real magic happens when you stop following tutorials exactly and start making creative decisions yourself. Use these techniques as your foundation, then push boundaries to develop your unique style.
Post Title: Create Stone Tiger Photoshop Composite with Blue Flames
Meta Description: Want to create jaw-dropping fantasy art in [Photoshop](https://www.adobe.com/products/photoshop.html)? This stone tiger composite tutorial shows you exactly how to blend