
Want to make a fish leap out of a glass with dramatic water splashes? This advanced Photoshop technique combines photo manipulation, custom brushes, and layer blending to create a stunning surreal image.
Most photo manipulation tutorials skip the hard parts. Not this one. We’ll tackle realistic water physics, bubble effects, and seamless compositing. Plus, you’ll learn techniques that work for any liquid manipulation project.
Expect to spend 1-2 hours on this tutorial. But the skills you gain apply to countless other creative projects.
What You’ll Need Before Starting
First, gather your resources. You can’t build this effect without the right stock images and brushes.
Required Stock Images:
- Water textures (background and detail shots)
- Glass container on neutral background
- High-resolution goldfish photo
- Hand holding object (for composition)
- Water bubble overlays
Essential Photoshop Brushes:
- Water splash brush pack
- Liquid droplet brushes
- Bubble scatter brushes
Download everything before opening Photoshop. Trust me. Stopping mid-project to hunt for resources kills creative momentum.
Also, make sure you’re working in Photoshop CS2 or newer. Older versions lack some blending modes we’ll need later.
Set Up Your Canvas Properly
Document setup matters more than most beginners realize. Wrong settings create problems that surface hours into your work.
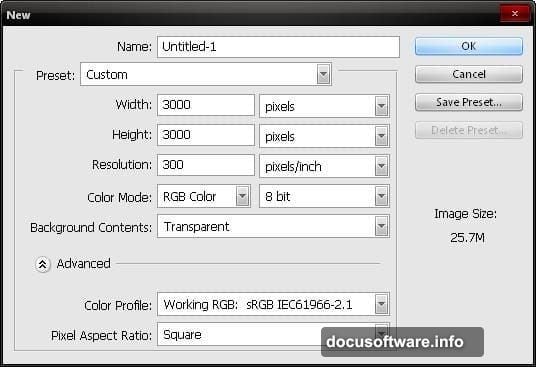
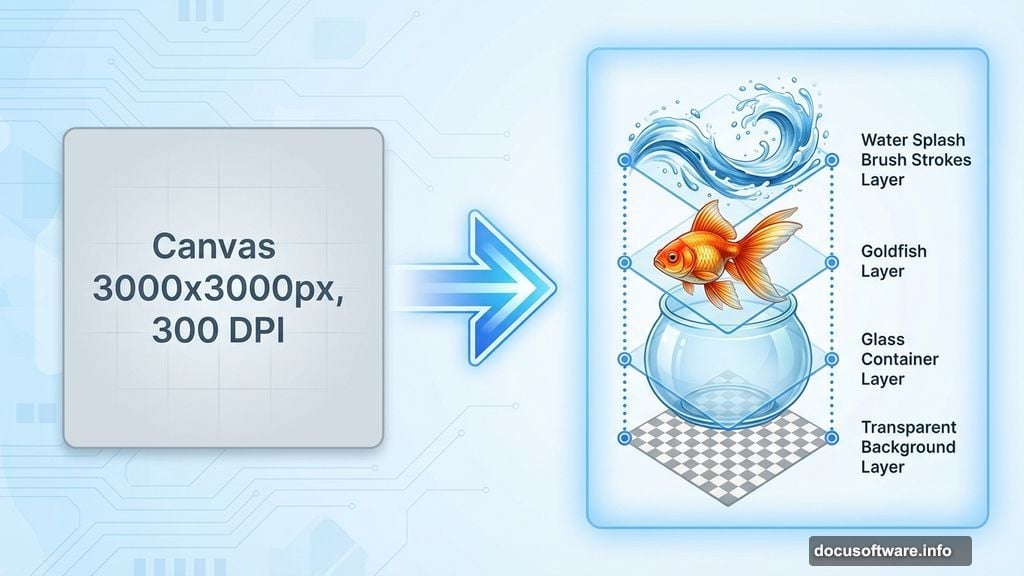
Create a new document with these exact specifications:
- Width: 3000 pixels
- Height: 3000 pixels
- Resolution: 300 DPI
- Color Mode: RGB, 8-bit
- Background: Transparent
Why so large? High resolution gives you flexibility. You can crop, scale, and adjust without losing quality. Plus, print options stay open if you want physical copies later.
The transparent background prevents white halos around composited elements. That alone saves hours of cleanup work.
Build Your Base Scene
Now we construct the room and glass setup. This forms the foundation everything else builds on.
Open your glass stock image. Use the Move Tool (V) to drag it onto your canvas. Then activate Free Transform (Ctrl/Cmd + T) to position and scale it.
Here’s where it gets interesting. The glass probably doesn’t fill your canvas. So we’ll stretch the background intelligently.
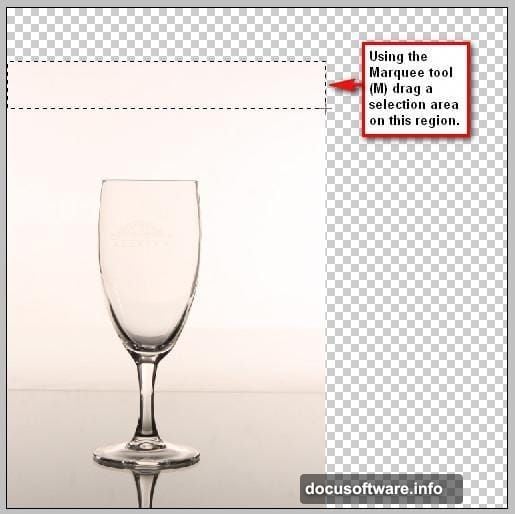
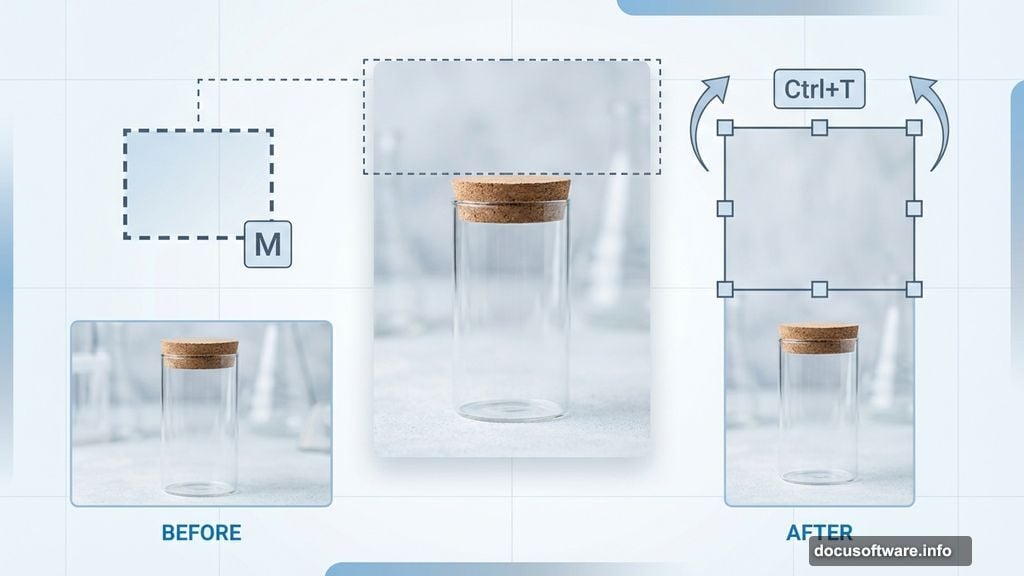
Grab the Rectangular Marquee Tool (M). Select the top portion of the background above the glass. Activate Free Transform again and stretch that selection upward. This extends the background without distorting the glass itself.
Repeat this process for the sides if needed. Select background sections, transform them outward, and blend the seams. The goal is filling your canvas while keeping the glass sharp and undistorted.
Cool Down the Color Temperature
Raw stock photos rarely match your creative vision. This image probably looks too warm and yellow. But we’re adding water and splashes. Those elements demand cooler, bluer tones.

Create a Hue/Saturation adjustment layer. Find the adjustment layer button at the bottom of your Layers panel. Click it and select Hue/Saturation from the menu.
Reduce saturation by roughly 20-30 points. Then shift the hue slider slightly toward cyan. The exact values depend on your specific stock image. But the principle stays constant: cool tones suggest water better than warm ones.
Also, adjustment layers are non-destructive. You can tweak these values anytime without permanently altering pixels. That flexibility proves invaluable during later refinement stages.
Position Your Fish Perfectly
Import your goldfish stock image. This becomes the star of your composition. So placement and scaling matter enormously.
Use the Move Tool to drag the fish onto your canvas. Position it so it appears to be mid-jump, just emerging from the glass. The fish should overlap the glass rim slightly but not too much.
Activate Free Transform to rotate and scale the fish. Aim for a dynamic angle that suggests upward motion. Perfectly horizontal fish look static and boring. Instead, angle it 15-20 degrees for energy.
Pay attention to the fish’s tail position. The tail should still be near the water surface. This sells the illusion that the fish just launched itself upward. If the entire fish clears the glass, the jump looks less believable.
Create Realistic Water Inside the Glass
Empty glasses don’t work for this effect. We need convincing water with depth, color variation, and surface tension.
Import your water texture image. Place it behind the glass layer in your layer stack. Then use Free Transform to scale and position it so it fills the glass interior.
Next, create a layer mask on the water texture layer. Paint black on the mask everywhere the water shouldn’t appear—basically outside the glass boundaries. This confines the water to the glass shape.
Now blend the water naturally. Reduce the water layer’s opacity to 70-80%. Then experiment with blend modes. Multiply often works well. Screen can lighten things nicely too. Find what looks most realistic for your specific images.
Add subtle highlights near the glass rim. Create a new layer, paint white with a soft brush at low opacity, and set the blend mode to Overlay or Soft Light. This mimics how light refracts through water surfaces.
Add Bubble Details for Depth
Real water contains bubbles. Small ones cluster near surfaces. Larger ones float through the liquid volume. Without bubbles, your water looks flat and fake.
Import your bubble stock image. Place it above the water texture layer. Scale and position bubbles throughout the water volume. Don’t place them uniformly. That looks artificial. Instead, cluster some near the fish, scatter others randomly.
Vary bubble sizes using Free Transform. Mix tiny bubbles with larger ones. Natural water always contains multiple bubble scales simultaneously.
Set the bubble layer to Screen blend mode. This makes dark areas transparent while keeping white bubble highlights bright. Perfect for bubble integration.
Create duplicates of your bubble layer if you need more. Flip them horizontally or vertically to avoid obvious patterns. Then reduce opacity on some duplicate layers for depth variation.
Paint Dynamic Water Splashes
Here’s where custom brushes become essential. Download high-quality water splash brushes before this step.
Create a new layer above your fish layer. Name it “Splashes.” This keeps your work organized as layers multiply.
Select your water splash brush. Adjust brush size with the bracket keys. Then paint splashes around the fish—especially near where the fish breaks the water surface.
Vary your approach for realism:
- Paint large dramatic splashes near the jump point
- Add smaller droplets radiating outward
- Include mist and spray at the edges
- Layer multiple splash strokes for complexity
Don’t overdo it initially. Start subtle. You can always add more. But removing excess splashes gets tedious.
Adjust splash layer opacity around 70-80%. Full opacity looks too heavy. Slight transparency integrates splashes better with the scene.
Blend Everything Together Seamlessly
Individual elements look great. But they need to feel like one cohesive image. That requires careful blending and adjustment.
First, match colors across all elements. Create a Color Balance adjustment layer affecting all layers. Shift highlights toward cyan and blues. Push shadows slightly toward blue too. This unifies the color palette.
Next, add overall contrast. Create a Curves adjustment layer. Pull the curve into a subtle S-shape. This deepens shadows, brightens highlights, and makes the image pop.
Consider adding a subtle vignette. Create a new layer filled with white. Apply a black Layer Mask. Then paint white in the mask’s center with a large soft brush. Set this layer to Multiply at 20% opacity. This darkens edges subtly, drawing eyes toward your fish.
Finally, sharpen selectively. Create a merged copy of all visible layers (Ctrl/Cmd + Shift + Alt + E). Apply a Smart Sharpen filter. Then mask the sharpening away from soft elements like distant splashes. This adds punch to your fish while keeping backgrounds soft.
Refine Details Until It Feels Real
Great photo manipulation comes down to small details most people miss. But those details make the difference between “good” and “incredible.”
Check your fish’s edges carefully. Use a small soft eraser at low opacity to blend any harsh cutout edges. The fish should blend naturally into splashes and water.
Add reflected light under the fish. Real objects reflect color onto nearby surfaces. Create a new layer, paint subtle blue-green under the fish’s belly, and set it to Overlay or Soft Light at low opacity.
Examine splash directions. Water physics follows predictable patterns. Splashes should arc realistically based on the fish’s movement vector. If something looks wrong, repaint those splashes with more natural trajectories.
Look for lighting inconsistencies. The fish, glass, and water should all respond to the same light source. Add highlights and shadows as needed to unify the lighting.
Why This Technique Matters Beyond Fish
Sure, you just created a surreal fish jumping scene. But these skills transfer everywhere.
The masking techniques work for any photo composite. The water creation process applies to rain, floods, or underwater scenes. Custom brush usage improves countless creative projects.
Plus, you learned non-destructive editing through adjustment layers. That workflow accelerates all Photoshop work while maintaining flexibility.
Most importantly, you practiced seeing reality—water physics, light behavior, natural compositions. Those observation skills matter more than any specific tool or technique.
Keep practicing. Try variations—different fish, different containers, different splash patterns. Each iteration teaches you something new.
Photo manipulation rewards patience and attention to detail. But the results speak for themselves. Your portfolio just got significantly more impressive.