
Want to build a stunning hourglass without any stock images or pre-made assets? This tutorial shows you exactly how to create one using pure Photoshop techniques.
You’ll learn skills that go way beyond just making an hourglass. These techniques work for any glass object, realistic shadows, and custom textures. Plus, the methods here apply to tons of design projects you’ll tackle later.
The finished piece looks professional enough for print or web design. And you can customize every detail to match your specific needs.
What Makes This Tutorial Different
Most hourglass tutorials rely on photos or pre-made shapes. Not this one. You’ll build everything from basic rectangles and paths.
That means you understand each step. You can modify the design however you want. And you’ll gain skills that transfer to other projects immediately.

The techniques work in Photoshop CS3 and newer versions. So even if you’re running older software, you’re covered.
Setting Up Your Workspace
First, create a new file in Photoshop. Go to File > New and use these settings for best results. Save it as “Hourglass.psd” right away.
Get in the habit of hitting Ctrl/Cmd + S frequently. Photoshop crashes happen. Regular saves prevent losing hours of work.
Next, open the Info Panel by selecting Window > Info. This panel helps you create precise shapes without guessing measurements.
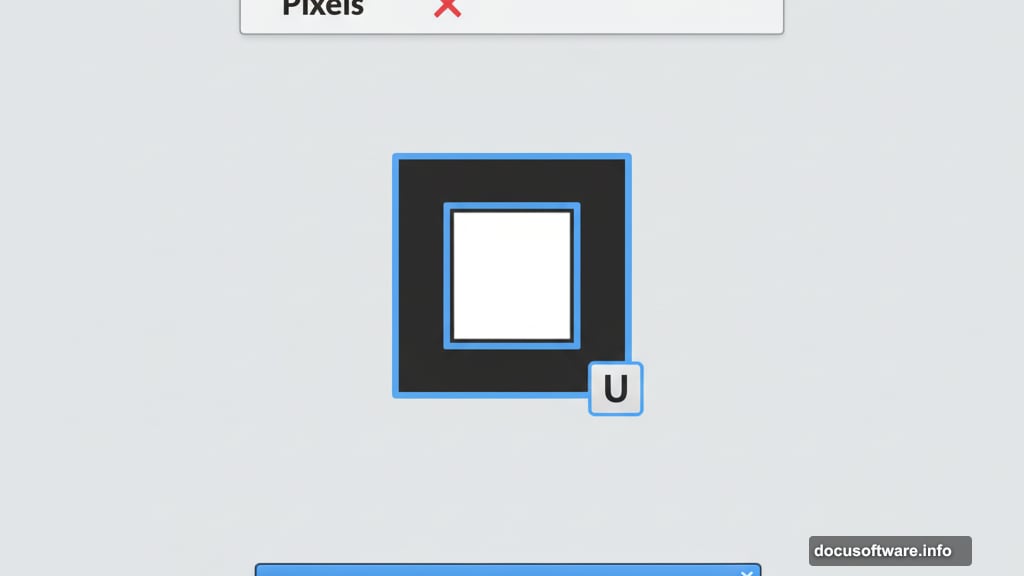
Click the “+” sign next to the X and Y coordinates in the Info Panel. Select Pixels as your unit. This ensures accuracy throughout the tutorial.
Building the Glass Shape

Select the Rectangle Tool from your Toolbox. Set your foreground color to #808080 (medium gray). This neutral color makes it easier to see shadows and highlights later.
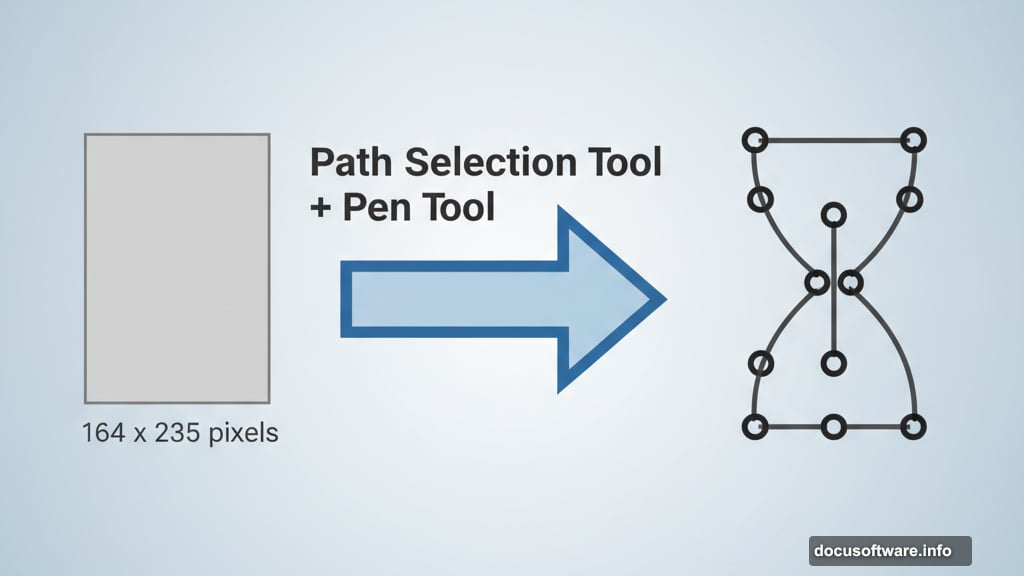
Go to the Option Bar at the top. Make sure “Path” is selected instead of “Shape” or “Pixels”. Then drag a rectangle measuring 164 x 235 pixels.
Rename this layer to “Glass upper” in your Layers Panel. Clear naming saves confusion later when you’re managing multiple layers.
Now comes the interesting part. Take the Path Selection Tool and drag around your rectangle to select it. You’ll see four anchor points appear as solid black squares.
Shaping the Hourglass Curve
Switch to the Pen Tool. Add eight new anchor points along the rectangle’s edges by clicking on the path. These points let you reshape the straight edges into the curved hourglass form.

Place the points strategically. Two on each vertical side near the middle. Two on the top horizontal edge. Two on the bottom horizontal edge. This gives you control over the classic hourglass pinch.
After adding the points, you’ll need to adjust them to create smooth curves. The Direct Selection Tool helps you move individual points precisely. Drag them inward at the middle to create that distinctive hourglass narrowing.
Take your time with this step. The curve quality determines how realistic your final hourglass looks. Smooth, gradual curves beat sharp angles every time.
Adding Depth With Shadows
Realistic objects need shadows to look three-dimensional. Start by creating a new layer named “glass upper shadow edge 1”. This layer will hold your first shadow pass.
Load the selection of your glass shape. Then fill this selection with black. Don’t worry that it looks wrong initially. You’ll modify it next.
Apply a Gaussian Blur to soften the shadow edges. Hard-edged shadows look fake. Real shadows always have some softness based on light distance and surface texture.
Reduce the layer opacity to around 40-60%. This makes the shadow subtle instead of overwhelming. You can always adjust opacity later if needed.
Creating Glossy Glass Highlights
Glass reflects light in specific ways. Understanding this makes your hourglass convincing instead of flat.
Create a new layer for highlights. Use a soft white brush set to low opacity. Paint along the edges where light would naturally hit the glass surface.
Focus on the outer curves. Real glass catches light on its rounded surfaces. The hourglass pinch should have subtle highlights showing its three-dimensional form.
Layer these highlights carefully. Start with very low opacity and build up gradually. Too much highlight at once looks artificial and hard to fix.
Building Custom Sand Texture
The sand inside your hourglass needs texture to look real. Photoshop’s Noise filter creates this perfectly.
Make a new layer and fill it with a tan or beige color. Then go to Filter > Noise > Add Noise. Use a moderate amount with Gaussian distribution selected.
This creates the grainy appearance of sand. Adjust the noise amount until it looks right for your hourglass size. More noise for a larger view. Less for smaller hourglasses.
You can add slight color variation by applying subtle gradients or color overlays. Real sand isn’t perfectly uniform in color. Small variations add believability.
Creating Wood Base Texture
The hourglass needs stands at top and bottom. Wood works great for this classic look.
Start with a brown base color that matches your design vision. Then apply Filter > Render > Fibers to this layer. The Fibers filter automatically creates wood grain patterns.
Adjust the Variance and Strength sliders in the Fibers dialog. Higher variance creates more dramatic grain patterns. Lower strength makes subtler wood texture.
After applying fibers, you might want to stretch or transform the texture slightly. Real wood grain runs in specific directions. Match your texture direction to how the wood would naturally sit.
Fine-Tuning Lighting and Shadows
Go back through your layers now. Look at how light and shadow interact across the entire hourglass.
Light sources should be consistent. If light hits the top-left of the glass, it should also hit the top-left of the wood bases. Inconsistent lighting destroys realism fast.
Add cast shadows where the hourglass contacts surfaces. The bases should cast shadows on whatever they’re sitting on. The upper glass portion might cast a faint shadow on the lower portion.
Subtle environmental reflections add extra realism. Glass reflects its surroundings. Adding hints of color or light from imagined nearby objects makes the hourglass feel placed in a real space.
Why These Techniques Matter Beyond This Project
You just learned fundamental skills for any Photoshop design work. Path manipulation with anchor points works for any shape you need to create.
The shadow and highlight techniques apply to every realistic rendering. Product mockups, character art, scene compositions—they all need proper lighting.
Custom texture creation using filters saves you from hunting for perfect stock images. You control every aspect. You can create exactly what your design needs.
These aren’t just hourglass techniques. They’re core Photoshop skills that improve every project you touch. Practice them here. Use them everywhere.