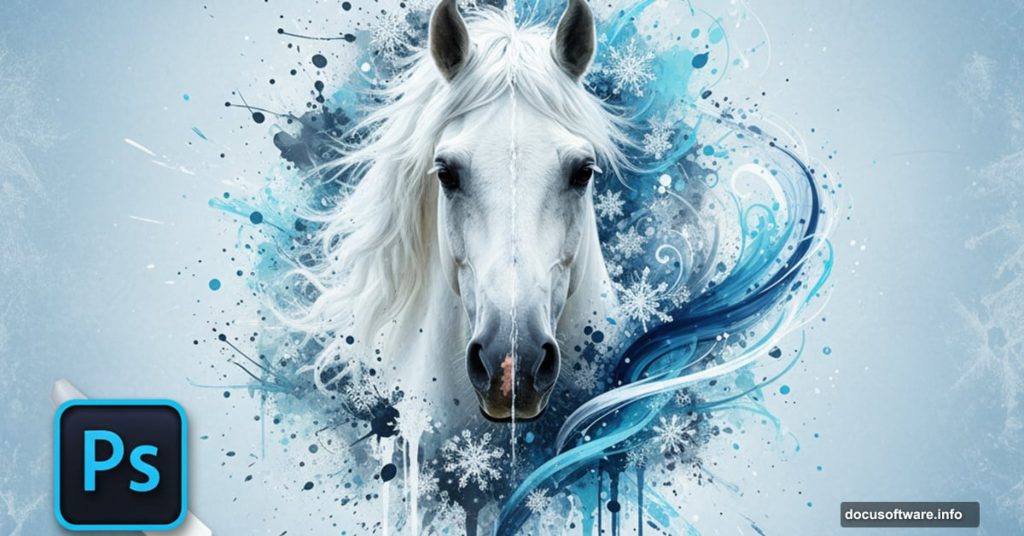
Want to transform a simple horse photo into a breathtaking artistic masterpiece? This detailed Photoshop tutorial walks you through creating a winter-themed illustration using custom brushes, blending techniques, and photo manipulation.
Plus, you’ll learn how to make your own ink splatter brushes from scratch. Even better, the tutorial includes raw scans and the full layered PSD file so you can follow along.
This guide assumes you already know basic Photoshop tools. But don’t worry. I’ll explain each technique clearly as we build this illustration step by step.
Build Custom Ink Splatter Brushes
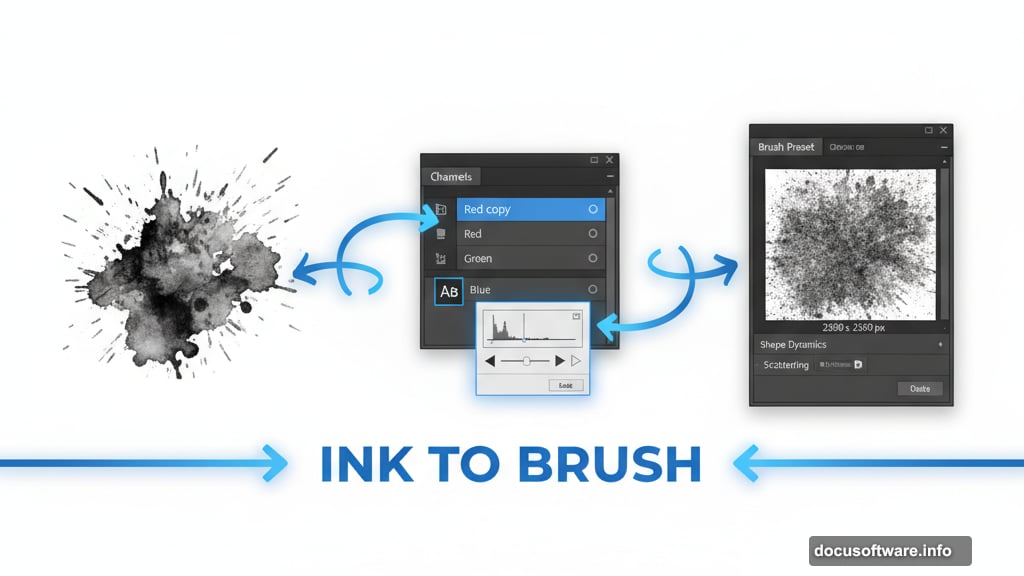
Creating custom brushes gives your work unique texture. Here’s how to turn ink scans into usable Photoshop brushes.
Start with a scanned ink splash image. Grab the Crop Tool (C) and hold Shift to select a square area. This keeps your brush proportions balanced.
Next, add contrast. Go to Layer > New Adjustment Layer > Black & White. Choose the “High Contrast Red Filter” preset. This separates your ink from the background.

Now switch to the Channels panel. Find the Red channel and right-click to duplicate it. Then navigate to Image > Adjustments > Levels. Move the sliders until your splatter appears dark black against pure white.
Extract Your Brush Shape
Load your selection by holding Ctrl and clicking the Red channel. Then invert it with Shift+Ctrl+I. This selects your ink splatter instead of the background.
Before moving on, make sure you select the RGB channel again. Switch back to the Layers panel and press Ctrl+J to cut your selection onto a new layer.
Clean up any unwanted spots with the Eraser Tool (E). You can also try the Magic Wand Tool or Color Range selection for different effects.
For best results, create your brush on a 2500x2500px canvas at 300dpi. Once you’re satisfied, go to Edit > Define Brush Preset. Save it with a memorable name so you can find it later.
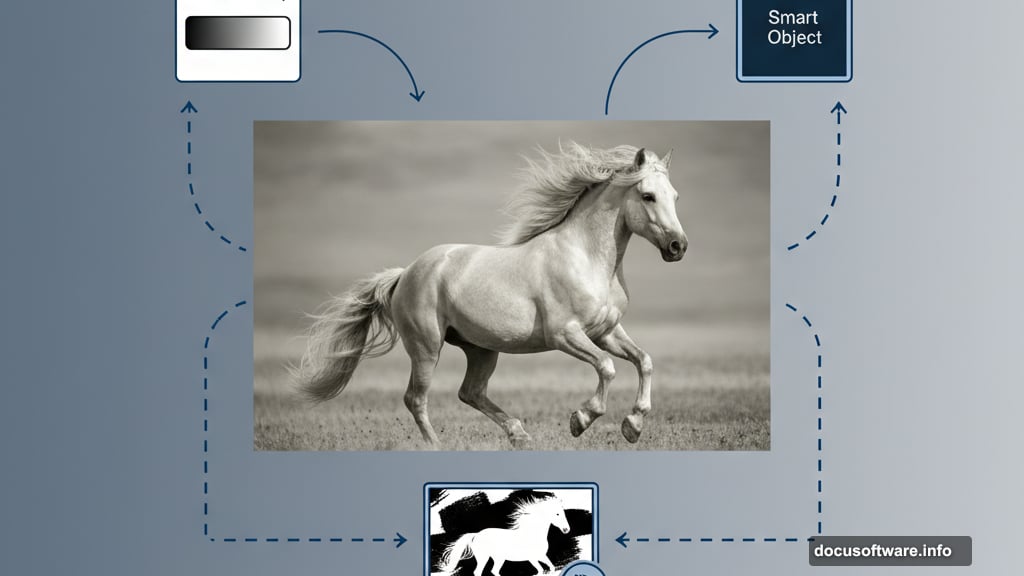
Set Up Your Canvas and Horse Base
Create a new document at your preferred size. Then add your horse photo to the canvas.
Apply a black to white gradient map by going to Layer > New Adjustment Layer > Gradient Map. This creates a monochromatic base that’s easier to work with.
Right-click your horse layer and choose “Convert to Smart Object.” This lets you make non-destructive edits later.
Add Depth with Shadow Adjustments
Go to Image > Adjustments > Shadow/Highlights. This brings out detail in both dark and bright areas of your horse.
Adjust the shadows and highlights until the horse has good tonal range. You want visible detail throughout the image without looking flat.
Click the “Add layer mask” icon at the bottom of your Layers palette. Select the Brush Tool (B) and paint with black (#000000) to refine your mask. Use a soft brush at 50% opacity for smooth transitions.
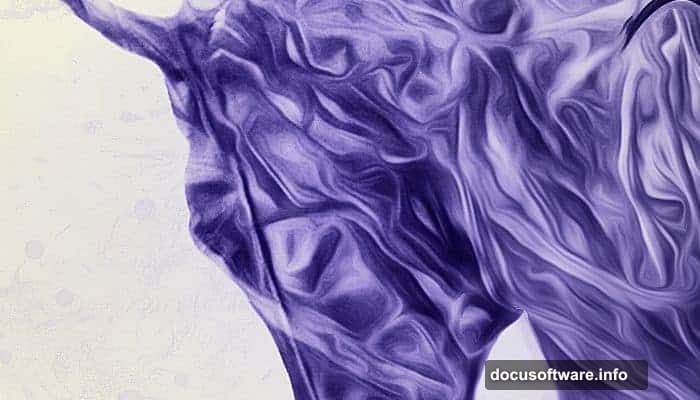
Blend Texture Elements into the Horse
This technique creates that signature artistic look. You’ll merge natural textures directly into the horse’s body.
Press and hold Ctrl/Cmd while hovering your cursor between layers. You’ll see a clipping mask icon appear. Click it to apply your texture layer only to the horse below.
If you’re using Photoshop CS6 or newer, there’s an alternative method. Select your texture layer with the Polygonal Lasso Tool. Make a selection around the horse shape.
Open your roots or texture image. Press Ctrl/Cmd+A to select everything, then Ctrl/Cmd+C to copy. Back on your main canvas, go to Edit > Paste Special > Paste Into. Your texture appears only within the horse selection.
Layer Multiple Textures for Richness
Don’t stop at one texture. Stack multiple elements like roots, branches, and organic shapes. Each layer adds visual complexity.
Adjust blend modes for each texture layer. Try Multiply, Overlay, or Soft Light. These modes determine how textures interact with the horse underneath.
Lower the opacity on some layers to create subtle effects. Not every texture needs to be bold. Sometimes a hint of texture at 30% opacity works better than full strength.
Add Atmospheric Effects with Custom Brushes
Remember those ink splatter brushes you created earlier? Now’s the time to use them.
Create a new layer above your horse. Select your custom brush and adjust the settings. Enable Shape Dynamics and Scattering to make each brush stroke unique.
Paint splashes and splatters around the edges of your horse. Vary the size and opacity to create depth. Smaller, lighter splatters work well in the background while bolder marks add drama to focal points.
Build a Winter Atmosphere
Add a water or ice texture for the background. Place it behind your horse layers. Adjust the levels or curves to match your overall color scheme.
Create snow effects with white brush strokes at low opacity. Layer them gradually instead of painting at full strength. This builds realistic falling snow.
Add a slight blue color cast to emphasize the winter theme. Use a Color Balance adjustment layer and push the shadows toward cyan and blue. Keep highlights neutral or slightly warm for contrast.
Final Touches and Polish
Zoom out and evaluate your composition. Look for areas that need more contrast or refinement.
Add a Sharpen layer at the top of your layer stack. Use the Sharpen Tool set to Luminosity mode with a soft brush. This enhances details without creating harsh edges.
Consider adding a subtle vignette. Create a new layer, fill it with black, and use a layer mask to fade the edges. This draws the viewer’s eye toward your horse.
Save multiple versions as you work. Keep a master PSD with all layers intact. Then flatten a copy for sharing online.
Your Turn to Create
This technique works with any subject, not just horses. Try it with portraits, landscapes, or abstract compositions. The combination of textures, custom brushes, and careful blending creates that professional artistic look.
The key is experimentation. Don’t be afraid to try different textures or adjust blend modes until something clicks. Sometimes happy accidents produce the best results.
Download the tutorial resources and start practicing. The more you work with custom brushes and texture blending, the faster you’ll develop your own style. Soon you’ll be creating breathtaking illustrations without following tutorials step by step.
Post Title: Winter Horse Photoshop Tutorial: Artistic Illustration
Meta Description: Want to transform a simple horse photo into a breathtaking artistic masterpiece? This detailed [Photoshop](https://www.adobe.com/products/photoshop.html) tutorial walks you