Creating surreal photo manipulations in Photoshop feels like magic. You take ordinary images and transform them into impossible scenes that capture imagination.
This tutorial walks you through building a complete fantasy landscape floating above clouds. We’ll combine multiple stock images, blend them seamlessly with adjustment layers, and add atmospheric lighting that sells the illusion.
The best part? You don’t need advanced skills. Just patience and willingness to experiment with layer masks and blending modes.
Gather Your Source Images First
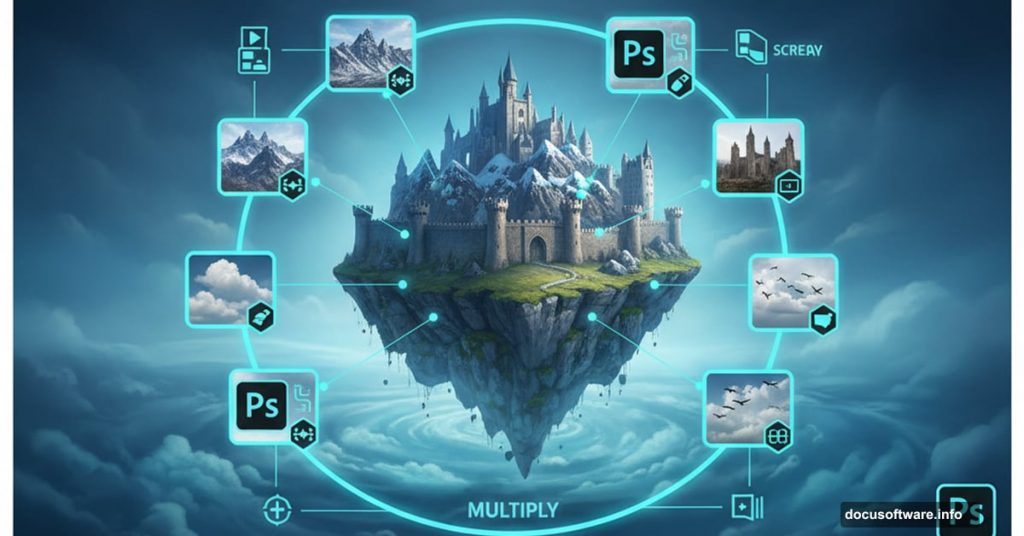
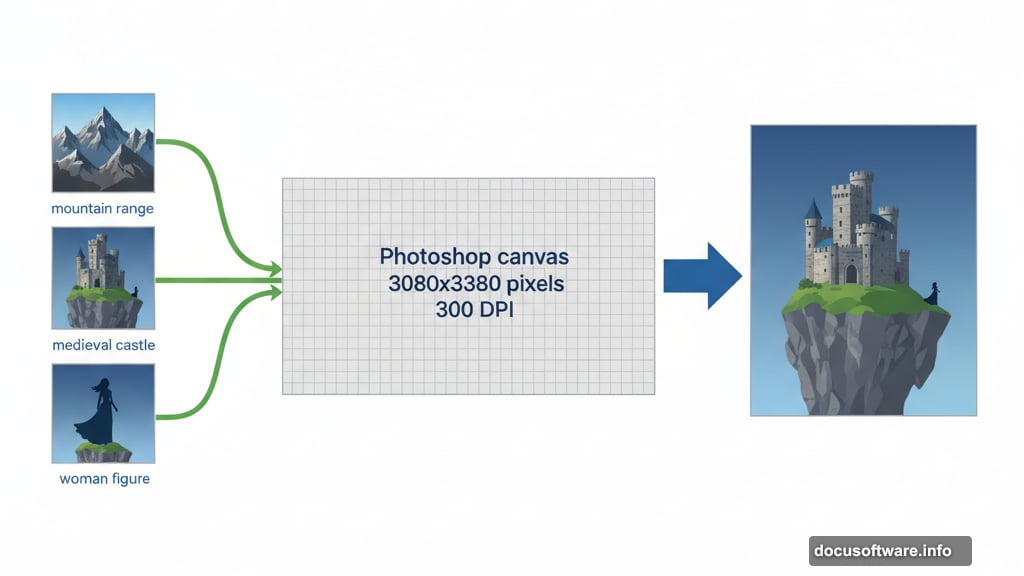
Before opening Photoshop, collect all the elements you’ll need. This tutorial requires seven key resources: cloudscape background, mountain range, windmills, medieval castle, woman figure, flying birds, and seagulls.
Download high-resolution versions of each. Low-quality images won’t scale well and will look pixelated in your final composition. Aim for at least 3000 pixels on the longest side.
Also grab cloud brushes and ray brushes. These help add atmospheric effects later. Many free brush packs exist online if you don’t already have them in your toolkit.
Set Up Your Canvas Properly
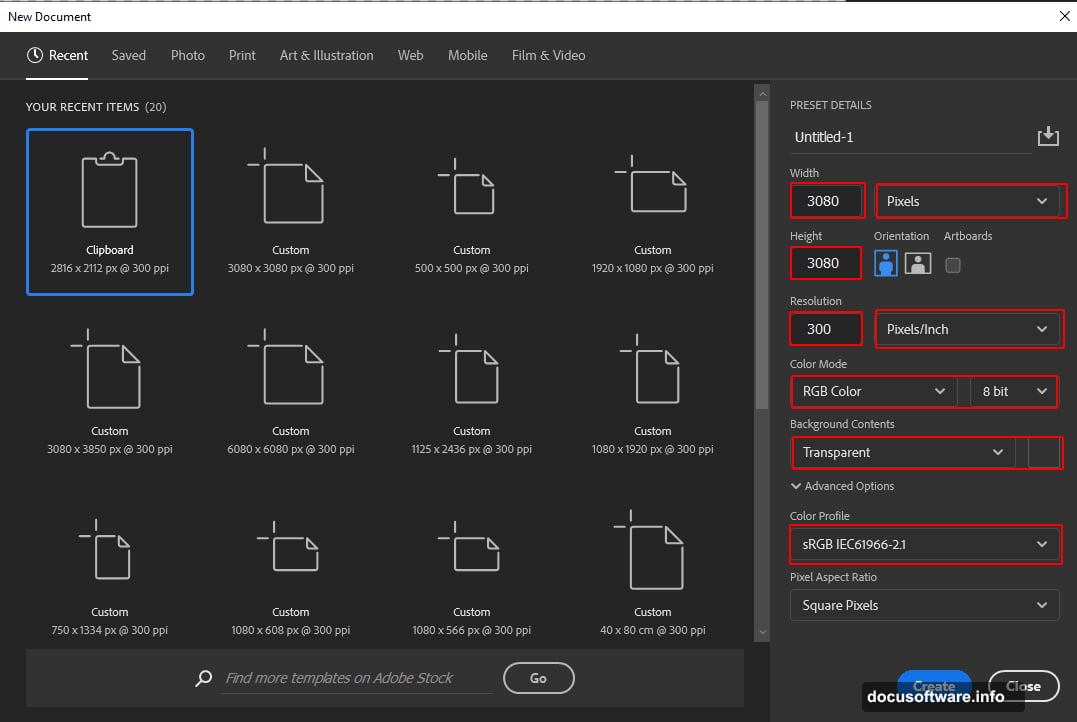
Create a new document in Photoshop. Go to File > New and use these settings: 3080 x 3080 pixels at 300 DPI resolution. Choose RGB color mode with 8-bit depth. Set background to transparent.
Why these dimensions? Square format works great for Instagram and portfolio presentations. Plus, the high resolution lets you print the final piece if desired.
The transparent background gives you flexibility. You can always add color later if needed. But starting transparent makes compositing cleaner.
Build the Sky Foundation
Place your cloud background first. Go to File > Place and select the cloudscape image. Position it with the Transform tool (Ctrl/Cmd + T).
Here’s a key tip: Hold Alt + Shift while dragging corner handles to scale proportionally from the center. In Photoshop CC, just Alt works. This keeps your clouds from getting distorted.
Rasterize the layer once positioned correctly. Now add three adjustment layers to color grade the sky.
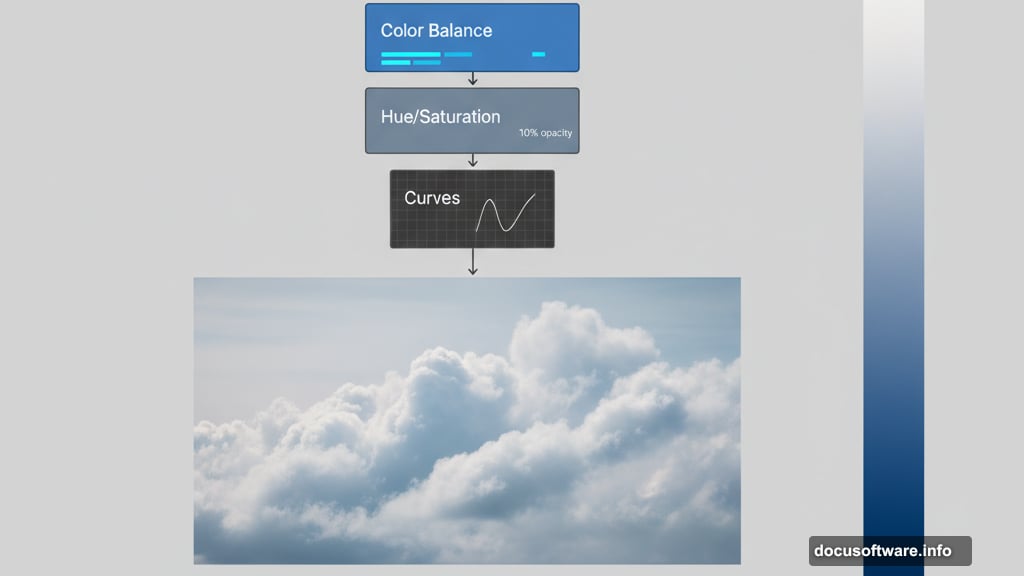
Color Balance Your Clouds
Add a Color Balance adjustment layer above the clouds. Push the midtones slightly toward cyan and blue. This creates that dreamy, otherworldly atmosphere fantasy scenes need.
Don’t go overboard. Subtle shifts work better than dramatic changes. The goal is enhancing mood without making clouds look unnatural.
Next, add a Hue/Saturation adjustment layer. Set its opacity to just 10%. Reduce saturation slightly to desaturate the sky. Overly vivid clouds distract from the fantasy elements you’ll add later.
Deepen Shadows with Curves
Add a Curves adjustment layer. Pull down the midtones and shadows slightly. This adds depth and contrast to your cloudscape.
The curve should form a gentle S-shape. Darken shadows a bit, keep midtones mostly neutral, and maybe brighten highlights just slightly. This creates dimension in the clouds.
These three adjustments work together. Color Balance sets the tone, Hue/Saturation controls intensity, and Curves adds depth. Together they create the perfect foundation.
Add Distant Mountains
Place your mountain range image next. Use File > Place again, then scale and position the mountains along the horizon line where clouds meet sky.
Mountains should sit naturally in the scene. Too high and they float awkwardly. Too low and they disappear into clouds. Find that sweet spot where they emerge from the cloud layer.
Now create a layer mask on the mountains. Press Ctrl/Cmd + I to invert it to black. This hides everything initially.
Blend Mountains into Clouds
Select a soft round brush with white foreground color. Paint on the layer mask to reveal mountains gradually. Focus on the peaks first, letting lower elevations fade into clouds.
This technique creates that magical effect where mountains emerge from mist. It’s more convincing than hard edges. Reality gets hazy at great distances, especially through clouds.
Vary your brush opacity as you work. Use 100% for solid mountain peaks, then lower opacity for areas that should fade. This gives you precise control over the blending.
Position the Windmills
Place your windmill image next. These add scale and a touch of civilization to your fantasy landscape. Position them on a cloud formation in the mid-ground.
Scale them appropriately. Windmills should be smaller than mountains but large enough to read clearly. They’re middleground elements, so size matters for depth perception.
Create a layer mask, invert it to black, and paint with white to reveal only the windmills. Remove any background from the original image. Clean edges matter here since windmills sit against sky.
Adjust Windmill Opacity
Set the windmill layer opacity to 95%. This subtle transparency helps them integrate into the atmospheric perspective of the scene.
Objects in the distance appear slightly hazy due to atmospheric scattering. That 5% transparency mimics this natural phenomenon. Small details like this separate good composites from great ones.
Also, windmills might need their own adjustment layers. Consider adding slight blue tint to match the sky’s color temperature. They should feel like they belong in this world, not pasted on top.
Add the Fantasy Castle
Now for the star of your composition. Place the castle image and scale it large. This becomes your focal point, so give it prominent placement.
Position the castle on a substantial cloud formation. It needs to feel grounded, not floating randomly. Find clouds with enough visual weight to support a structure.

Mask the castle carefully. This takes time but pays off. Use a hard-edged brush for stone walls and towers. Switch to softer brushes for areas where castle meets clouds. That transition is critical for believability.
Integrate Your Character
Place the woman figure next. Position her on a cloud platform or castle rampart. She provides scale and human interest to your fantasy scene.
Careful with proportions here. Your character’s size relative to the castle and other elements tells viewers how to read the space. Too small and she disappears. Too large and scale breaks down.
Mask the figure precisely. Hair and clothing edges need special attention. Use the Refine Edge tool if needed to capture fine details. Sloppy masking ruins the illusion instantly.
Add Flying Birds for Life
Place your bird and seagull images scattered through the composition. Birds add motion and help establish scale at different depths.
Vary their sizes. Birds closer to the viewer should be larger. Birds in the distance become tiny specks. This reinforces atmospheric perspective and depth.
Consider adding slight motion blur to some birds. Filter > Blur > Motion Blur with low settings suggests flight. Experiment with blur angle to match their flight direction.
Create Atmospheric Lighting
Now add your light source. Create a new layer set to Screen blending mode. Use a large soft brush with warm yellow color to paint where sunlight breaks through clouds.
Start subtle. Build up light gradually with multiple brush strokes at low opacity. This gives you control and looks more natural than one heavy application.
Add ray brushes on another Screen mode layer. These light rays streaming through clouds sell the dramatic atmosphere. Place them coming from your main light source direction.
Final Color Grading
Almost done. Add one more Curves adjustment layer affecting all layers below. This unifies the entire composition with final color grading.
Push the curve slightly to add contrast. Maybe warm up highlights or cool down shadows. Small adjustments here tie everything together visually.
Consider adding a Photo Filter adjustment layer. Warming Filter (85) at low density adds golden hour magic. Or use Cooling Filter (80) for moodier atmosphere.
Apply Camera Raw Filter
For the finishing touch, flatten your image or create a stamped layer (Ctrl/Cmd + Alt + Shift + E). Then go to Filter > Camera Raw Filter.
Increase Clarity slightly to add definition. Boost Vibrance rather than Saturation for more natural color enhancement. Add a touch of Dehaze if clouds look too soft.
Play with the tone curve in Camera Raw. This final adjustment lets you fine-tune contrast and color balance across the entire composition. Don’t overdo it. Subtle refinements work best.
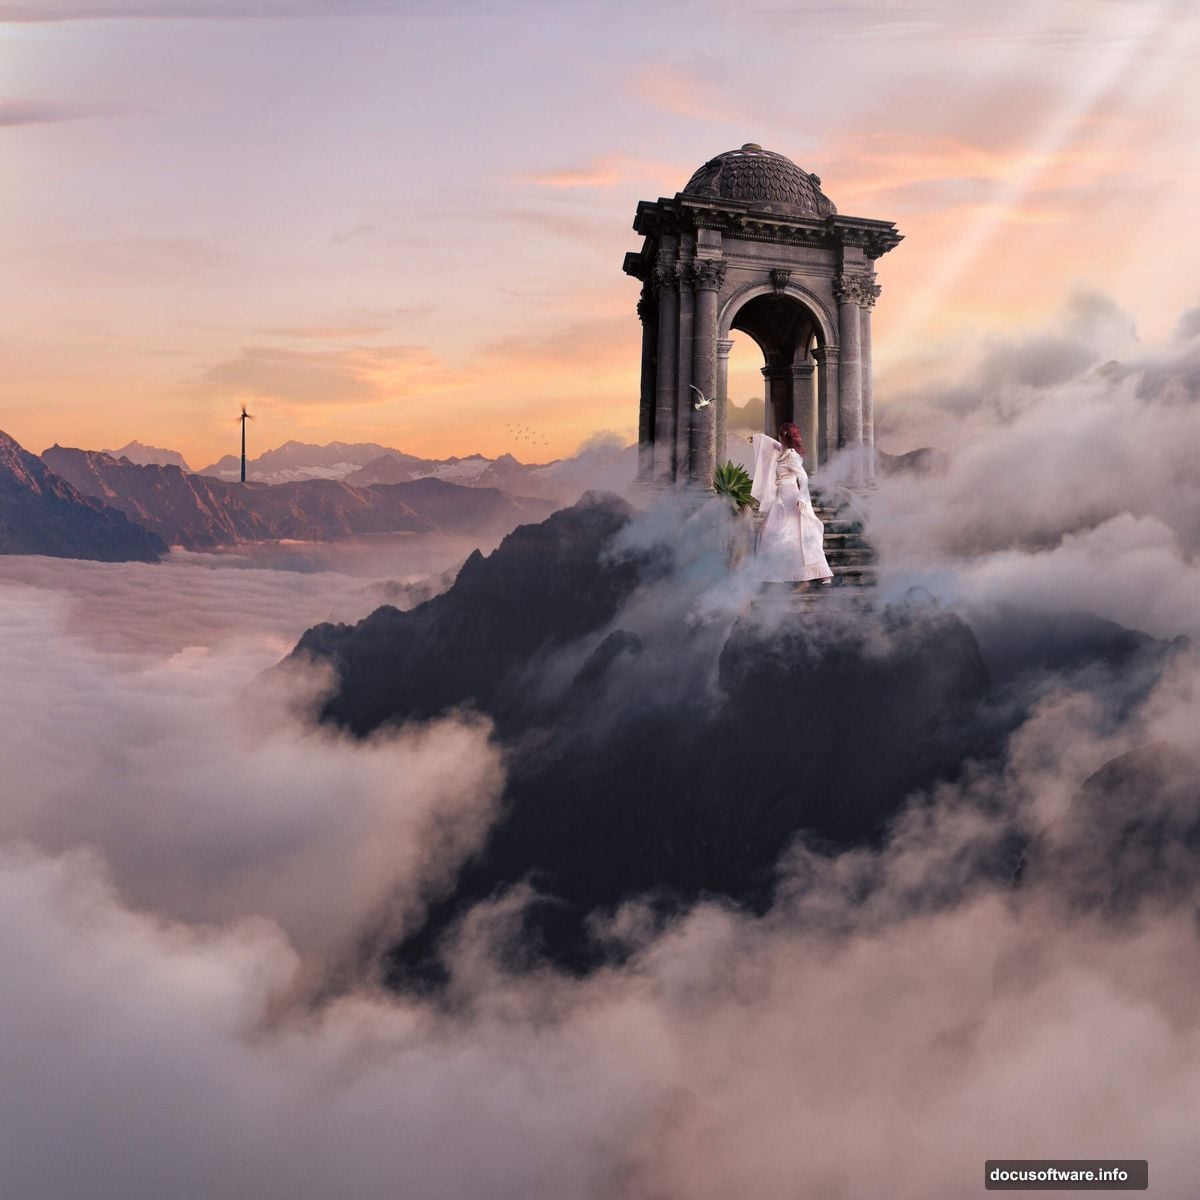
Your fantasy place above the clouds is complete. The combination of careful masking, thoughtful adjustment layers, and atmospheric lighting transforms disparate stock images into a cohesive magical scene.
Save your PSD file with all layers intact. You never know when you’ll want to revise something. Also export a high-resolution JPG or PNG for sharing online.
Fantasy photo manipulation requires patience more than technical wizardry. Take time with your masks. Build atmosphere gradually with adjustment layers. Pay attention to light direction and color consistency.
The techniques here apply to countless fantasy scenes. Floating islands, underwater cities, space stations, impossible architecture. Once you master blending multiple images seamlessly, your imagination becomes the only limit.
Practice these methods and develop your own style. Study how light behaves in real environments, then recreate those effects digitally. The more you observe reality, the better you’ll be at creating convincing fantasy.