Photoshop feels overwhelming. Too many buttons, too many menus, too many ways to do the same thing.
But here’s the truth. Most professionals use maybe 20% of Photoshop’s features to do 80% of their work. So learning the right shortcuts and techniques makes you faster without needing to memorize every tool.
These 15 tips cover the essentials that graphic designers, photographers, and digital artists actually use daily. Plus, they work in any version of Photoshop from the past few years.
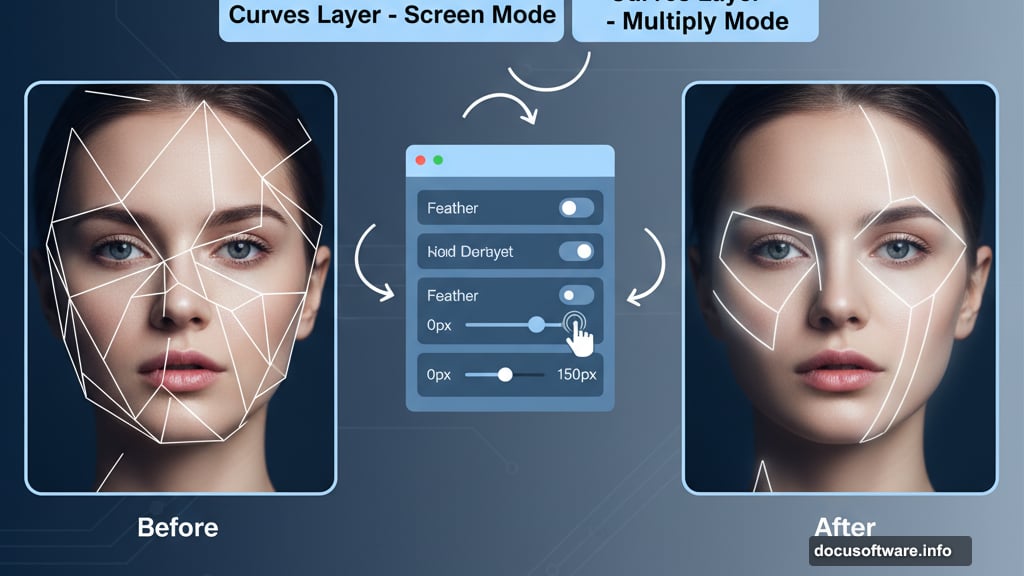
Create Perfect Highlight Lines with Dodge and Burn
Want to add dramatic lighting to portraits or products? This mask technique beats manually dodging and burning every time.
First, create a Curves adjustment layer. Set the blend mode to Screen to brighten areas. Fill the mask with black to hide the effect completely.
Now grab a hard-edged white brush. Paint white lines on the mask where you want highlights. The lines will look harsh at first. That’s fine.
Here’s the magic trick. Open the Properties panel for that mask. Drag the Feather slider right. Watch those harsh lines blend smoothly into your image.
Need darker shadows too? Create another Curves layer set to Multiply instead of Screen. Same process. Black mask, white brush, feather to blend.
You can stack multiple layers for complex lighting. Each layer stays editable. Way better than permanent dodge and burn tools.
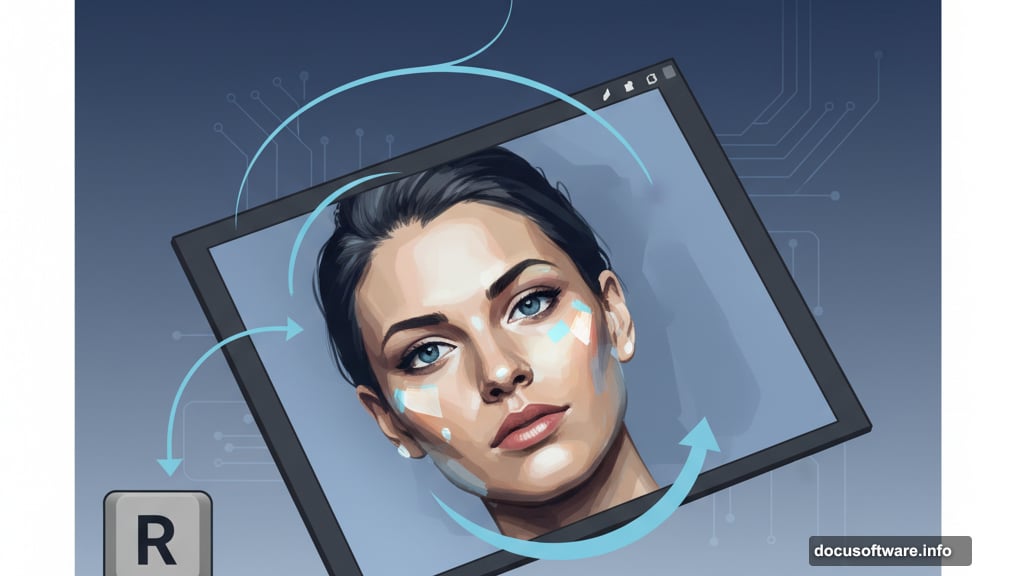
Rotate Your Canvas Without Switching Tools
Retouching faces or drawing precise lines gets easier when you rotate the canvas to a comfortable angle. But switching to the Rotate tool breaks your flow.
Here’s the solution. Press and hold the letter “R” while working. Your current tool temporarily becomes the Rotate tool. Spin the canvas. Release “R” to snap back to whatever tool you were using.
This sticky hotkey works with every tool in Photoshop. Hold “H” for the Hand tool to pan around. Hold “Z” to zoom in and out. Never lose your place in the toolbox.
Most pros rotate constantly while retouching. This hotkey makes it feel natural instead of disruptive.
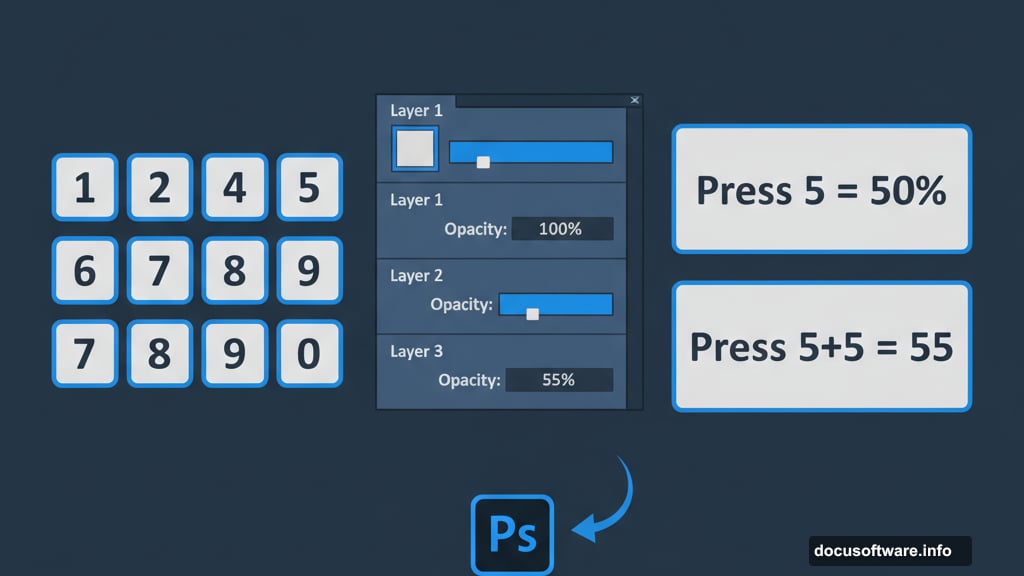
Control Layer Opacity Without Touching the Slider
Moving your mouse to the Opacity slider wastes seconds. Multiply those seconds across hundreds of adjustments and you’ve lost real time.
Press any number key to set layer opacity instantly. Press “5” for 50% opacity. Press two numbers quickly for precise control—press “5” then “5” again for 55% opacity. Press “0” for 100% opacity.
Hold Shift while pressing numbers to adjust Fill opacity instead. This affects the pixels but not the layer effects.
But wait. If you have a brush or tool selected, Photoshop adjusts that tool’s opacity instead of the layer. Switch to the Move tool first if you want to change layer opacity.
Here’s a bonus trick. Click and drag directly on the word “Opacity” or any label next to a slider. It becomes a scrubby slider you can drag left or right. Hold Shift while dragging to speed up. Hold Alt or Option to slow down for precise adjustments.
Keep Adjustments Editable Forever with Smart Objects
Adjustment layers work great until you need 15 of them all clipped to one layer. The Layers panel becomes a mess.
Convert your layer to a Smart Object first. Right-click the layer and choose “Convert to Smart Object.” Now go to Image > Adjustments and apply adjustments like Curves, Hue/Saturation, or Levels directly to the layer.
These adjustments attach to the Smart Object instead of becoming permanent. Double-click the adjustment name in the Layers panel to reopen and edit it anytime.
You keep full control over blend modes and opacity. But everything stays organized in one layer instead of scattered across multiple adjustment layers.
This technique shines when color correcting photos. Apply five different adjustments to a Smart Object. Still looks like one clean layer in your panel.
Merge Only Selected Layers to a New Layer
The classic merge shortcut (Cmd/Ctrl + Shift + Alt/Opt + E) merges all visible layers to a new layer. But sometimes you only want to merge specific layers.
Select the layers you want to merge. Press Cmd/Ctrl + Alt/Opt + E. Photoshop merges just those selected layers to a new layer above them.
The original layers stay intact underneath. You get a merged copy to work with while preserving your layer structure.
This works great for testing effects. Merge a few layers, apply a filter, see how it looks. Don’t like it? Delete the merged layer and try something else.
Pro tip: Create an empty layer at the top before merging all visible layers. Photoshop will merge everything into that empty layer instead of creating a new one.
Export Multiple Layers Without Breaking a Sweat
Exporting graphics from Photoshop used to mean flattening layers, saving, undoing, and repeating. Painful and slow.
File > Export > Export As handles most export needs. Choose your format (PNG, JPG, SVG), adjust quality, and resize if needed.
Right-click any single layer and choose “Export As” to export just that layer. No need to hide everything else first.
Select multiple layers and right-click. Choose “Export As” to export them as separate files in one go. Photoshop names them automatically based on layer names.
Group layers first, then export the group to combine multiple layers into one exported file.
Here’s the tricky part. Exporting with transparency keeps the layer’s position relative to the full canvas. Your small icon might export as a huge transparent PNG.
The fix? Go to Image > Canvas Size and note the actual canvas dimensions. Then in Export As, manually set the Canvas size to match. Now your transparent export matches the original canvas size perfectly.
Rotate Your Clone Stamp or Healing Brush
Cloning or healing works better when the brush matches the angle of what you’re retouching. Hair, fabric texture, or architectural lines need proper rotation.
Open the Clone Source panel (Window > Clone Source). Find the rotation input field. Type an angle or drag the rotation icon.
Your clone stamp or healing brush now rotates to that angle. The sampled texture aligns perfectly with the area you’re fixing.
This saves tons of time compared to manually rotating your canvas or trying to compensate with brush angle.
Do Math Directly in Input Fields
Need to double the size of something? Or add 50 pixels to a dimension? Photoshop lets you do math right in the input fields.
Click any input box—canvas size, brush size, layer position, whatever. Type a math operation. Use “+” to add, “-” to subtract, “*” to multiply, or “/” to divide.
Want a canvas 200 pixels wider? Type “+200” after the current width value. Hit Enter. Done.
This works almost everywhere in Photoshop. Transform values, effect parameters, color values. Just type the math and Photoshop calculates it.
Way faster than doing mental math or reaching for a calculator.
Target Specific Colors with Hue/Saturation
Hue/Saturation adjustments affect entire images by default. But you can narrow the target to incredibly specific color ranges.
Add a Hue/Saturation adjustment layer. Open the dropdown menu that says “Master” and choose a color channel—Reds, Yellows, Greens, Cyans, Blues, or Magentas.
Now look at the color bar at the bottom of the panel. You’ll see sliders appear. These define exactly which colors get affected by your adjustment.
Drag the outer sliders to expand or narrow the color range. The middle sliders control the falloff—how gradually the effect fades at the edges of your selected range.
This lets you change lavender flowers to red without touching the green stems. Or adjust skin tones without shifting lip color. Precise color control without masking.
Use Curves with Luminosity Blend Mode
Curves adjustments change both color and brightness. Sometimes you only want to affect one or the other.
Add a Curves adjustment layer. Set the blend mode to Luminosity. Now adjustments only affect brightness and contrast. Colors stay exactly the same.
Boost contrast as much as you want. No weird color shifts. No oversaturated skies or muddy shadows.
Try the opposite too. Set a Curves layer to Color blend mode. Now you can shift colors dramatically without changing brightness at all.
This gives you separate control over color and light. Professional color grading becomes much easier when you can adjust each independently.
Create Complex Masks Instantly with Blend If
Manual masking takes forever. Blend If sliders automate complex selections based on brightness.
Add any adjustment layer. Double-click the layer (not the thumbnail) to open Layer Style options. Find the “Blend If” sliders at the bottom.
The bottom slider controls the current layer. The top slider controls the layer below. Drag these sliders to make your adjustment appear only in highlights, shadows, or midtones.
Hold Alt or Option while dragging a slider to split it. This creates a gradual transition instead of a hard edge.
Use this for selective dodging and burning. Add a brightening Curves layer. Use Blend If to constrain it only to highlights. Instant natural-looking enhancement without tedious masking.
Convert Colored Objects to White for Pattern Overlays
Want to add a pattern to clothing or objects in photos? Converting the base color to white first makes patterns blend naturally.
Use Select > Color Range to select the object—like a dress or shirt. Click OK to load the selection.
Add a Gradient Map adjustment layer. It automatically uses your selection as a mask. Set the gradient from dark gray to white. This converts all the colors to neutral tones while keeping shadows.
Now drag your pattern onto the canvas. Place it above the Gradient Map layer. Set the pattern layer to Multiply blend mode.
The pattern appears only on the white areas. It darkens naturally in the shadows. Looks like it was printed on the fabric.
Double-click next to the pattern layer name to open Layer Styles. Use the Blend If sliders to bring back highlights and adjust how the pattern sits on the fabric.
Work in 16-Bit for Smoother Gradients
8-bit images show ugly banding in smooth gradients. Sky photos, color backgrounds, and subtle lighting all suffer from visible steps between colors.
Create new documents as 16-bit instead. File > New, then choose 16 Bits/Channel in the dropdown. Your file gets bigger but gradients stay perfectly smooth.
Try this test. Create a big radial gradient from bright red to cyan. Zoom to 100%. In 8-bit mode, you’ll see distinct bands of color. In 16-bit mode? Silky smooth transition.
This matters most when you’re heavily adjusting colors or creating graphics from scratch. Photos usually start as 8-bit from cameras, but you can convert them (Image > Mode > 16 Bits/Channel) before making major adjustments.
The extra bit depth prevents banding when you push colors hard. Worth the larger file size for professional work.
Use Perceptual Gradient Mode for Better Colors
Photoshop’s gradient tool has three interpolation methods. Most people stick with the default and wonder why bright colors turn muddy in the middle.
Grab the Gradient tool. Look at the options bar. Find the interpolation dropdown—it shows Classic, Linear, or Perceptual.
Classic works fine for simple gradients. But harsh color transitions (like red to cyan) create muddy browns in the middle.
Linear improves this by blending through different color spaces. Better results with most color combinations.
Perceptive is the newest option and usually the best choice. It creates bright, saturated gradients even between complementary colors. No muddy midtones.
Test all three modes when creating colorful graphics. Perceptual typically wins for vibrancy and smooth transitions.
Paint Selections Fast with Quick Mask Mode
Selections tools work great for hard edges. But organic shapes need a painterly approach.
Press “Q” to enter Quick Mask mode. Your image gets a red overlay showing unselected areas.
Grab a large, soft brush. Paint with black to add to the selection (remove the red overlay). Paint with white to remove from the selection (add red overlay).
This lets you build complex selections as quickly as you can paint. Trees, hair, clouds, anything with soft or irregular edges becomes easy.
Hit “Q” again to exit Quick Mask mode and load your painted selection. Now add adjustment layers to affect only that selected area.
Way faster than trying to precisely click around edges with the Lasso tool. Plus your selection automatically has soft, natural edges.
These techniques cover the core workflows that separate fast Photoshop users from slow ones. Master these before diving into advanced filters or obscure menu items.
Speed comes from knowing the right tool for each job. Not from memorizing every tool that exists.