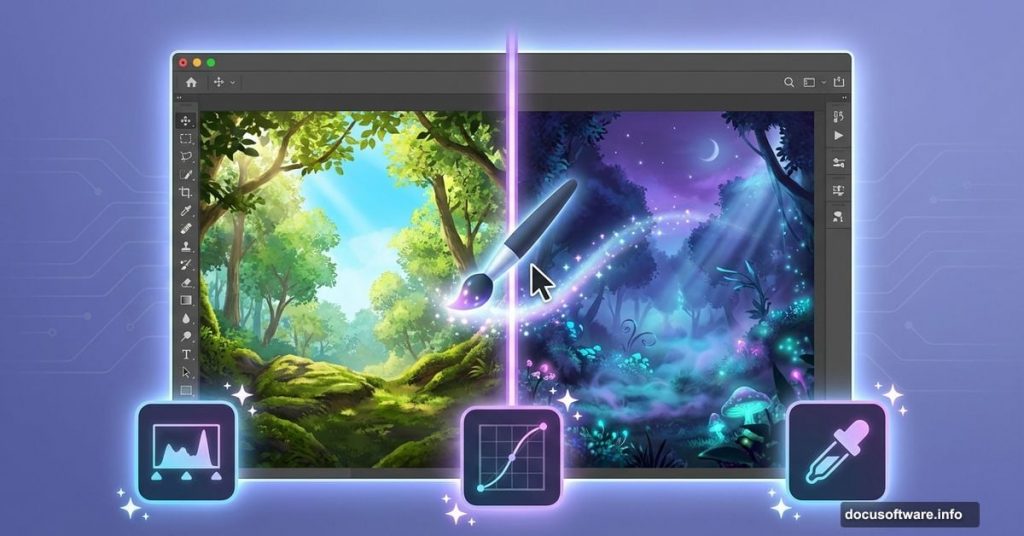
Want to create a haunting forest scene that looks straight out of a fairy tale? This tutorial walks you through building a moody, mystical photo manipulation from scratch.
You’ll learn advanced techniques that actually matter. Color Range extraction for complex details. Strategic adjustment layers for dramatic lighting shifts. Plus, practical fog and atmosphere techniques that bring the whole scene together.
Let’s dive in.
What You’ll Need Before Starting
Grab these resources first. You’ll need specific stock images and brushes to follow along.
Essential Downloads:
- Model photo from mjranum-stock
- Forest background by HumbleBeez
- Ivy textures from Black-B-o-x
- Dead tree images from gd08 and Pixabay
- Sky reference from Pixabay
- Fog and ray light brushes from Brusheezy
Make sure everything downloads before opening Photoshop. Nothing kills creative momentum like stopping mid-project to hunt for files.
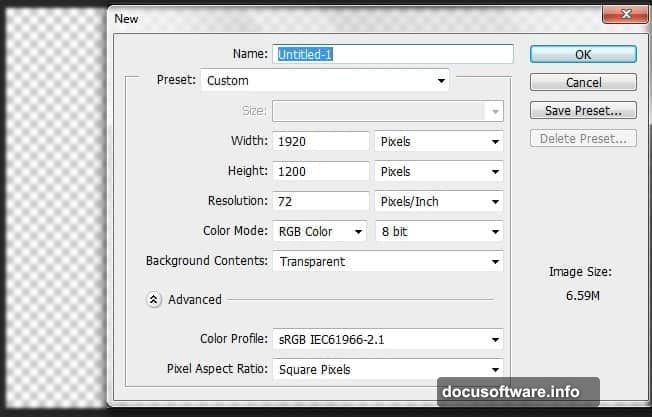
Set Up Your Canvas Right
Start with these exact dimensions. They give you room to work while maintaining web-friendly file sizes.
Create a new document at 1920 x 1200 pixels. Set the background to transparent. This lets you build up layers without fighting a white backdrop later.
Why these dimensions? Wide enough for dramatic compositions. Tall enough for vertical elements like trees. Plus, it scales down beautifully for social media sharing.
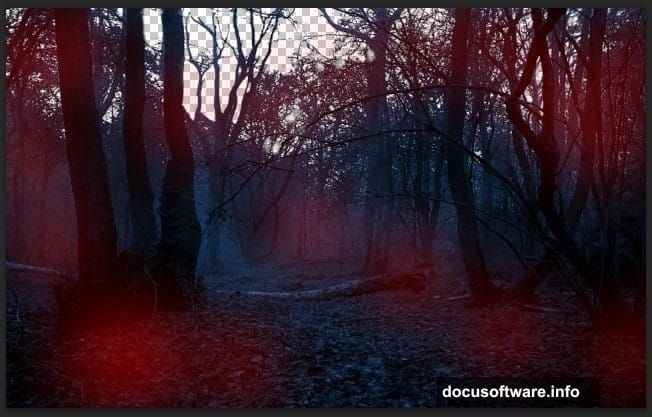
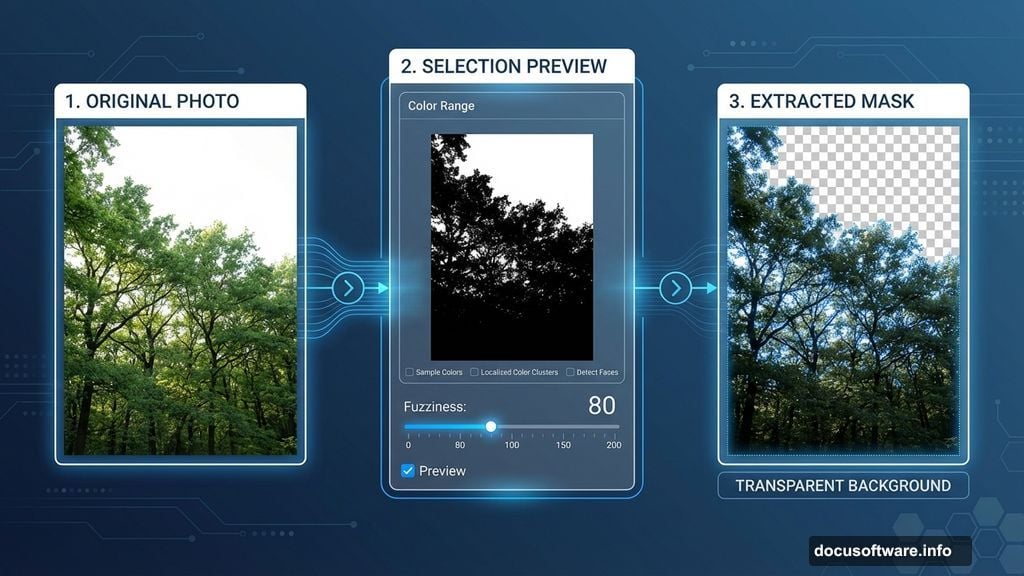
Extract the Forest Without the Boring Sky
Open your forest stock image. See that bright sky? It’s gotta go.
Instead of trying to darken it, we’ll remove it completely using Color Range. This tool works magic on complex selections like forests and hair.
Hit Ctrl + A to select everything. Then navigate to Select > Color Range. Now hold Shift and click on different sky areas until the forest turns black in the preview window.
Keep Fuzziness below 80. Higher values grab too much of what you want to keep. Lower values give you cleaner edges on those branches.
The forest extracts cleanly in seconds. Way faster than manually masking hundreds of branches.
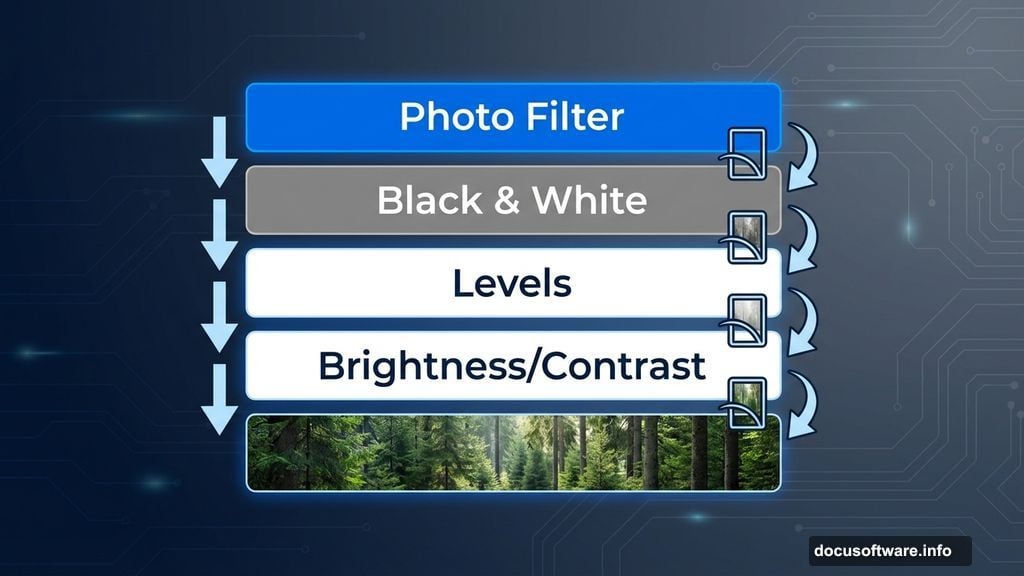
Transform Day Into Night
Drop your extracted forest into the main document. Resize it to fill the frame naturally.
Now stack these adjustment layers on top. Make sure you tick “Create Clipping Mask” so they only affect the forest layer beneath.
Layer Stack:
- Brightness/Contrast
- Levels
- Black & White
- Photo Filter
Each adjustment pushes the scene darker and moodier. The Black & White layer especially kills that daytime warmth. Then Photo Filter adds back controlled color.
Deepen Those Shadows
Create a new layer above your adjustments. Grab a soft black brush at low opacity.
Paint shadows in these key areas. Under dense foliage clusters. Along the forest floor. Behind thick tree trunks.
Switch the blend mode to Soft Light. Drop opacity to 75%. This gives you rich shadows without looking muddy or fake.
The extra shadow layer sells the “deep forest at dusk” vibe. Without it, the scene feels flat.
Apply the Dark Blue Color Theme
Dark blue creates that mystical, otherworldly atmosphere. Time to bake it into the whole scene.
Go to Layer > New Fill Layer > Solid Color. Pick #4273b0 for a rich midnight blue. Change blend mode to Color at 77% opacity and 78% fill.
Boom. The entire forest shifts to that enchanted blue tone. But some areas look too intense, right?
Add a layer mask. Paint with black to reduce the effect where it’s too strong. Focus on keeping some neutral tones in the foreground for depth.
Build Atmospheric Fog
Download those fog brushes from the resources list. Open them in Photoshop and select a soft, wispy brush.
Create a new layer. Paint fog gradually, building up density in layers. Concentrate fog in the mid-ground between trees.
Pro tips for realistic fog:
- Use multiple fog layers at different opacities
- Vary brush sizes for depth
- Keep foreground relatively clear
- Build up density gradually rather than one heavy pass
The fog separates depth planes. It makes distant trees fade naturally while keeping focus on your subject area.
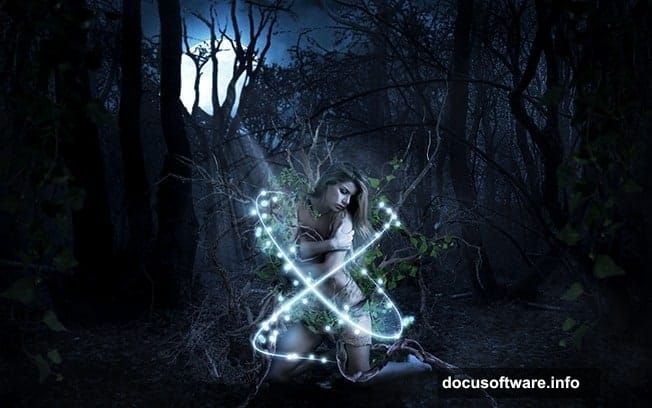
Add the Model and Dead Trees
Position your model in the foreground. She becomes the focal point that draws viewers into the scene.
Bring in those dead tree stocks. Place them strategically to frame the composition. One on the left, another on the right works well.
Use Free Transform to adjust angles and sizes. Dead trees add that “abandoned forest” feeling. Plus, their bare branches create interesting silhouettes against the fog.
Don’t forget to color-match everything. Add adjustment layers to the model and trees so they share the same blue color palette.
Weave in the Ivy Details
Grab those ivy textures. Place them climbing up the dead trees and wrapping around branches.
This step takes patience. Use layer masks to blend ivy naturally with the tree bark. Vary the opacity so some sections look weathered or partially hidden.
Ivy adds organic complexity. It suggests this forest has been undisturbed for years. That sells the magical, forgotten atmosphere.
Create Dramatic Light Rays
Time for those light brushes. Create a new layer and paint rays filtering through the trees from above.
Set the blend mode to Screen or Linear Dodge. Drop opacity until the effect looks natural, usually around 40-60%.
Light ray placement matters:
- Angle them from a consistent direction
- Make some stronger than others
- Let them interact with fog layers
- Fade them near the bottom
Light rays guide the eye. They add dimension and suggest a world beyond the frame.
Final Color Grading Pass
Add one more Color Balance adjustment layer at the very top. Shift slightly toward cyan in shadows and midtones.
Then add a Curves adjustment. Create a subtle S-curve to boost contrast. Pull down the blacks just a touch.
These final adjustments unify everything. They ensure all your elements share the same color temperature and mood.
Polish With Final Details
Zoom in and check your edges. Clean up any rough masks with a small, soft brush.
Add a subtle vignette. Create a new layer, fill it with black, then use a large soft eraser to clear the center. Set to Multiply at low opacity.
The vignette focuses attention inward. It keeps viewers’ eyes from wandering off the edges.
Why This Technique Works
This approach builds atmosphere through layers rather than filters. Each adjustment serves a specific purpose.
Color Range extraction saves hours of manual masking. The adjustment layer stack gives you flexibility to tweak moods later. And building fog gradually in multiple passes looks way more realistic than slapping on one heavy fog layer.
Most importantly, this workflow stays non-destructive. You can revisit any step without starting over.
The skills you practiced here apply to any photo manipulation. Extracting complex shapes. Unifying color palettes. Building atmospheric depth. These fundamentals show up in everything from product composites to fantasy illustrations.
Take these techniques and run with them. Swap in different stock photos. Try warmer color schemes. Add more dramatic lighting. The creative possibilities expand once you understand the core workflow.
Now go create something that makes people stop scrolling and stare.