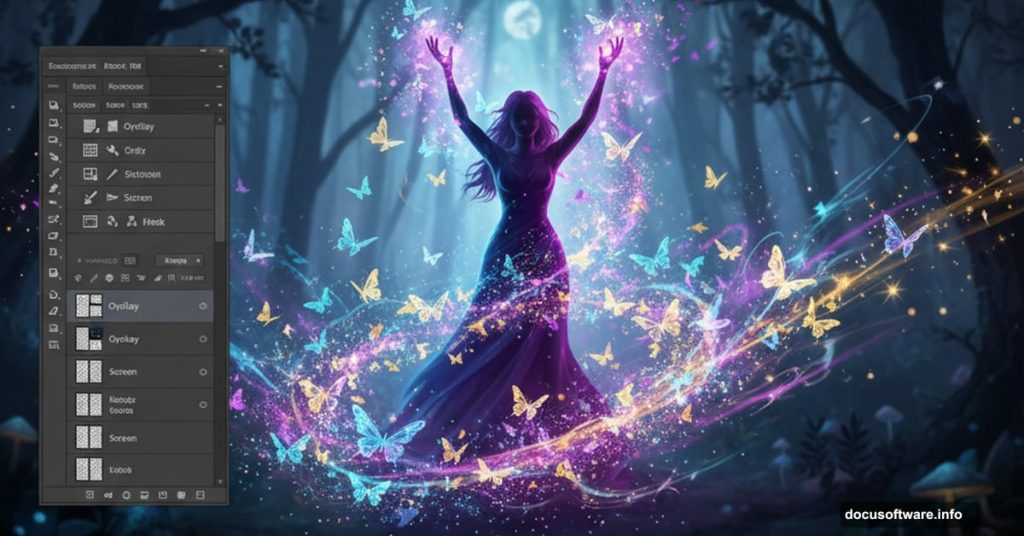
Want to build fantasy scenes that look professionally crafted? This photo manipulation tutorial walks you through creating a sorceress wielding magical butterfly energy.
You’ll learn essential Photoshop techniques: blending multiple images seamlessly, working with custom brushes, and applying realistic lighting effects. Plus, the skills you pick up here translate to countless other fantasy projects.
Let’s start casting some digital magic.
Gather Your Materials First
Before opening Photoshop, download these free stock resources:
Images you’ll need:
- Misty forest background by Angband
- Black magic pose photo by liam-stock
- Butterfly stock image by shoofly-stock
- Sparkle brush pack by Tempting-Resources
- Crash Space brush set by KeRen-R
Having everything ready saves frustration mid-project. Trust me on this one.
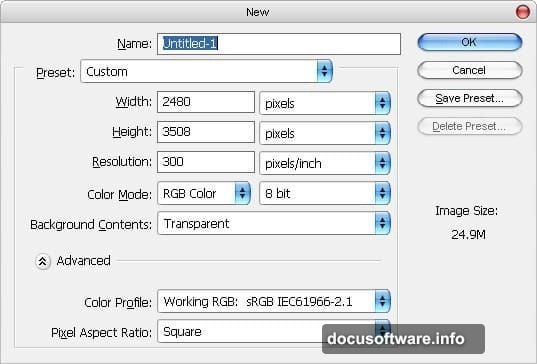
Set Up Your Canvas
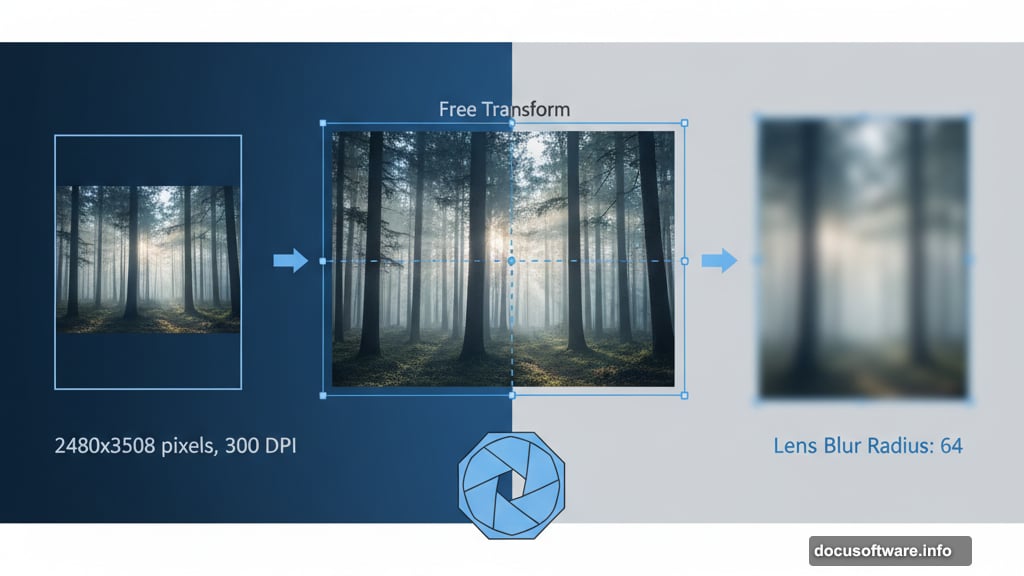
Create a new document with these exact specifications:
Canvas dimensions:
- Width: 2480 pixels
- Height: 3508 pixels
- Resolution: 300 DPI
- Color mode: RGB, 8-bit
- Background: Transparent
Why these numbers? They give you print-quality resolution at standard poster size. So your finished piece looks crisp whether displayed on screen or printed large.
Navigate to File > New to access these settings. Input each value carefully before clicking Create.
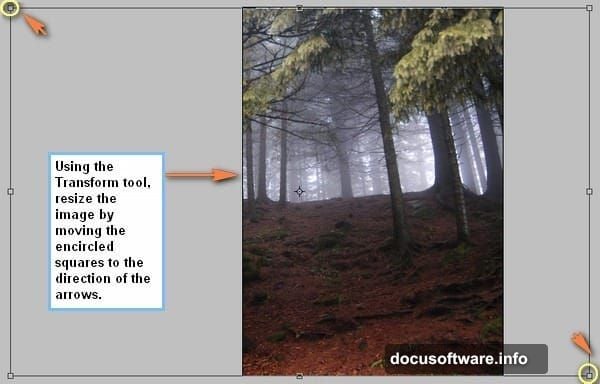
Build the Fantasy Background
Open your misty forest stock image. Now comes the fun part.
Move the image to your canvas:
Press V to activate the Move tool. Click and drag the forest image onto your new document. Then rename this layer “Background” by double-clicking the default “Layer 1” text.
Next, transform the image to fit properly. Press Ctrl/Cmd + T to activate Free Transform. You’ll see a box with small squares at corners and edges surrounding your image.
Resize and position carefully:
Scale the forest larger until it fills your canvas edges. Hold Shift while dragging corners to maintain proper proportions. Otherwise you’ll stretch the image awkwardly.
Position the focal point roughly one-third from the canvas top. This follows the classic rule of thirds for balanced composition.
Add Depth With Blur
Blurring the background separates your subject from the environment. It creates that professional shallow depth-of-field look.
Navigate to Filter > Blur > Lens Blur. When the dialog opens, input these values:
Blur settings:
- Render: Faster
- Source: None
- Blur focal distance: 0
- Shape: Octagon (8 sides)
- Radius: 64
- Blade curvature: 0
- Rotation: 0
For specular highlights:
- Brightness: 0
- Threshold: 255
Noise settings:
- Amount: 0
- Distribution: Gaussian (checked)
Hit OK and watch your background soften beautifully. The forest now recedes, ready for your sorceress to command attention.
Create Atmospheric Light
Fantasy scenes need ethereal lighting. Let’s add glowing atmosphere to sell the magical mood.
Set up a new layer:
Press Ctrl/Cmd + Shift + N to create a fresh layer. Name it “Light 1” when the dialog appears. This layer sits above your background.
Now configure your brush color. Click the foreground color box in your toolbar. The Color Picker opens.
Input this exact color:
- Hex code: #ffffdb
This soft yellow-white mimics natural magical glow. It’s warm without being overwhelming.
Press B to activate the Brush tool. You’re ready to paint atmosphere.
Paint Mystical Atmosphere
Choose a large, soft brush from your brush picker. Set opacity around 30-40% for subtle layering.
Where to paint light:
Click once in the upper canvas area where sunlight filters through trees. Build up several clicks in the same spot for intensity variation.
Add smaller glowing spots throughout the background. Imagine light particles floating through the misty forest. Don’t overthink placement—organic randomness looks most natural.
Pro tip: Vary your brush size between clicks. Mix large atmospheric washes with smaller light specks. This creates visual interest and depth.
Lower opacity brushes let you layer effects gradually. You maintain full control instead of accidentally overdoing the glow.
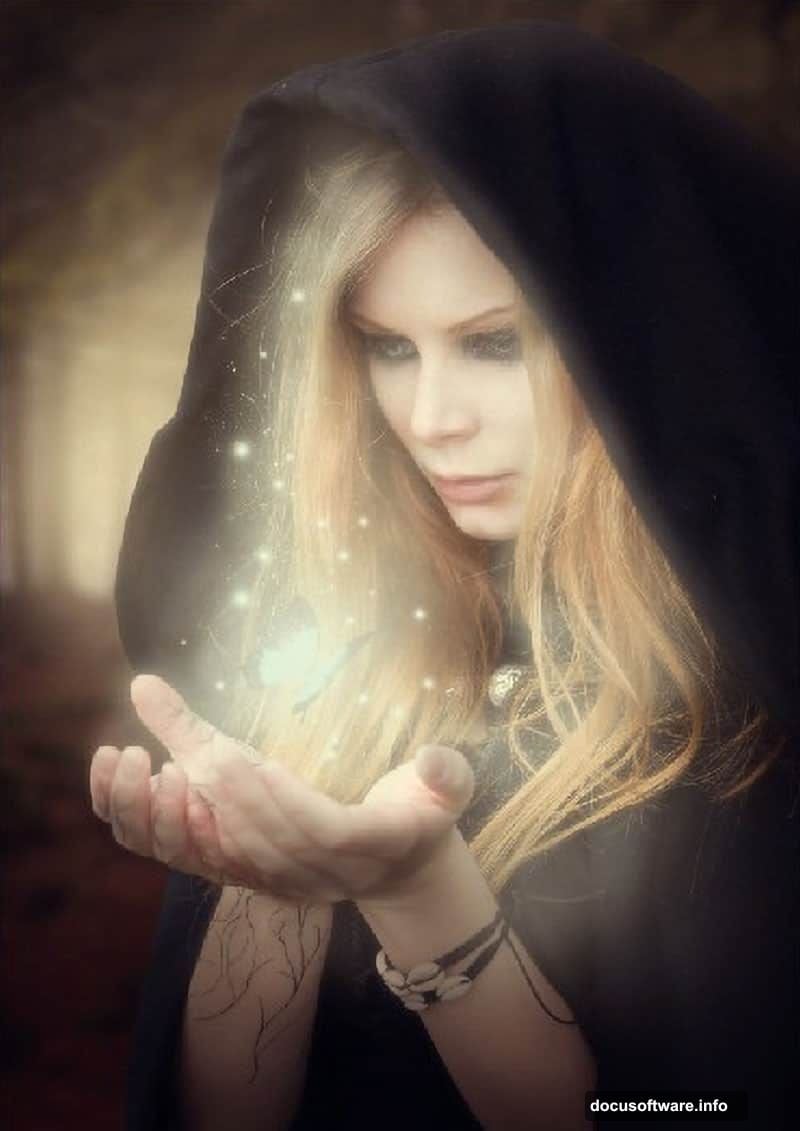
Position Your Sorceress
Open the black magic pose stock image. This becomes your main subject.
Use the Lasso tool (L) or Pen tool (P) to carefully select your model. Take time here—clean selections make or break photo manipulations.
Selection tips:
Zoom in close when selecting around hair and flowing fabric. These areas need precision. For hair specifically, use the Refine Edge tool (Select > Refine Edge) to capture fine strands.
Once selected, copy (Ctrl/Cmd + C) and paste (Ctrl/Cmd + V) onto your main canvas. Name this layer “Sorceress.”
Transform and position:
Press Ctrl/Cmd + T again. Scale your sorceress down until she fits naturally in the scene. She should look powerful but proportional to the environment.
Position her slightly off-center. Remember the rule of thirds for dynamic composition.
Blend Subject With Background
Right now your sorceress probably looks pasted on. Let’s fix that.
Adjust color and tone:
Add a Hue/Saturation adjustment layer (Layer > New Adjustment Layer > Hue/Saturation). Click the clipping mask icon so adjustments only affect the sorceress layer.
Shift the hue slightly toward blue-green to match the forest color temperature. Reduce saturation by 10-15% so she doesn’t pop unnaturally bright.
Add atmospheric perspective:
Create another layer set to Multiply blend mode. Use a soft brush with the background’s dominant color (sample with the eyedropper tool). Paint lightly over the sorceress’s lower body and legs.
This simulates atmospheric haze. Objects farther from the viewer appear less saturated and slightly obscured.
Create the Butterfly Energy Orb

Now for the signature element—a magical orb made of butterflies.
Open your butterfly stock image. Select individual butterflies using the Lasso tool. Copy each to your main canvas on separate layers.
Arrange butterflies:
Position them in a rough sphere shape in front of the sorceress’s outstretched hand. Overlap them at varying angles for dimensional depth.
Scale some butterflies smaller, some larger. This creates perspective as if they’re swirling in three-dimensional space.
Add the energy glow:
Create a new layer beneath your butterfly layers. Name it “Orb Glow.” Use a soft round brush with light blue color (#8ec5ff).
Paint circular strokes where butterflies cluster densest. Build up intensity gradually with multiple passes. The glow should emanate from within the butterfly sphere.
Apply Magical Sparkles
Load your sparkle brush set. These add finishing fairy-dust magic.
Create a new layer named “Sparkles” above everything. Set this layer to Screen or Linear Dodge blend mode for luminous effect.
Paint sparkle accents:
Choose white or pale yellow as your foreground color. Click your sparkle brushes around the orb, trailing off toward the sorceress’s hand.
Add smaller sparkles floating through the background atmosphere. Concentrate them near light sources for realism.
Vary brush sizes and opacity. Dense sparkles near the orb, scattered ones in the distance.
Add Final Light Effects
Almost done. Let’s enhance the magical energy with light effects.
Create energy beams:
Make a new layer set to Linear Dodge blend mode. Use the Lasso tool to create thin, slightly curved triangular selections pointing from the orb toward the sorceress.
Fill these with a bright cyan color (#00ffff). Then apply Gaussian Blur (Filter > Blur > Gaussian Blur) at radius 15-20 pixels.
Lower layer opacity to 60-70% so the beams glow without overwhelming other elements.
Add rim lighting:
Create another layer set to Screen mode. Use a small, soft brush with pale blue. Paint along the sorceress’s hand and arm edges facing the orb.
This rim light sells the illusion that magical energy illuminates her from that direction. Small details like this separate amateur work from professional.
Polish With Color Grading
Time for final color polish. This ties all elements together cohesively.
Add a Color Balance adjustment layer at the top of your layer stack. Adjust shadows, midtones, and highlights slightly toward cyan and blue.
This creates that fantasy color grade—slightly cool and otherworldly.

Fine-tune with Curves:
Add a Curves adjustment layer. Create a subtle S-curve to boost contrast. Then adjust the blue channel specifically, lifting shadows slightly blue and keeping highlights neutral.
These adjustments are subtle—move sliders just 10-20 points maximum. Heavy-handed color grading looks amateurish.
Export Your Masterpiece
Save your working file as a PSD first. You’ll want layers intact for future edits.
For sharing, flatten your image (Layer > Flatten Image). Then export as high-quality JPEG (File > Export > Export As).
Export settings:
- Quality: 90-100%
- Format: JPEG
- Color space: sRGB
Your magical sorceress manipulation is complete. Frame it, share it, add it to your portfolio.
What You’ve Learned
This tutorial covered professional photo manipulation fundamentals. You practiced precision selections, learned layer blending techniques, and discovered how lighting creates mood.
These same skills apply to any fantasy scene you create next. Dragon battles, enchanted forests, superhero composites—all use identical techniques.
The key? Patience during selection and subtlety with effects. Amateur work screams “Photoshop!” Professional composites make viewers forget multiple images were combined.
Keep practicing these techniques. Your next manipulation will be even stronger.