Photoshop masks confuse beginners more than any other feature. But here’s the secret: they’re just digital stencils that control what shows and what hides.
Once you understand masks, your editing becomes faster and more flexible. Plus, you’ll never permanently delete pixels again. Let’s break down exactly how masks work and why every professional photographer relies on them daily.
Why Masks Beat the Eraser Tool Every Time
Think of masks as reversible decisions. Erase something and it’s gone forever. Mask it and you can bring it back anytime.
That flexibility matters when clients change their minds. And trust me, they always change their minds.
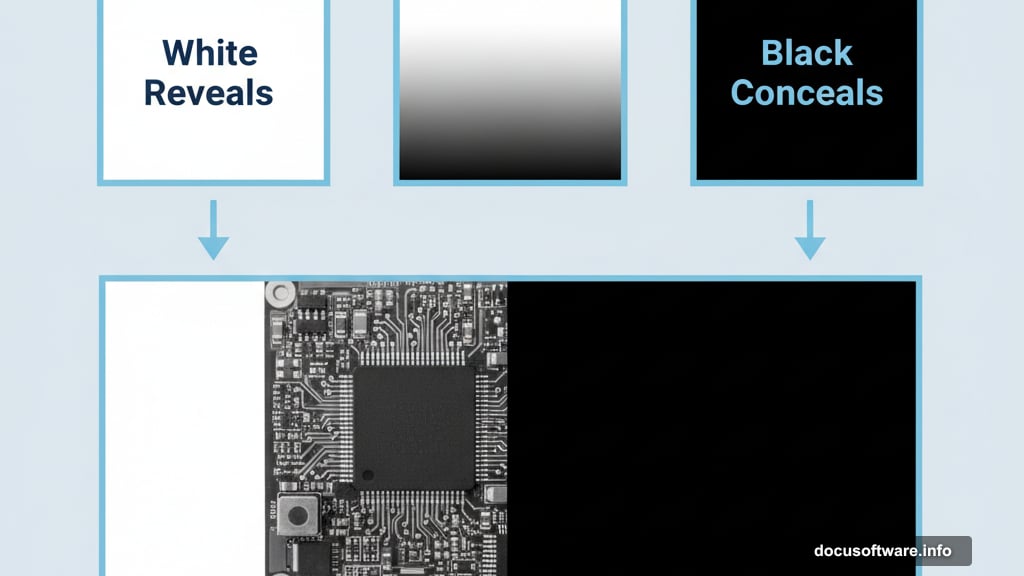
Masks work with a simple concept: white reveals, black conceals. Paint white on a mask to show that area. Paint black to hide it. Gray creates partial transparency. That’s literally all you need to remember.
Change Colors Without Painting Over Anything
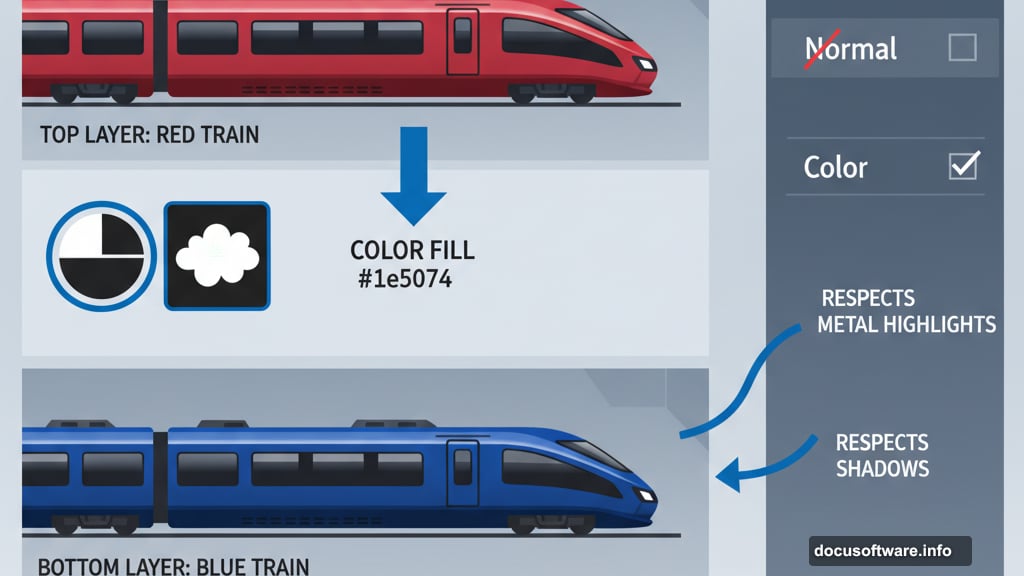
Here’s a practical example that shows masks in action. Say you need to recolor a train’s paint job from red to blue.
First, select the colored stripe using any selection tool you prefer. The Quick Selection tool works great for solid colors. Once you have that selection active, create a new Color Fill adjustment layer.
Photoshop automatically converts your selection into a mask. Everything you selected becomes white in the mask. Everything else turns black. So your color change only affects the train stripe.
Choose your new color and watch it apply exactly where you want it. The hex code #1e5074 creates a nice professional blue. But the color looks flat and fake right now because it’s sitting on top of the metal.
Switch the blend mode to Color instead of Normal. Suddenly the blue respects the highlights and shadows of the metal surface. This happens because Color blend mode only changes hue while preserving the underlying brightness values.
Now imagine the client wants both trains in the image colored blue. No problem. Grab the Brush tool, set your foreground color to white, and paint directly on the mask over the second train. The blue spreads exactly where you paint.
This demonstrates the core power of masks: you can modify them anytime without starting over.
Blend New Skies Seamlessly
Masks excel at blending elements together naturally. Take a photo of a deer with a boring sky. You want to add dramatic clouds from another image.
Drag in your cloud photo above the deer layer. Try different blend modes until you find one that works. Soft Light often creates beautiful results because it enhances contrast without overwhelming the original image.
Add a mask to the clouds layer by clicking the mask icon at the bottom of the Layers panel. You now have a white mask that hides nothing. We need to flip that.
Select the mask and go to Edit > Fill, then choose Black. Your clouds disappear completely because black conceals everything in a mask.
Now comes the fun part. Grab a soft-edged brush set to 40% opacity. Paint with white to reveal clouds exactly where you want them. The low opacity lets you build up the effect gradually by clicking multiple times.
Press X to swap your foreground and background colors whenever you want to remove clouds instead of adding them. This back-and-forth painting gives you complete control over the blend.
The soft brush edges create smooth transitions that look natural instead of cut-and-pasted. Take your time dabbing clouds into the sky until it looks right to your eye.
Fix Specific Problems Without Affecting Everything Else
Masks shine when you need to adjust one element without touching the rest. Say you’re retouching fashion photos and the client wants yellow stripes changed to pink on a model’s shirt.
Add a Hue/Saturation adjustment layer. Target the Yellows channel and shift the hue slider until you get pink. Right now this affects every yellow in your entire image.
Select the mask on that adjustment layer and press Cmd/Ctrl + I to invert it. White becomes black and black becomes white. Your pink adjustment vanishes because the mask now hides everything.
Switch to the Brush tool at 100% opacity with white as your foreground color. Paint over just the shirt stripes. The pink appears only where you paint, leaving the rest of the image untouched.
This technique works for any localized adjustment. Brighten someone’s eyes. Darken a distracting background element. Boost saturation in the sky while keeping skin tones natural. Masks make it all possible.
Remove Backgrounds in Seconds
Need to cut someone out of a background? Masks handle this better than the Eraser tool ever could.
Click Select Subject in the top toolbar. Photoshop analyzes your image and creates a selection around the main subject. This works best with clearly focused subjects against simple backgrounds.
Hit the Select and Mask button to refine your selection. Add a bit of edge feathering to soften the cutout and make it look more natural. The amount depends on your image resolution and desired effect.
In the Output Settings, choose Output To: Layer Mask. Click OK. Photoshop creates a new masked layer with your subject isolated and the background hidden.
You can now drop in any new background you want behind your subject. The mask means you can always refine the edges or bring back parts of the original background if needed.
Essential Mask Shortcuts That Save Time
Masks become even more powerful when you know these quick commands.
Shift-click any mask to temporarily disable it. This lets you see the full layer without deleting the mask you worked hard to create. Shift-click again to re-enable it.
Alt/Opt-click a mask to view it in black and white. This helps you spot areas where the mask might need touching up. You can see exactly which parts are fully hidden, fully visible, or partially transparent.
Alt/Opt-drag a mask to copy it to another layer. This saves tons of time when you need the same mask on multiple adjustments.
Right-click any mask for a menu of options. You can delete the mask, apply it permanently to the layer, or enter Refine Mask mode to adjust the edges.
Click and drag a mask to the trash icon to delete it. Photoshop asks if you want to apply the mask before deleting. Choose Apply to permanently delete the hidden areas, or Delete to remove the mask and restore everything.
Think in Masks Instead of Erasers
Once masks click in your brain, you’ll wonder how you ever worked without them. They’re not just a Photoshop feature – every serious creative app uses the same concept.
The key is understanding that you’re not deleting anything. You’re just deciding what shows and what hides. And you can change that decision whenever you want.
Start simple. Practice making selections and converting them to masks. Paint white to reveal, black to conceal. That’s the whole foundation.
Then experiment with adjustment layers and blend modes. Try blending elements together with soft brushes at low opacity. The more you practice, the faster your workflow becomes.
Masks aren’t complicated once you see them work. They’re just smart layers of control that give you options instead of forcing permanent choices. And in client work, having options is everything.