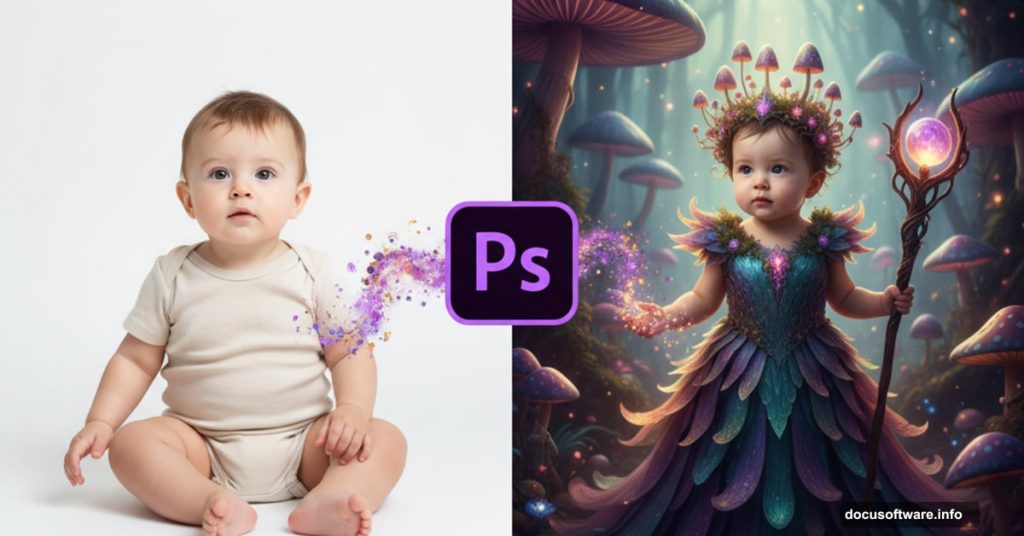
Want to create magical portraits that look professionally edited? This comprehensive guide walks you through turning an ordinary baby photo into an enchanting “Queen of Fungi” fantasy composite.
You’ll learn professional photo manipulation techniques that work for any creative project. Plus, these same methods apply whether you’re creating gifts, portfolio pieces, or just experimenting with fantasy photography.
The best part? You don’t need advanced Photoshop skills to start. Just follow along step-by-step.
What You’ll Create
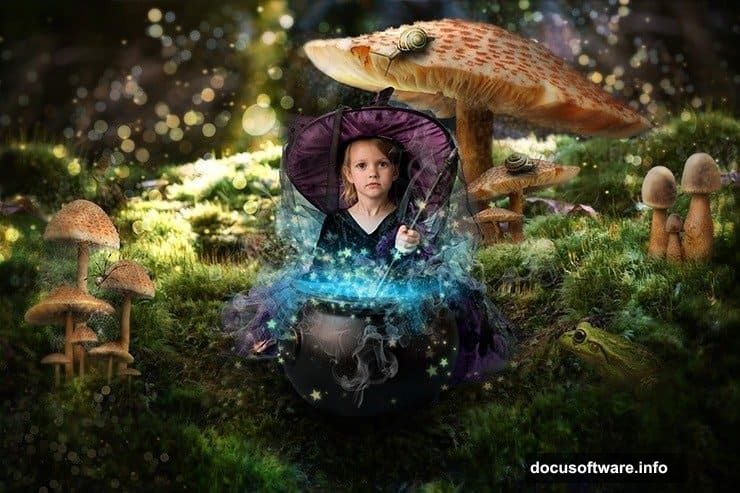
This tutorial builds a complete fantasy scene from scratch. First, you’ll construct a mystical forest background using texture blending. Then you’ll add whimsical elements like glowing mushrooms and insects. Finally, you’ll integrate your subject and create luminous, magical effects.
The finished image features phosphorescent stars, realistic depth, and professional-grade compositing. Most importantly, you’ll understand the techniques well enough to adapt them for your own creative visions.
Required Materials and Setup
Before starting, gather all your resources in one folder. This simple organization step saves tons of time during the editing process.
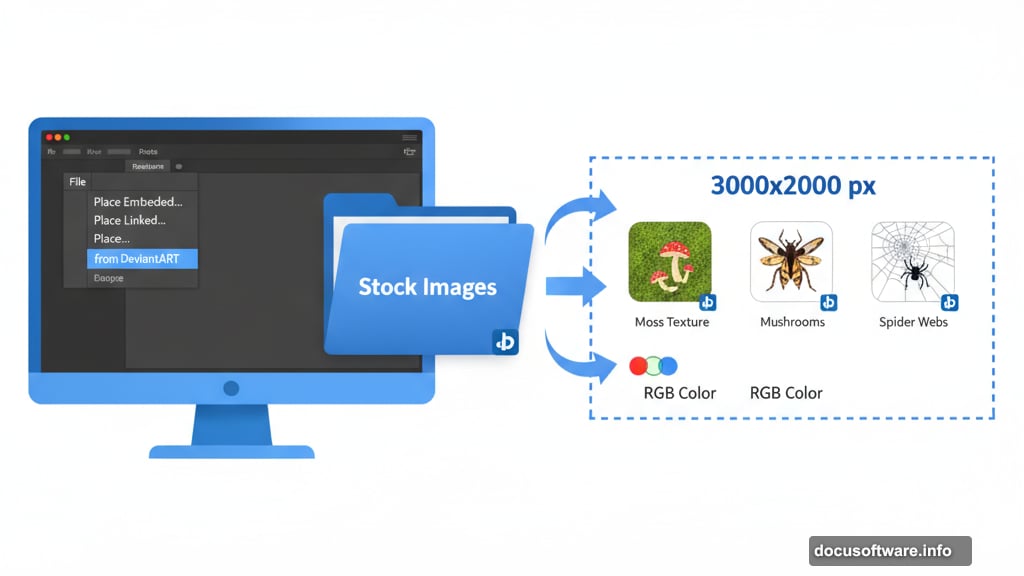
Download these stock images:
- Model photo from deathbycanon-stock
- Moss background from rustymermaid-stock
- Mushroom packs from Dracoart-Stock (three varieties)
- Insects: snails from gd08, spider from Camelfobia
- Texture elements: light overlay from xnienke, frog from hatestock
- Spider webs from frozenstocks
- Nature bokeh from koko-stock
Pro tip: Always click the “Download” button in the top-right corner of DeviantART resource pages. This ensures you get the highest quality versions.
Setting Up Your Canvas

Create a new document in Photoshop. Go to File > New or press Cmd/Ctrl + N.
Use these specifications:
- Width: 3000 pixels
- Height: 2000 pixels
- Resolution: 200 pixels per inch
- Color mode: RGB
Name your document something memorable like “Queen of Fungi.” This helps if you’re working on multiple projects simultaneously.
Building the Background Foundation
Start by placing your moss background image. Navigate to File > Place and select your moss texture file.
The image should fill your entire canvas. If it doesn’t, you likely downloaded a preview instead of the full-resolution file. Go back and download the complete version using the proper download button.
Scale your background properly:
Press Cmd/Ctrl + T to activate Free Transform. Alternatively, go to Edit > Transform > Scale. Resize the moss texture until it covers your whole working area with some overlap.
This extra coverage matters. It gives you flexibility for adjustments later without revealing empty canvas edges.
Creating Background Depth
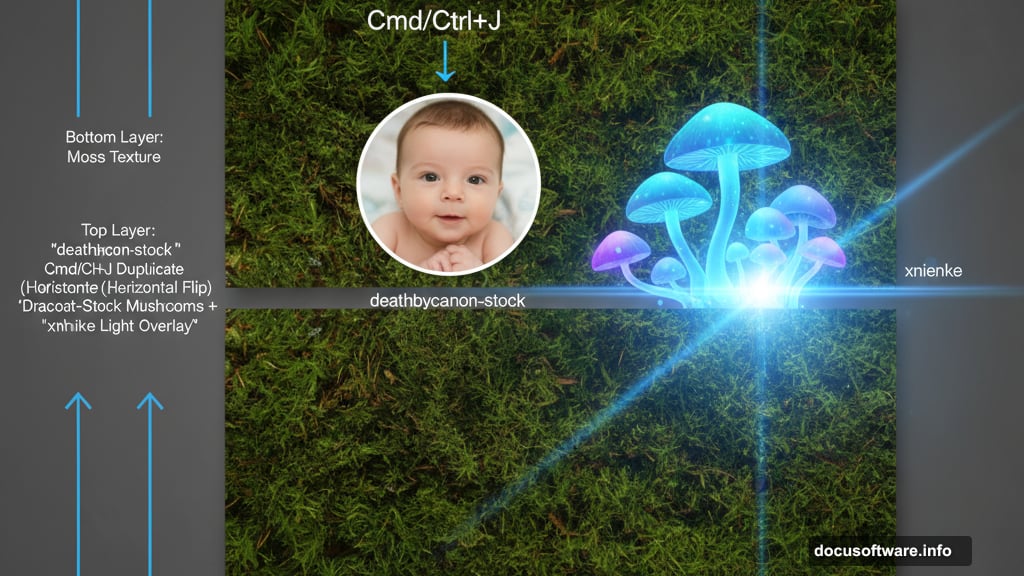
Duplicate your background layer by pressing Cmd/Ctrl + J. Or go to Layer > Duplicate Layer for the menu option.
Now flip this duplicate horizontally. Go to Edit > Transform > Flip Horizontal. This creates a mirror effect that extends your background naturally.
Move the original (non-flipped) background layer down slightly. This creates visual interest and breaks up obvious repetition patterns.
Blending Background Layers Seamlessly
Add a layer mask to blend where your two background layers meet. Select the Brush Tool by pressing B.
Configure your brush with these settings:
- Size: 100 pixels
- Hardness: 0%
- Opacity: 50-100% (vary as needed)
- Flow: 100%
Paint along the seam where both background layers meet. Use lower opacity for gradual blending. Increase opacity to remove more visible texture quickly.
The goal? Create a seamless forest floor that looks like one continuous scene. Nobody should spot where one image ends and another begins.
Adding Mushrooms and Forest Elements
This is where your fantasy scene comes alive. Place mushroom stock images throughout your composition.
Position larger mushrooms in the foreground. Place smaller ones toward the back. This size variation creates natural perspective and depth.
Remember these placement principles:
- Foreground elements: Larger, more detailed, sharper
- Background elements: Smaller, less detailed, slightly blurred
- Middle ground: Moderate size and detail
Use layer masks to blend mushroom bases into the moss. Paint away hard edges where stems meet the ground. This integration makes elements look naturally rooted rather than pasted on.
Incorporating Insects and Small Creatures
Add snails, spiders, and other small creatures strategically. These details make your scene feel lived-in and believable.
Place creatures on mushrooms, near edges, or crawling on moss. Vary their sizes according to their position in the scene’s depth.
For each creature:
- Place the stock image
- Scale appropriately for its position
- Add a layer mask
- Blend edges into the background
- Adjust colors to match the scene’s overall tone
Spider webs add atmospheric detail. Stretch and warp web textures to wrap around mushrooms or span between elements. Lower their opacity to 30-50% for subtle, realistic effect.
Preparing Your Model
Open your baby or child photo. Select your subject carefully using the selection tool of your choice. For detailed selections with fine hair, the Select and Mask feature works best.
Refine your selection edges. This step determines how naturally your subject integrates into the final composite.
Copy your selected subject and paste it into your main document. Position them as the central focus of your mushroom kingdom.
Scale your subject appropriately:
They should feel like they belong in this miniature forest world. Not too large that they dominate everything. Not too small that they get lost among the mushrooms.

Creating the Magical Glow Effect
This is where technical skill meets artistic vision. The phosphorescent effect makes your composite truly magical.
Create a new layer set to Screen or Color Dodge blending mode. Use a soft, round brush with low flow (10-20%). Paint with bright cyan, green, or blue colors on this layer.
Focus your glow in these areas:
- Around mushroom caps and stems
- Behind your subject as rim lighting
- On small details like dewdrops or insect eyes
- Creating pools of light on the forest floor
Build up the effect gradually. Multiple subtle layers look more convincing than one intense application.
Adding Luminous Stars
Create phosphorescent star effects using custom brushes or the brush presets that come with Photoshop.
Make a new layer above your glow effects. Set it to Linear Dodge (Add) blending mode. Select a star or sparkle brush preset.
Scatter stars throughout your scene with variation:
Larger, brighter stars in the foreground. Smaller, dimmer ones in the background. This depth variation prevents a flat, clipart appearance.
Adjust individual star opacity. Some should shine brilliantly. Others barely visible. This randomness mimics natural bioluminescence.
Color Grading for Cohesion

Your composite needs unified color to look professional rather than like separate images stuck together.
Add a Color Balance adjustment layer. Push shadows toward cyan and blue. This creates that mystical forest atmosphere.
Add a Curves adjustment layer. Lift the shadows slightly. This prevents your darkest areas from going pure black, which looks more natural and magical.
Optional but effective:
Add a subtle yellow or warm glow to your highlights. This creates color contrast with your cool shadows. The warm-cool interplay adds visual depth.
Final Detail Pass
Zoom in and inspect your composition carefully. Look for these common issues:
Hard edges: Any element with visible selection edges needs more blending.
Color mismatches: Objects that don’t match the scene’s overall color temperature stick out.
Lighting inconsistencies: Shadows should all suggest light comes from similar directions.
Scale problems: Elements that look obviously too large or small for their position.
Fix these issues with adjustment layers, additional masking, or careful retouching.
Adding Atmospheric Effects
Create a final layer on top of everything. Fill it with a dark blue or purple. Set the blend mode to Overlay or Soft Light. Lower opacity to 10-20%.
This atmospheric layer ties everything together. It adds a subtle color cast that unifies all your separate elements.
For extra atmosphere:
Add a very subtle vignette. Darken the corners slightly to draw focus toward your central subject. Keep this effect barely noticeable.
Sharpening for Print or Web
Flatten your image or create a merged copy on top. Go to Filter > Sharpen > Smart Sharpen.
Use these conservative settings:
- Amount: 100-150%
- Radius: 0.5-1.0 pixels
- Reduce Noise: 5-10%
Sharpening should enhance details without creating visible halos or artifacts. When in doubt, sharpen less rather than more.
Adapting This Technique
These same methods work for countless creative projects. Try these variations:
Underwater scenes: Replace mushrooms with coral. Change blue-green color grading. Add floating particles instead of stars.
Winter wonderland: Use ice and snow textures. Replace glowing effects with sparkles. Add cool blue tones.
Space explorer: Swap forest elements for asteroids and planets. Use stars as actual stars. Purple and pink nebula colors.
The core technique remains identical. Only the specific elements and color choices change.
Common Mistakes to Avoid
Inconsistent lighting directions: Every element’s highlights and shadows should suggest the same light source position.
Over-sharpening: Excessive sharpening creates ugly halos around edges and makes images look processed.
Ignoring color temperature: Warm and cool elements mixed randomly look disconnected. Choose a dominant temperature and commit.
Skipping layer organization: Name your layers. Use layer groups. Your future self will thank you.
Rushing the blending: Spend time on subtle masks and edge refinement. This separates amateur from professional work.
Why This Technique Matters
Photo compositing isn’t just about creating fantasy images. These skills transfer directly to:
- Product photography retouching
- Real estate virtual staging
- E-commerce image enhancement
- Social media content creation
- Portrait enhancement and manipulation
Master these fundamental compositing concepts and you’ve unlocked countless creative and commercial applications.
The techniques you’ve learned here form the foundation of professional photo manipulation. Practice them until they become second nature. Then push boundaries and create work that’s uniquely yours.
Start with this tutorial’s specific example. Then experiment with your own creative visions. The tools and methods stay the same. Your imagination determines what you create.