Want to create stunning surreal photo manipulations? This step-by-step tutorial shows you how to transform an ordinary library into a magical underwater aquarium.
You’ll learn essential Photoshop techniques that work for any photo manipulation project. Plus, these skills transfer to countless other creative projects. No advanced expertise required.
What You’ll Learn
This tutorial covers practical Photoshop fundamentals. We’ll walk through layer masking, adjustment layers, and blending techniques. Each step builds on the previous one.
By the end, you’ll understand how to combine multiple images seamlessly. More importantly, you’ll know how to add realistic lighting and atmospheric effects. These skills apply far beyond this single project.
Tools and Resources You Need
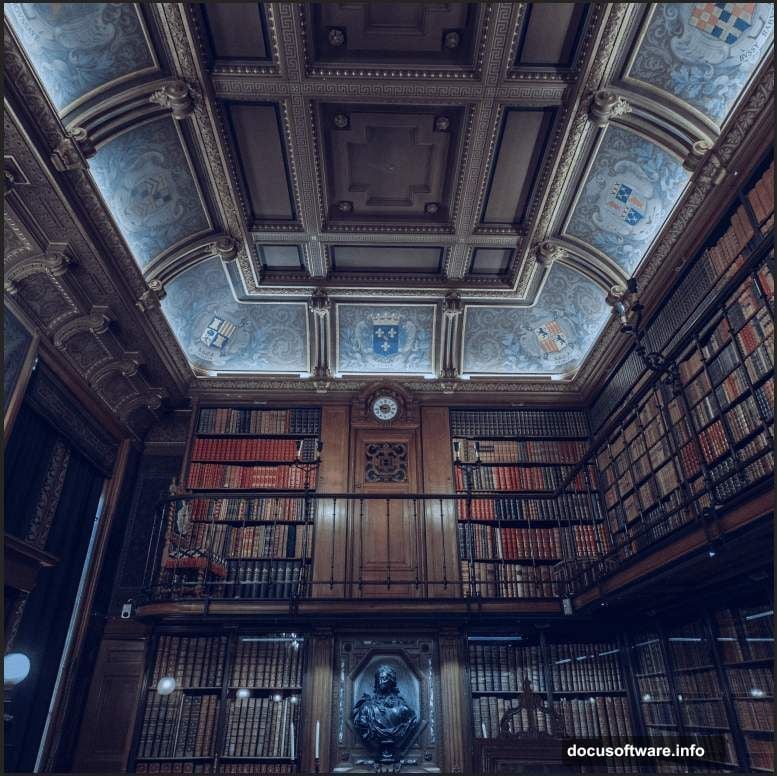
Before starting, gather your source images. You’ll need a library interior photo, water texture overlays, and various sea creature images. The tutorial uses jellyfish, tropical fish, and bubble overlays.
Free stock photo sites work perfectly for practice. Once you master the technique, you can use premium images for portfolio pieces. Just make sure you have the right to use any images commercially if needed.
Key resources:
- Library interior photograph
- Water surface texture
- Multiple fish images (at least 3 varieties)
- Jellyfish photographs
- Bubble overlays
- Good lighting reference photos
Setting Up Your Canvas
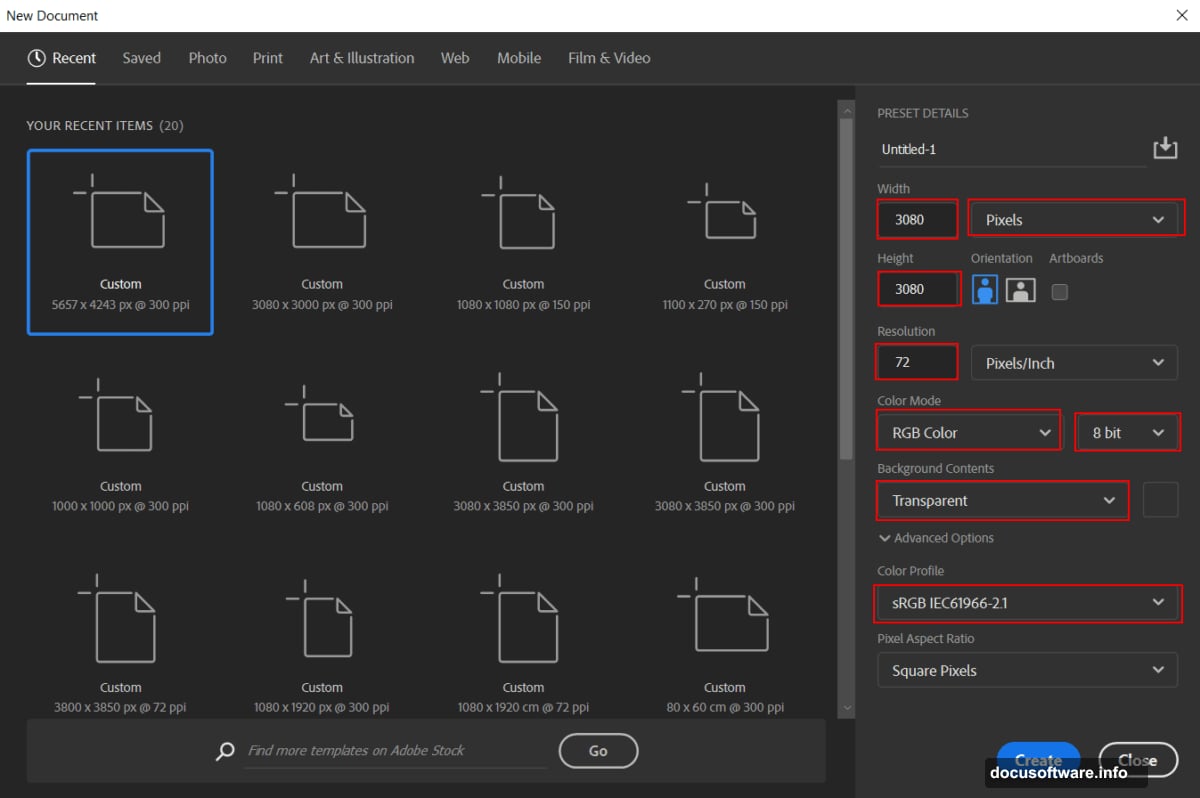
Start by creating a new document in Photoshop. Go to File > New and set your dimensions to 3080 x 3080 pixels at 72 DPI resolution.
Why square? Social media loves square images. Plus, this gives you flexibility to crop for different platforms later. Set your color mode to RGB and background to transparent.
These settings work for web projects. If you’re printing, increase resolution to 300 DPI. But for most digital art, 72 DPI keeps file sizes manageable.
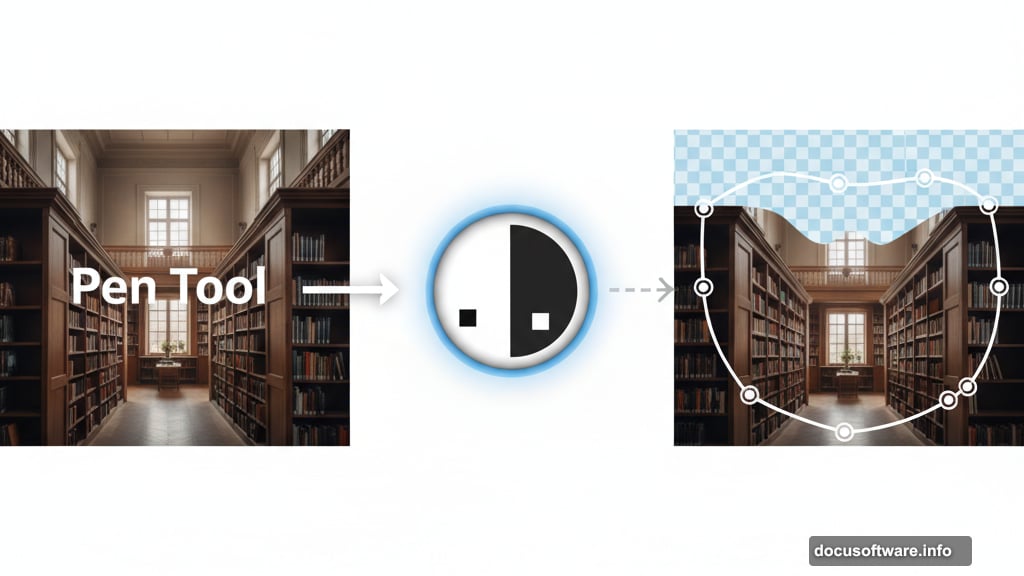
Mastering the Pen Tool for Precise Selections
The Pen Tool is your best friend for clean selections. Press P to activate it. Then start clicking around the library roof area you want to remove.
Each click creates an anchor point. Connect these points to form a path around your selection area. Don’t worry about perfection on your first try.
Here’s the trick: Click where straight edges begin and end. For curves, click and drag to create smooth flowing paths. Right-click your completed path and choose “Make Selection” when finished.
Then add a layer mask to hide the unwanted areas. This method beats the Magic Wand tool every time. Why? You maintain complete control over edges. Plus, masks are non-destructive so you can adjust later.
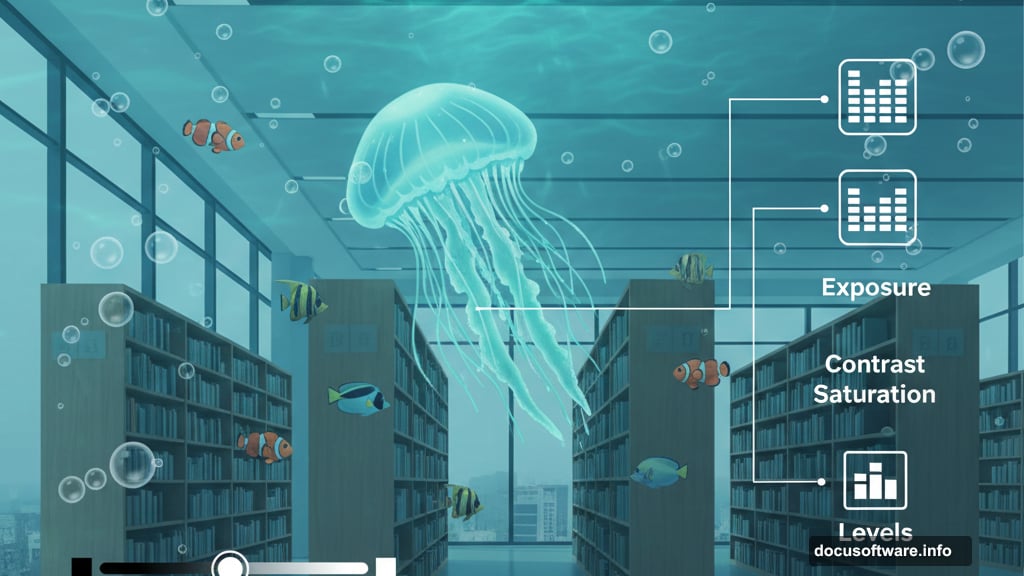
Building Realistic Depth with Adjustment Layers
Now comes the magic. Adjustment layers let you modify colors and lighting without permanently changing your images. Start with a Levels adjustment layer.
Levels control your image’s tonal range. Drag the black slider right to deepen shadows. Move the white slider left to brighten highlights. The middle slider adjusts midtones.
Next, add a Selective Color adjustment. This fine-tunes specific color ranges. Want deeper blues for underwater atmosphere? Adjust the cyan and blue channels. Each change brings your scene closer to reality.
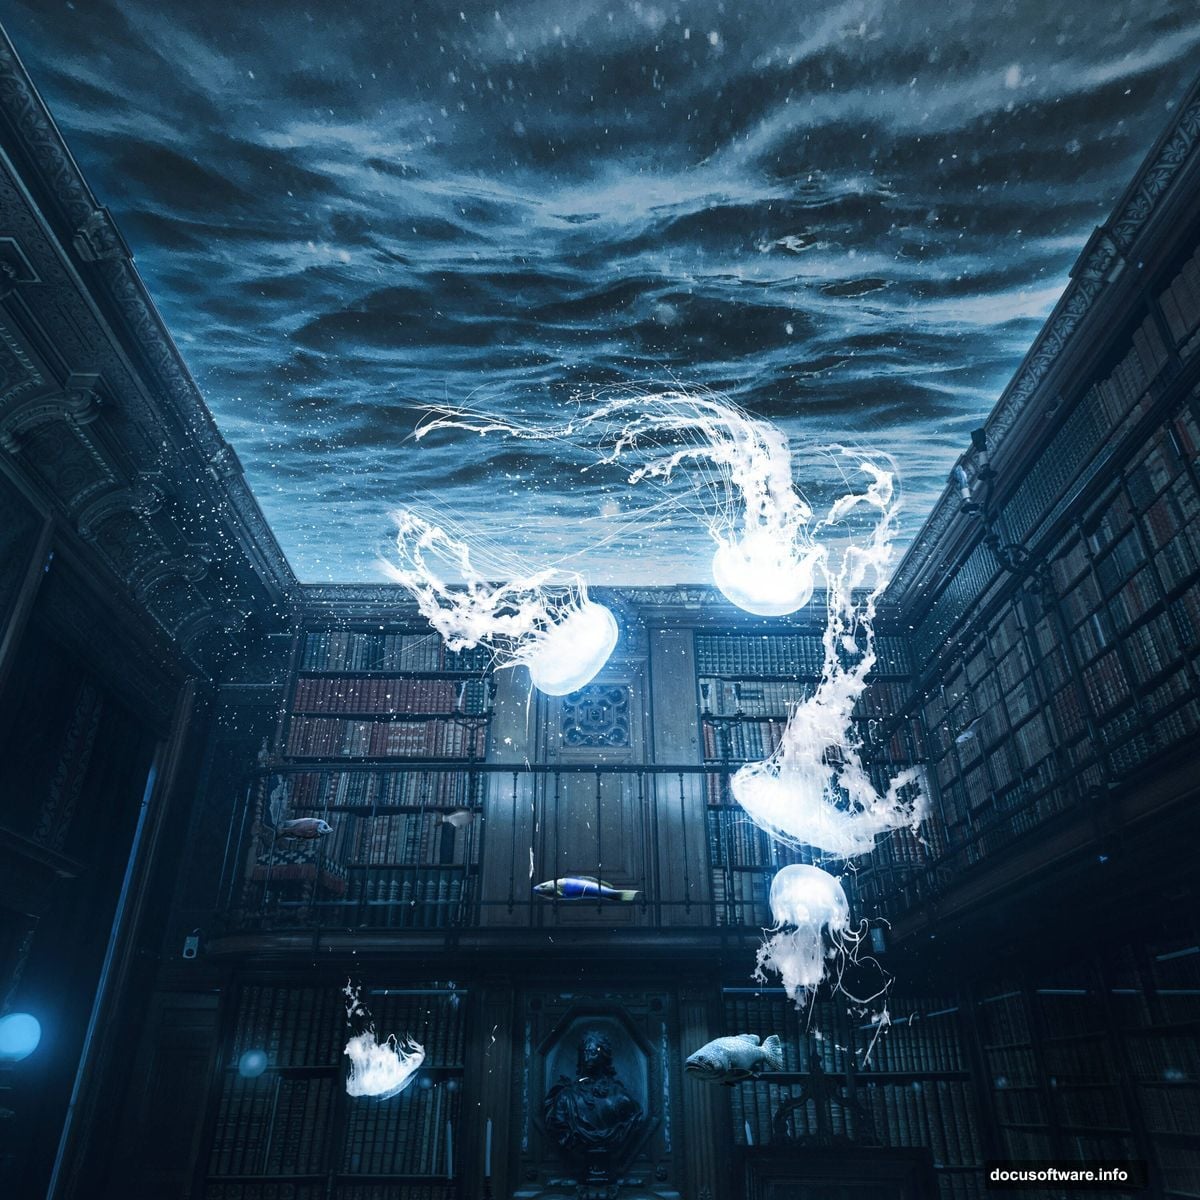
Creating Underwater Atmosphere

Water changes how light behaves. Everything underwater gets that characteristic blue-green tint. Add a Curves adjustment layer to replicate this effect.
Click the middle of the curve and drag slightly upward. This lightens midtones. Then add another point in the shadows and drag down slightly. This creates the murky depth of water.
But don’t overdo it. Subtle adjustments look more convincing than dramatic changes. Remember, you can always add more intensity later.
Painting Light and Shadow
Switch to the Brush Tool (B). Select a soft round brush and set your foreground color to black. Lower the brush flow to around 10 percent.
Now paint over areas that should be darker. The upper portions of the library need less light since they’re deeper underwater. Build up the effect gradually with multiple brush strokes.
This technique mimics how light scatters and diminishes underwater. The key is patience. Layer multiple subtle passes instead of one heavy application.
Adding Highlights and Drama
Create another Curves adjustment layer. This time, invert it by pressing Ctrl/Cmd + I. The layer mask turns black, hiding all adjustments.
Switch your foreground color to white. Paint on the mask where light should hit. Shelves facing upward catch more light. So do objects closer to the water surface.
This selective lighting adds three-dimensional depth. Your flat image suddenly has form and structure. Plus, it guides viewers’ eyes to important elements.
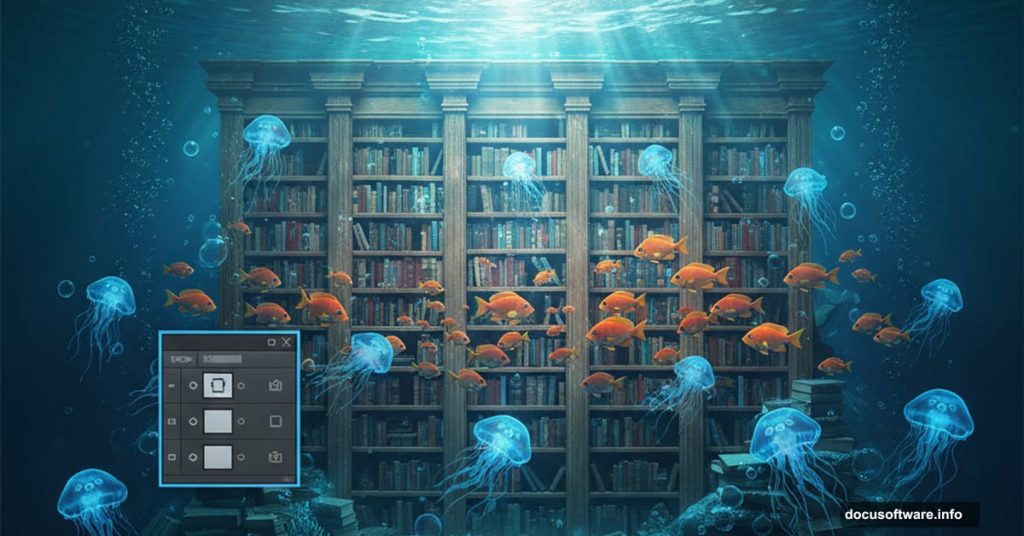
Placing Your Sea Creatures
Go to File > Place and select your fish images. Position them throughout your library space. Use the Transform tool (Ctrl/Cmd + T) to resize and rotate each creature.
Hold Alt + Shift while dragging corners to maintain proportions. In newer Photoshop versions, just holding Alt works. Scale fish smaller as they move deeper into the scene for realistic perspective.
Add jellyfish near the ceiling area. Their translucent bodies and trailing tentacles add movement. Plus, they fill empty vertical space beautifully.
Blending Multiple Elements Seamlessly
Each added element needs adjustment layers. Match the lighting and color of your fish to the overall underwater scene. Add Curves adjustments to each creature layer.
Darken fish in shadowy areas. Brighten those near light sources. This consistency sells the illusion. Your brain expects light to behave predictably.
Don’t forget to add subtle motion blur to some fish. Filter > Blur > Motion Blur creates the sense of swimming. Just keep the blur amount low for believability.
Final Polish with Camera Raw
The Camera Raw filter adds professional polish. Go to Filter > Camera Raw Filter. This opens an interface packed with adjustment options.
Bump up clarity slightly for sharper details. Add a hint of vibrance to make colors pop. Reduce highlights if anything looks blown out.
Most importantly, add a subtle vignette. Darken the edges of your image slightly. This focuses attention on the center of your composition. Plus, it mimics how underwater scenes naturally appear.
Common Mistakes to Avoid
New photo manipulators often add too many elements. Less is more. Three to five fish work better than twenty. Empty space lets viewers’ eyes rest.
Another mistake? Ignoring light direction. If light comes from above, everything should cast shadows downward. Inconsistent lighting destroys believability fast.
Finally, don’t skip the adjustment layers. They seem tedious but make the difference between amateur and professional results. Every element needs color matching.
Taking Your Skills Further
This technique works for countless scenarios. Replace the library with a bedroom for a dreamlike scene. Or put an office underwater for surreal corporate art.
The core skills remain the same. Master layer masking, adjustment layers, and lighting principles. Then you can create any photo manipulation your imagination produces.
Practice with different source images. Try manipulating portraits, landscapes, or architecture. Each project teaches new problem-solving approaches.
Photo manipulation combines technical skill with artistic vision. The technical parts come with practice. But the creative vision? That’s uniquely yours. So experiment freely and develop your personal style.
Your next stunning surreal image is just one Photoshop session away.