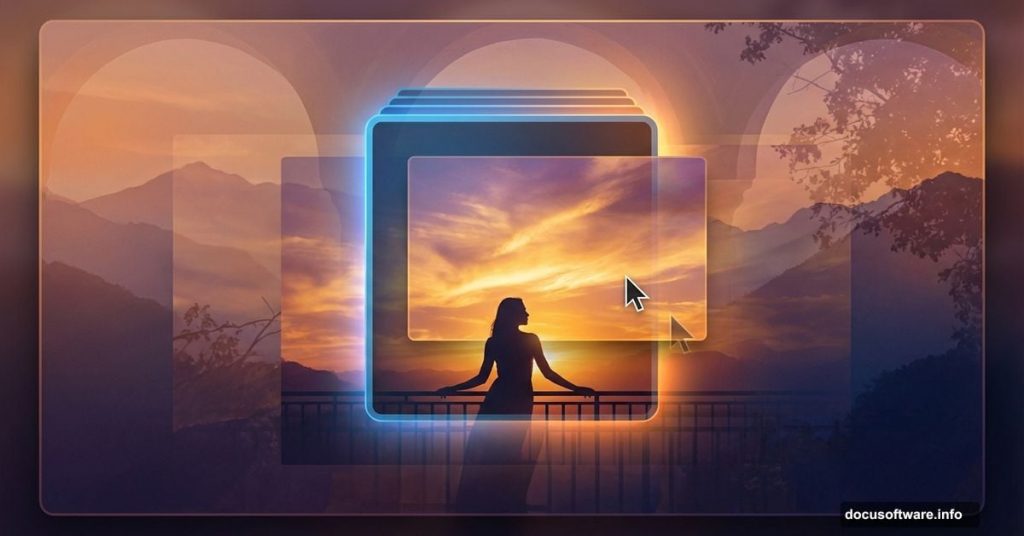
Want to create stunning landscape composites? This sunset manipulation teaches you professional techniques step by step.
You’ll blend multiple images into a cohesive scene. Plus, you’ll learn lighting tricks that make composites look real instead of fake. No complex theory. Just practical Photoshop skills you can use immediately.
What You’re Building
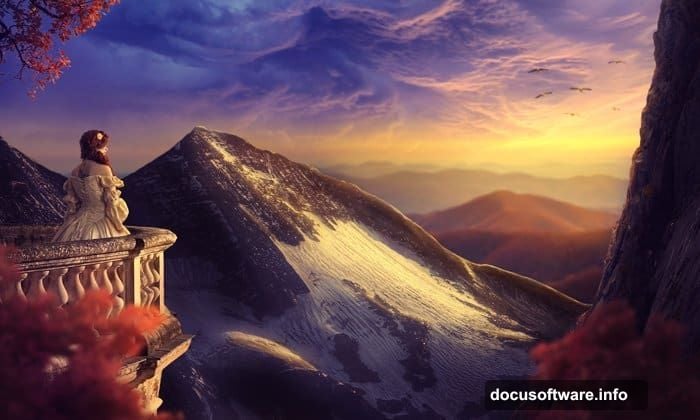
This tutorial creates a dramatic sunset landscape with a model on a balcony. Think moody atmosphere, golden hour lighting, and professional polish.
The final image combines seven different source photos. Mountains, sky, trees, architecture—all blended seamlessly. Most importantly, you’ll understand why each adjustment works, not just copy settings blindly.
You’ll need intermediate Photoshop knowledge. Basic masking and layer skills are essential. But if you understand adjustment layers and blend modes, you’re ready to start.
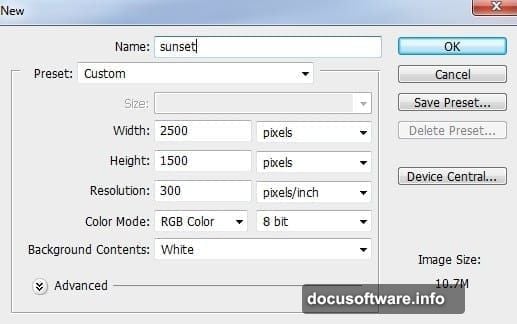
Set Up Your Canvas
Create a new Photoshop document first. Use these settings for best results:
Width: 3000 pixels. Height: 2000 pixels. Resolution: 300 dpi. Color Mode: RGB.
These dimensions give you flexibility for prints or web use. Plus, working larger helps maintain quality when you scale down later.
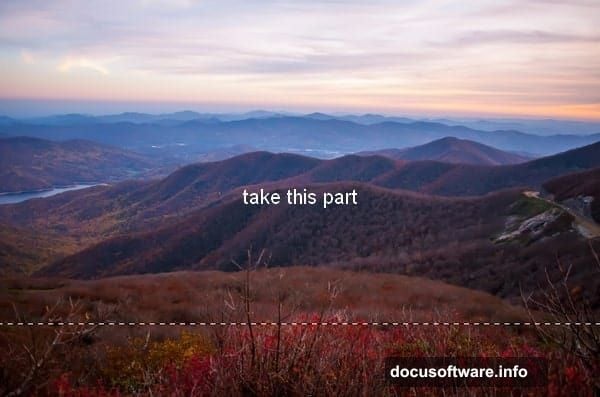
Build the Base Landscape
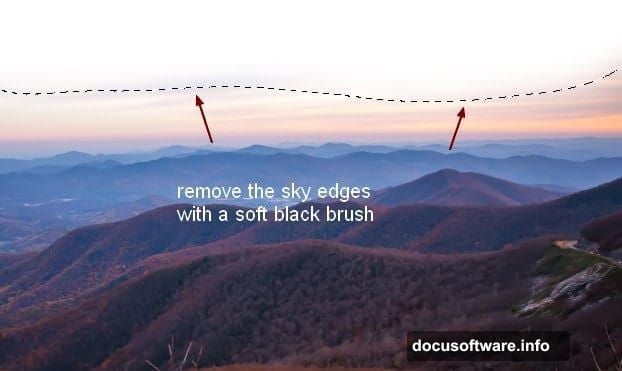
Open your landscape photo. Select the Rectangular Marquee Tool (M). Choose the upper portion where sky meets land.
Drag that selection into your canvas. Transform it using Cmd/Ctrl+T to fit your composition. Position it at the bottom of your frame.
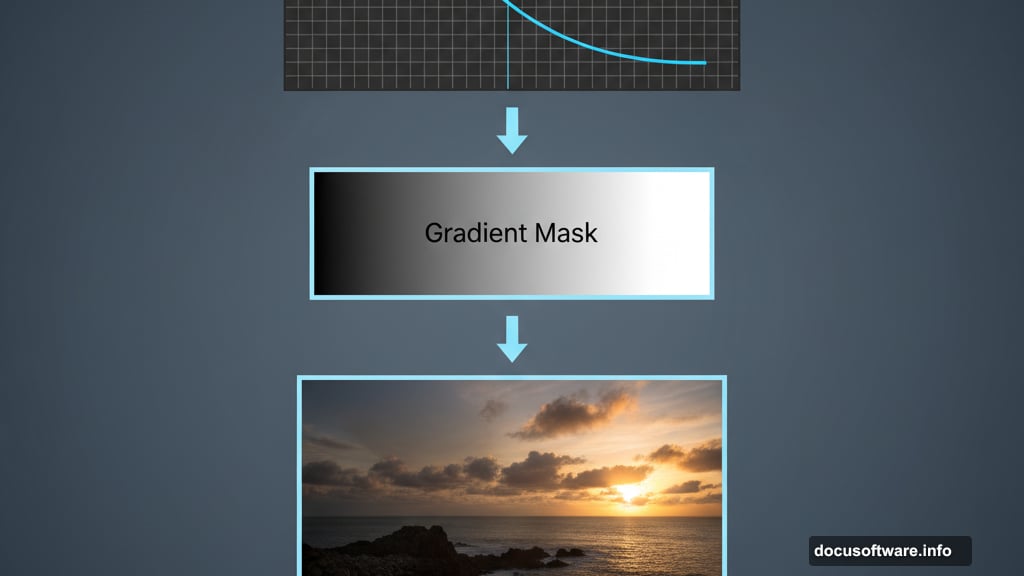
Now add a layer mask. Click the mask icon at the bottom of your Layers panel. Grab a soft black brush at 100% opacity. Paint along the top edge to remove harsh transitions.
This blending technique matters more than most tutorials admit. Hard edges scream “fake composite.” Soft transitions sell the illusion.
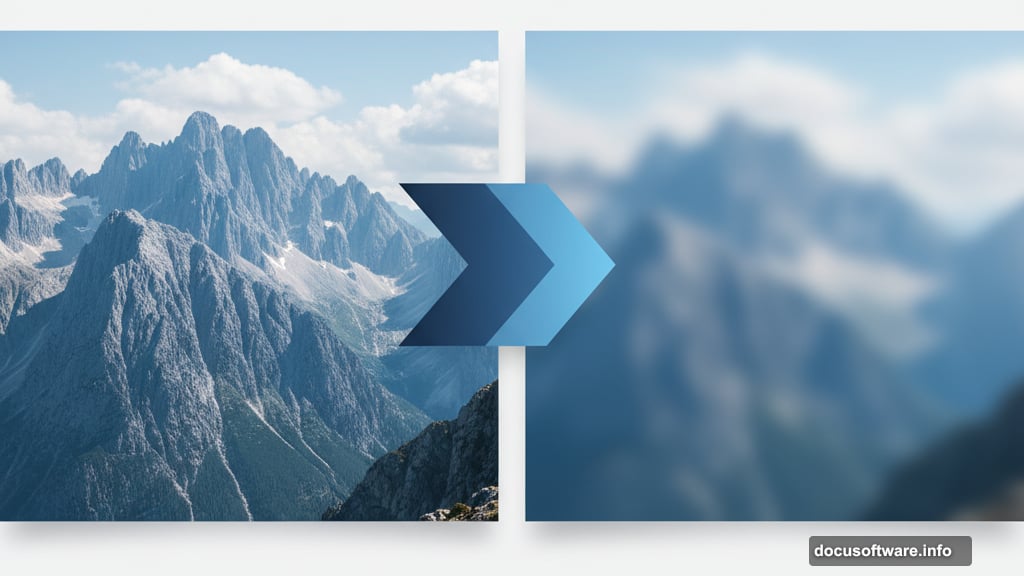
Blur for Depth
Apply Gaussian Blur to your landscape layer. Go to Filter > Blur > Gaussian Blur. Set radius to 4 pixels.
Why blur a landscape? Depth of field. Real photos show selective focus. Background elements appear slightly soft compared to your focal point. This small detail adds realism.
Darken the Foundation
Create a Curves adjustment layer. Go to Layer > New Adjustment Layer > Curves. Pull the curve down to darken overall tones.
But here’s the trick. Use the layer mask to protect the upper right. Grab a soft black brush at 50% opacity. Paint over that area on the mask. This creates directional lighting that matches your sunset.
Most beginners apply adjustments globally. Professionals use masks to control where effects appear. That’s what separates amateur from pro work.
Add Dramatic Sky
Place your sky image above the landscape. Rotate it using Cmd/Ctrl+T until the composition feels balanced. Sunset skies work best when the horizon aligns naturally.
Add a mask immediately. Remove rough edges with a soft black brush. The transition between sky and landscape should be invisible. Spend extra time here. Viewers notice bad sky blends instantly.
Apply Gaussian Blur at 2 pixels. Less blur than the landscape because sky sits farther back. This depth layering makes the scene believable.
Brighten Sky Selectively
Create a Curves adjustment layer with Clipping Mask. Click the adjustment layer, then hit Cmd/Ctrl+Alt+G. This clips it to affect only the sky.
Raise the curve to brighten. Now grab a soft black brush at 10-15% opacity. Paint on the left side of the layer mask. This reduces brightness there, creating directional light.
Low opacity brushwork matters here. Heavy-handed masking looks obvious. Gentle passes build realistic gradients.
Integrate Mountain Layers
Open your mountain stock photo. Extract it using your preferred method. Quick Selection Tool works for most landscapes. Refine Edge helps with complex details.
Place the mountain on the left side. Scale it to match perspective. Mountains farther away appear smaller. Keep proportions realistic.
Light the Mountain
Create another Curves adjustment layer with Clipping Mask. Brighten the mountain to match your light source. The sun sits on the right, so right-facing slopes should glow.
Paint black on the mask where shadows fall. Left edges of the mountain stay darker. Right edges catch sunset light. This directional lighting sells the integration.
The mask painting technique repeats throughout. Adjustment layers provide global changes. Masks give you local control. Master this workflow and composites improve dramatically.
Build Architecture Elements
Your balcony element comes next. Place it in the composition where your model will stand. Transform carefully to match perspective. Architecture follows strict perspective rules. Crooked lines ruin believability instantly.
Mask edges thoroughly. Balcony railings require precise selections. Use the Polygonal Lasso Tool for straight edges. Refine Edge helps smooth the mask.

Color match the balcony to your scene. Create a Color Balance adjustment layer with Clipping Mask. Push Midtones toward cyan and blue to match twilight atmosphere. Settings around -57, 0, 100 work well. Adjust Highlights to -2, 0, 78.
These numbers aren’t magic. They shift colors toward cool tones that match sunset lighting. Your specific image might need different values. Trust your eyes more than exact numbers.
Position Your Subject
Place your model photo. Extract carefully using the Pen Tool for clean edges. Hair requires special attention. Use Select and Mask to refine fuzzy areas.
Scale the model appropriately. Perspective matters critically here. A too-large figure looks pasted on. Too small feels disconnected. Match head size to your balcony proportions.
Add subtle shadows beneath the model. Create a new layer below your subject. Paint soft black shapes with a brush at 20-30% opacity. Shadows anchor subjects to their environment.
Integrate Foreground Trees
Trees add depth and frame your composition. Place your first tree on the right side. Scale it large since it sits closest to the camera.
Mask carefully around branches. Tree extractions take patience. Use a hard brush at 100% for major areas. Switch to 50-70% opacity for semi-transparent leaves.
Apply slight Gaussian Blur—maybe 1 pixel. Even foreground elements show minimal softness from atmospheric haze. This tiny detail adds realism.
Darken the tree with a Curves adjustment layer. It’s a silhouette against bright sky. Keep it nearly black but preserve some detail. Solid black shapes look flat.
Add Mid-Ground Vegetation
Your second and third trees go deeper in the scene. Place them smaller and higher in the frame. Things farther away sit higher in realistic compositions.
Blur these more aggressively. Use 2-3 pixels of Gaussian Blur. Distance creates atmospheric perspective. Farther objects lose detail and contrast.
Reduce opacity to 70-80%. This mimics atmospheric haze. Distant objects appear fainter. Plus, lower opacity helps integrate elements that resist perfect color matching.
Create Atmospheric Depth
Add a Color Fill layer above everything. Choose a warm orange tone that matches your sunset. Set blend mode to Overlay at 20-30% opacity.
This unifying color wash ties disparate elements together. It simulates atmospheric scatter that occurs in real photos. Every element picks up ambient light color.
Mask areas that should stay darker. Your deep shadows shouldn’t glow orange. Paint black on the mask over shadow regions. Preserve depth and contrast.
Enhance Overall Contrast
Create a Curves adjustment layer at the top. Form an S-curve by raising highlights and lowering shadows. This increases global contrast.
But watch your histogram. Don’t clip highlights or crush blacks. Pure white and pure black should only appear in specific areas like the sun or deepest shadows.
Use the layer mask again. Reduce the effect where it overpowers details. Gentle curves application across the entire image looks more natural than aggressive adjustments.
Add Final Light Effects
Create a new layer above everything. Set blend mode to Screen. Grab a large, soft brush with orange or yellow color. Paint where sunset light should glow brightest.
Keep opacity around 30-50%. Multiple gentle passes build realistic glow. Heavy-handed light effects look fake immediately.
Focus light near the horizon and on your subject. Light should have direction and purpose. Random glowing spots confuse viewers.
Polish with Selective Sharpening
Merge a copy of all layers. Press Cmd/Ctrl+Shift+Alt+E. This creates a merged layer at the top while preserving all individual layers below.
Apply Filter > Sharpen > Unsharp Mask. Use Amount around 80%, Radius 1-1.5 pixels, Threshold 0. This sharpens subtly.
Add a mask and paint black over areas that should stay soft. Sky and blurred background elements don’t need sharpening. Focus sharpness on your subject and main architectural elements.
The Secret Nobody Teaches
Here’s what tutorials skip. Color harmony matters more than perfect masking. A technically perfect composite with mismatched colors looks worse than rough masks with unified tones.
Spend time matching color temperature across all elements. Sunset scenes lean warm and golden. Everything should show hints of orange and amber. Cool blue elements stand out as obvious composites.
Use Color Balance and Hue/Saturation adjustment layers liberally. Every imported element needs color adjustment. No stock photo matches your scene perfectly straight from the download.
Layer masks give you surgical control. But unified color palette gives you believability. Professional compositors obsess over color matching. Amateurs focus only on clean extractions.
Save Your Work Properly
Save as PSD to preserve all layers. You’ll want to adjust elements later. Trust me on this. You’ll spot improvements after walking away.
Also save a flattened JPEG for sharing. But keep that layered PSD. Clients change their minds. Your own taste evolves. Editable files save hours of rework.
This workflow works for any photo manipulation. Combine images thoughtfully. Match lighting direction. Unify colors with adjustment layers. Use masks aggressively. Build depth with blur and atmospheric effects.
Master these techniques and your composites look professional instead of obvious. The difference between amateur and pro work comes down to these subtle refinements.