
Photoshop selections drive me crazy sometimes. You spend 20 minutes carefully tracing around hair or fur, only to end up with jagged edges that scream “amateur cut-out job.”
But here’s what most tutorials won’t tell you. The secret to perfect selections isn’t just one magic tool. Instead, it’s knowing which combination of techniques to use and when to use them. These 10 methods will transform how you approach masking and selections.
Let’s dig into what actually works.
Start with Smarter Base Selections
Photoshop offers dozens of selection tools. The Lasso, Pen tool, Object Selection, Quick Selection, and yes, even the old Magic Wand all have their place. But the real power lies in intelligent selection methods.
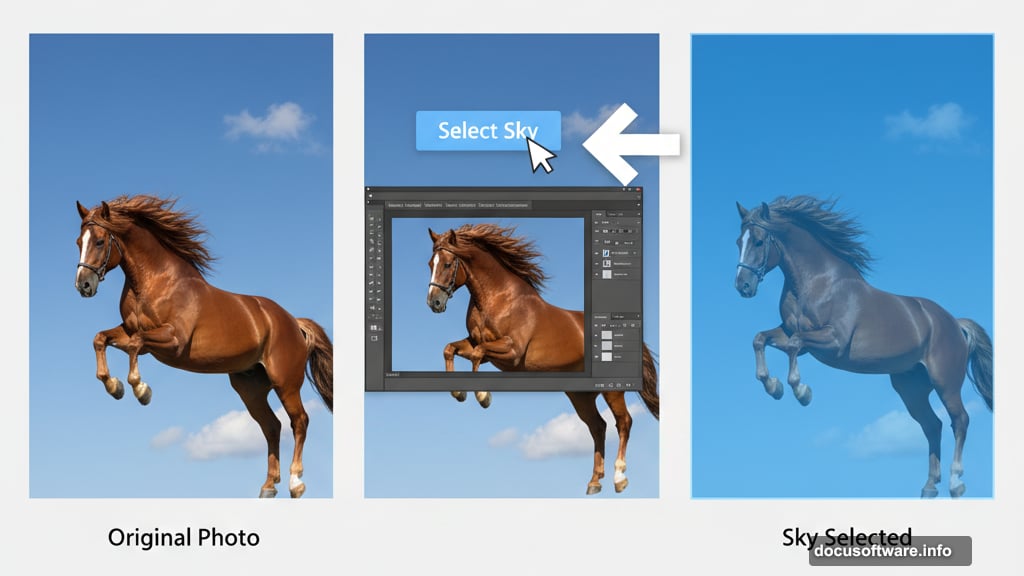
Select Subject and Select Sky work remarkably well for obvious subjects. Take a photo of a horse mid-jump against a bright sky. Select Sky grabs the background instantly. Then Select Subject captures the horse in one click.
However, those AI tools fail with specific color selections. Say you’re working with a photo of three friends wearing glasses. You want to change the blue glasses to match the yellow ones. Select Subject won’t help here.
Instead, use Color Range. First, draw a rectangular marquee around just the blue glasses. This tells Photoshop where to focus. Then open Color Range and sample the blue tones with the eyedropper.
Here’s a crucial tip. Change the selection view mode to see your selection better. Also, check your eyedropper sample size. If it’s set to a large area like 31×31 pixels, it won’t work well for thin objects. You can adjust this setting even while the Color Range dialog is open.
Once you have the selection, a simple Hue/Saturation adjustment makes those glasses yellow.
Focus Area Selection Changes Everything
For a macaw photo with shallow depth of field, Select Focus Area becomes your best friend. This feature lets you dial in exactly which parts of the image are in focus using a simple slider.
The preview modes help you see what will be selected before committing. This makes it my favorite AI selection feature. You get customization and instant feedback.
Plus, you can jump straight into Select and Mask from this dialog. The “soften edges” option sometimes improves the selection dramatically. Output your selection as a new layer with a layer mask to keep things non-destructive.
Reduce Mask Density to Find Missing Pieces
Add a solid color layer below your selected macaw to check the quality. Notice some feathers are missing? Here’s the fix.
Select your layer mask and open the Properties panel. Reduce the mask density to just 2-3%. This makes the mask semi-transparent so you can spot areas that need work. Then use a brush to paint those areas back in.
This technique reveals problems you’d never see otherwise.
The Smudge Tool is Your Secret Weapon
Complex subjects like bird feathers create nightmares for selections. Where two feathers diverge, the selection often fails completely. You could try painting with a round brush, but it looks terrible.
Instead, switch to the Smudge tool and work directly on the mask. Simply drag the mask edges around. The natural fading effect of the Smudge tool makes everything look organic.
Cleaning up bad edges becomes effortless. This one trick saves hours of frustrating brush work.
Get True Sharp Edges with Select and Mask
For clean subjects like donuts on a plate, place a black-filled layer underneath. Use Focus Area to select the donuts, then enter Select and Mask mode.
Clean up any missed areas with the brush or quick selection tools. Here’s a speed tip: change brush size by holding Alt (PC) or Ctrl+Option (Mac) and dragging side-to-side. Drag up and down to adjust softness.
Now use the Smooth slider to remove bumpy edges. Add some Feather to expand a soft glow outward. Finally, crank up the Contrast slider to pull out any halo effects while tweaking Shift Edge for perfect results.
The Smudge technique works here too if corners need cleaning up.
Brush in Soft Light Mode Fixes Halos
Select a subject with a puffy hood using Select Subject and enter Select and Mask. Use the Refine Edge brush on the fuzzy hood edge and output to a layer mask.
Zoom in on the edges. You’ll probably see subtle haloing. Here’s how to eliminate it: grab a large, soft-edged brush, set the blend mode to Soft Light, and paint with black until edges clean up.
This same brush technique cleans up glow around other soft edges too.
Darken or Brighten Edge Blending
Sometimes edges need to blend better with backgrounds. One method: duplicate your subject layer and set it to Multiply blend mode (or Screen to brighten). Then select the original mask, contract it, and feather the selection. Use this to save only a faded edge around the subject.
You can clip this edge adjustment layer to the subject for even cleaner results.
Another approach involves duplicating the layer and setting the lower copy to Screen or Multiply. Apply a layer mask to the top layer and paint black to hide edge areas that need better background blending.
Pro tip: drag the layer into a group (Cmd/Ctrl + G) or convert it to a Smart Object if it already has a mask. This lets you add another layer mask to the group or smart object.
Channels Create Ultra-Complex Selections Fast
Some subjects are impossibly complex. Like selecting every branch and twig of a bare tree against the sky.
Channels solve this. Grab the blue color channel and duplicate it. Use Levels to adjust the blacks and whites until edges look right. Remember that white areas become selected, so invert the channel if needed.
Use that channel to make a selection and replace the entire background with white. This technique handles complexity that would take days to mask manually.
Clean Every Mask Edge with One Adjustment
After creating a mask from channels, target the mask itself and apply a Levels adjustment directly to it. Slide the input levels back and forth to expand, contract, or feather every single edge simultaneously.
This gives you global control over mask refinement.
Double Pass Select and Mask for Hair
Make a rough first selection with any tool. Enter Select and Mask. Focus first on getting good edges for clothing and hands before worrying about hair.
Try different view modes to check that you’re not losing important parts. Use the Edge Detection slider around 3-5 pixels to help Photoshop find natural edges. Add some smoothing, feathering, and contrast as needed.
Commit this change. Then immediately go back into Select and Mask. Notice all sliders reset to zero. Now you can focus purely on hair without affecting the work you already did.
Use the Refine Edge brush as small as possible while still straddling the edge. Paint along hair edges and let Photoshop pick out the selection. Place a light solid color layer underneath to check your work. The color #dfd0b3 works well for most subjects.
Some images work better with light backgrounds, others prefer dark. Experiment to find what works.
Use Soft Light brushing and the Smudge tool to clean up remaining hair edges.
Decontaminate Edges for Translucent Objects
For semi-transparent subjects like powder smoke bursts, create a selection with Select Subject and refine with the Quick Selection tool. Enter Select and Mask and use the Refine Edge brush.
Then enable the Decontaminate Edge option and experiment with the slider. This feature removes color contamination from the original background.
It’s especially useful when you have your final background image in place. Change the view mode to see how the cut-out object looks over its new background.
These techniques cover most selection challenges you’ll face. The key is knowing which method fits your specific image. Practice combining these approaches and you’ll create selections that look professionally done every time.