
The Pen tool scares people. Those clean, curved paths seem impossible to create at first.
But here’s the truth. Once you understand three core concepts, the Pen tool becomes your most powerful selection and masking weapon. Plus, you’ll wonder why you avoided it for so long.
Let’s break down exactly what you need to know to start creating professional paths, selections, and vector masks today.
Stop Drawing Shapes, Start Drawing Paths
First mistake everyone makes? Drawing shapes when they should draw paths.
Open your Pen tool. Look at the top toolbar. You’ll see options for “Shape” and “Path.” Always choose Path when learning. Shapes fill automatically with color. That’s distracting when you’re building precision selections.
Paths give you clean lines to work with. Then you can convert them to selections or masks later. So start with paths every single time until the tool feels natural.
Make the Path Actually Visible
Default Pen tool settings make paths nearly impossible to see. Fix that immediately.
Turn on Rubber Band mode in your tool options. This shows a preview line between your last anchor point and your cursor. Game changer for visualizing where your path goes next.
Also, increase path line thickness. Click the gear icon in your tool options. Bump the path width up to 2 or 3 pixels. Now you can actually see what you’re creating as you work.
The Spacebar Trick Changes Everything
Here’s the secret that separates beginners from pros.
Click to place an anchor point. But don’t release yet. Hold spacebar before you let go. Now you can reposition that point before committing to it.
This matters more than you think. Perfect anchor point placement determines how smooth your curves look. Being able to adjust on the fly saves massive time later. So get comfortable holding spacebar mid-click to nudge points into perfect position.
Building Your First Real Path
Start simple. Open a photo with clear edges. Something like a car works perfectly because you get both straight lines and smooth curves.
Click around the object’s perimeter. Don’t worry about curves yet. Just click to place points along straight edges. Focus on accuracy over speed.
Notice how the path connects each point with straight lines? That’s your foundation. Now you’ll learn to make those lines curve.
Tangent Handles Control Everything
Click and hold on your next anchor point. Now drag. You’ll see handles appear on both sides of your point. These control how your path curves.
The longer the handle, the more gradual the curve. Shorter handles create tighter curves. Direction matters too. Point handles where you want the path to flow.
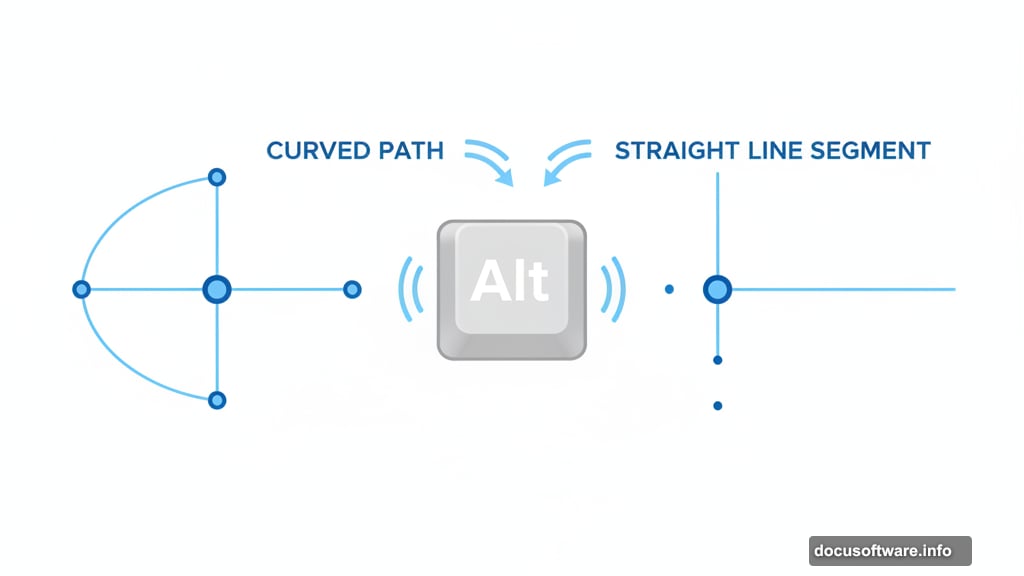
But here’s where it gets interesting. Sometimes you only want one handle. Maybe you’re transitioning from a curve to a straight line. Hold Alt (Option on Mac) and click the anchor point after dragging a handle. This resets the opposite handle to zero.
Want to create a new handle after resetting? Alt-click and drag from the anchor point. Now you’ve got independent control of each side. This technique lets you create complex shapes with perfect transitions between curves and straight edges.
Close Paths the Right Way
Your first anchor point looks different. It has a small circle indicator. That’s your target for closing the path.
Hover over that first point until you see a small circle appear next to your cursor. Click once to close the path cleanly. If you dragged a handle from that first point, you’ll need to carefully align your final curve to match.
Practice this a few times. Closing paths smoothly takes repetition. But once you’ve got it, you can trace any shape cleanly.
Cutting Out Complex Details
So you’ve traced around an entire object. Great start. But what about windows, vents, or other interior cutouts?
Save your path first. Name it something obvious like “Car Outline.” Now duplicate that path in your Paths panel.
Select the Pen tool again. Make sure you’re still on the same path layer. Draw another closed path inside your main shape. Maybe trace around a car’s windows or air scoops.
Here’s the magic part. Select your new interior path with the Path Selection tool (the black arrow). Change the path operation from “Combine Shapes” to “Subtract Front Shape” in the top toolbar.
Boom. Your interior path now cuts a hole in your main shape. Draw as many cutouts as you need. Each one subtracts from your overall selection.
Turn Paths Into Useful Masks
Paths look nice. But you need them to actually do something.
Select your completed path. Click the layer mask icon at the bottom of your Layers panel while holding Alt (Option on Mac). This creates a vector mask from your path.
Now add a Solid Color Fill layer. Set the blend mode to Color. Suddenly you can change your object’s color while preserving all the original texture and shading.
Try different colors. Adjust the path if edges look wrong. The Direct Selection tool (white arrow) lets you click individual anchor points and drag them to new positions. Pull those tangent handles to refine curves until everything looks perfect.
Practice Makes Perfect
Your first path probably looks rough. That’s completely normal.
The Pen tool rewards repetition. Trace the same object five times. Each attempt will be cleaner and faster than the last. Your brain needs to build muscle memory for placing points and dragging handles.
Start with objects that have simple shapes. Cars, bottles, phones. Gradually move to more complex subjects as your confidence builds. Soon you’ll be creating pixel-perfect selections in a fraction of the time traditional selection tools require.
The Pen tool isn’t magic. It’s just a skill that seems impossible until you practice the basics a few times. Give yourself twenty minutes of focused practice. You’ll be amazed how quickly it clicks.
Post Title:
Meta Description: