Photoshop‘s distortion filters unlock creative possibilities most designers overlook. This polar bear manipulation combines displacement mapping, water reflections, and natural compositing techniques.
You’ll learn practical skills that apply far beyond this single project. Plus, these techniques work for any reflection-based composition you’ll tackle.
Why Displacement Mapping Changes Everything
Most beginners skip displacement maps entirely. That’s a mistake.
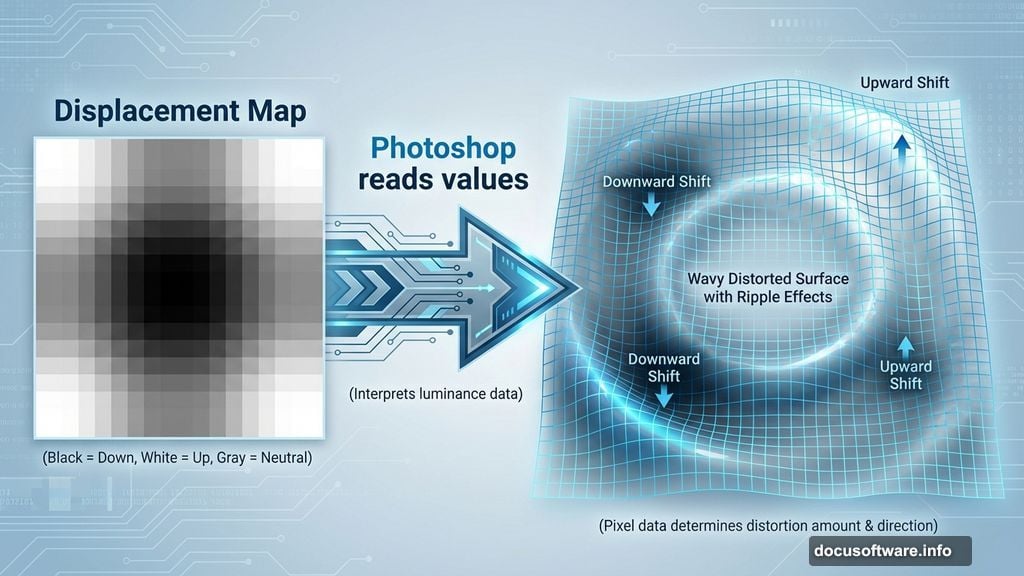
Displacement maps create realistic surface distortions automatically. Instead of manually warping reflections, you let Photoshop handle the complex math. The result looks natural because it follows actual water physics.
Think of it like this. Water surfaces ripple and distort reflections based on their texture. Displacement maps recreate that effect by reading grayscale values and shifting pixels accordingly. Dark areas push pixels one direction, light areas push them another.
So learning this technique now saves hours on future projects.
Setting Up Your Canvas
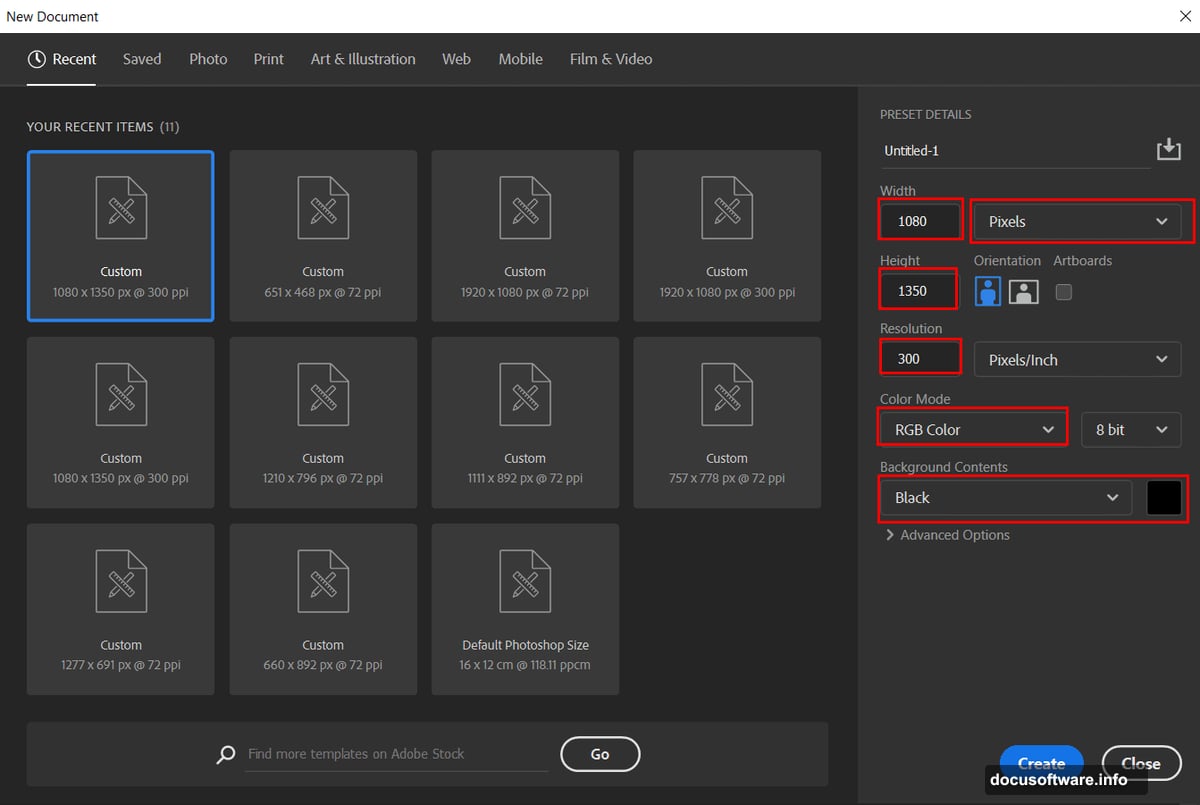
Start with the right foundation. Create a new document with these specs:
- Width: 1080 pixels
- Height: 1350 pixels
- Resolution: 300 DPI
- Color Mode: RGB 8-bit
- Background: Black
Why these dimensions? Portrait orientation works better for wildlife composites. Plus, 300 DPI ensures print-quality output if needed.
Next, add texture to your background. Go to Filter > Noise > Add Noise and crank Amount to 400%. Choose Uniform distribution for even grain. Then soften it with Filter > Blur > Gaussian Blur at 1.3px radius.
This creates subtle texture that prevents flat, digital-looking backgrounds.
Building Your Displacement Map
Here’s where things get technical. But stick with me because this part makes everything else work.
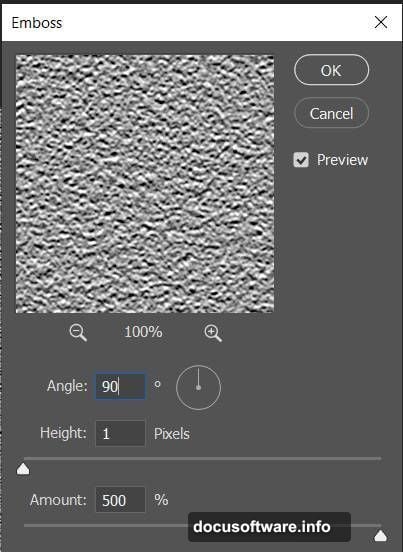
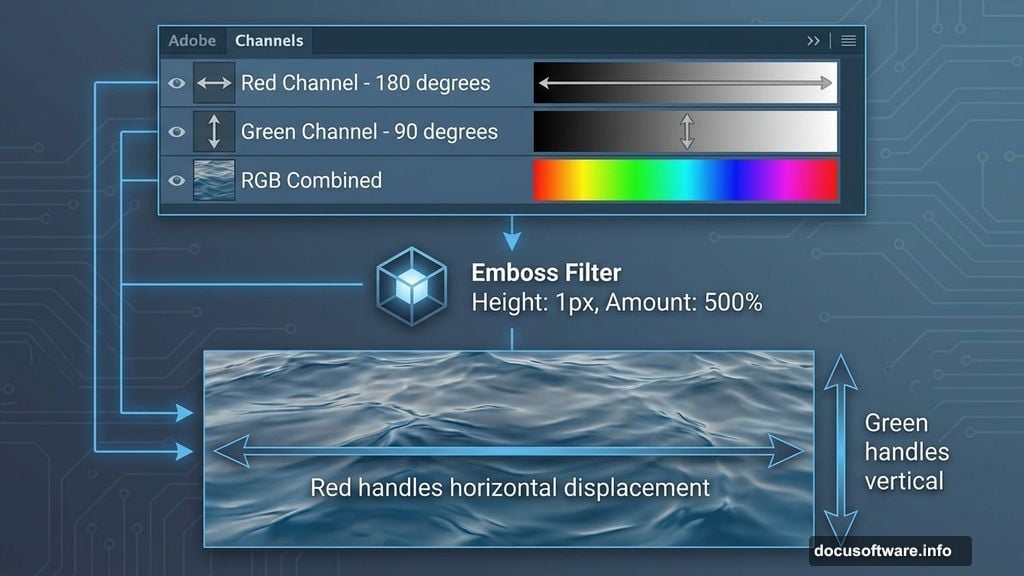
Switch to the Channels panel. Select just the Red channel. Now go to Filter > Stylize > Emboss with these settings:
- Angle: 180 degrees
- Height: 1 pixel
- Amount: 500%
Then select the Green channel and apply Emboss again. This time change Angle to 90 degrees. Keep Height at 1px and Amount at 500%.
What’s happening here? You’re creating directional distortion data. The Red channel handles horizontal displacement while Green handles vertical. Together they simulate water ripples.
Click back to RGB to see all channels combined. Duplicate this layer with Ctrl/Cmd + J. Time to transform it.
Creating Water Perspective
Press Ctrl/Cmd + T to activate Transform mode. Then go to Edit > Transform > Perspective. Grab the bottom corners and stretch them outward significantly.
This simulates water receding into the distance. Perspective distortion makes reflections look grounded rather than pasted on.

Save this file as a PSD. Name it something obvious like “Water_Displace.psd” because you’ll reference it soon.
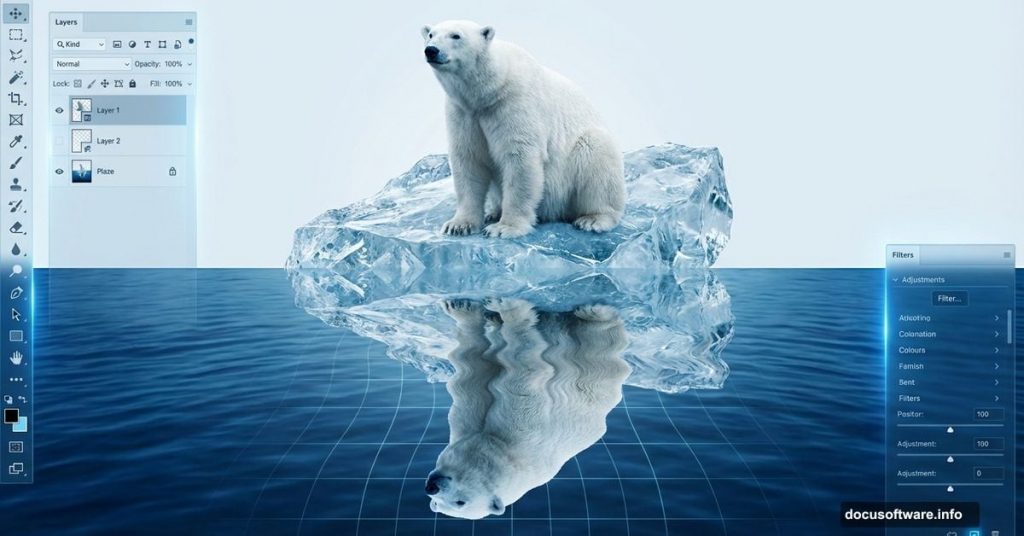
Applying Displacement to Your Bear
Open your polar bear stock image. Duplicate the layer immediately with Ctrl/Cmd + J. Always work non-destructively.
Now go to Filter > Distort > Displace. When prompted, select the displacement map PSD you just created. Photoshop applies your custom distortion to the bear image.
Next, flip the layer vertically. Go to Edit > Transform > Flip Vertical. This creates your reflection base.
But reflections aren’t perfect mirrors. They fade and blend with water. So add a layer mask to your flipped bear layer.
Mastering Gradient Masks for Reflections
Grab the Gradient Tool (G). Set foreground to black and background to white. Make sure you’re working on the layer mask, not the image itself.
Click at the bottom of your reflection and drag upward. This creates a smooth fade from visible reflection to transparent water.
The key is subtlety. Real reflections don’t have hard edges. They gradually blend with the water surface based on viewing angle and distance.
Try different gradient lengths until it looks natural. Too short feels abrupt. Too long makes the reflection too faint.
Adding Contact Shadows
Shadows sell the illusion. Create a new layer between your bear and reflection.
Select the Brush Tool (B). Choose a soft round brush. Set foreground to black. Drop both Flow and Opacity to 15%.
Now paint along the waterline where the bear meets its reflection. Build up darkness gradually with multiple strokes. This creates the shadow cast by the bear’s body blocking light from reaching the water.
Real contact shadows are darker in the center and fade at edges. So concentrate your brushstrokes where the bear’s weight presses into the water surface.
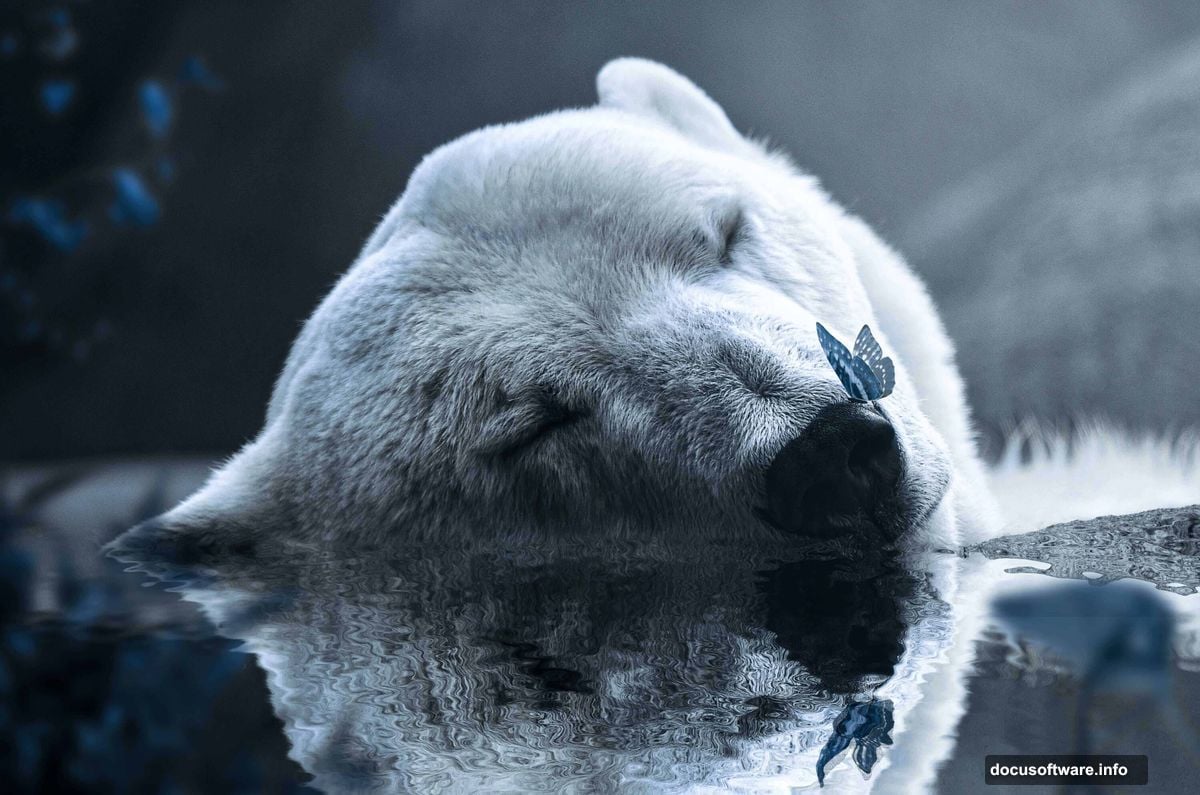
Compositing Natural Elements
Open your butterfly stock image. Use the Lasso Tool (L) to select it roughly. Don’t worry about perfection yet.
Copy (Ctrl/Cmd + C) and paste (Ctrl/Cmd + V) into your main composition. Press Ctrl/Cmd + T to transform. Hold Alt + Shift while dragging corners to resize proportionally.
Position butterflies around your scene strategically. They add life and guide the viewer’s eye through the composition.
For ivy elements, repeat this process. Select, copy, paste, transform. Layer multiple ivy pieces at different scales for depth.
Blending Everything Together
Here’s where your composition comes alive. Create adjustment layers to unify all elements.
Start with a Curves adjustment. Subtle S-curve adds contrast across your entire image. Pull highlights up slightly and shadows down slightly.
Then add Color Balance. Warm up highlights with yellow and red. Cool down shadows with blue and cyan. This mimics natural outdoor lighting.
Finally, try Camera Raw Filter for polish. Adjust Clarity for midtone contrast. Bump Vibrance for color pop without oversaturation. Add slight vignette to focus attention on your subject.
The Reflection Reality Check
Step back and evaluate critically. Does your reflection look believable?
Real water reflections share these traits:
- Slightly darker than the original
- Less saturated in color
- Softer in detail
- Properly distorted by water surface
If your reflection looks too crisp, add subtle Gaussian Blur. If colors look too vibrant, reduce saturation by 15-20%. Small adjustments make huge differences.
Common Mistakes to Avoid
Most beginners overdo effects. Resist that temptation.
Don’t crank displacement too high. Subtle distortion looks like water. Extreme distortion looks like bad Photoshop. Start conservative and add more if needed.
Also, watch your light direction. All elements should share the same lighting angle. Shadows that contradict light sources destroy believability immediately.
Finally, blend edges carefully. Nothing screams “composited” louder than harsh cutout edges. Use soft brushes and layer masks generously.
Why This Technique Matters Beyond Polar Bears
These skills transfer to countless projects. Product photography needs reflections. Architectural renders require water distortion. Fantasy illustrations demand natural compositing.
Master displacement mapping once and you’ll use it forever. Same with gradient masks and contact shadows. They’re fundamental Photoshop techniques that elevate any composite work.
So this tutorial isn’t just about making a cool polar bear image. It’s about building your technical foundation for professional-level photo manipulation.
Practice these techniques repeatedly. Try different subjects, different water types, different lighting scenarios. That’s how skills become second nature.