
Photo manipulation seems intimidating until you break it down into manageable steps. This sunset landscape project teaches you practical compositing skills using adjustment layers, masking, and lighting effects.
You’ll combine multiple stock images into one cohesive scene. Plus, you’ll learn matte painting techniques that professional artists use daily. No magic required—just solid technique applied systematically.
What You’re Building
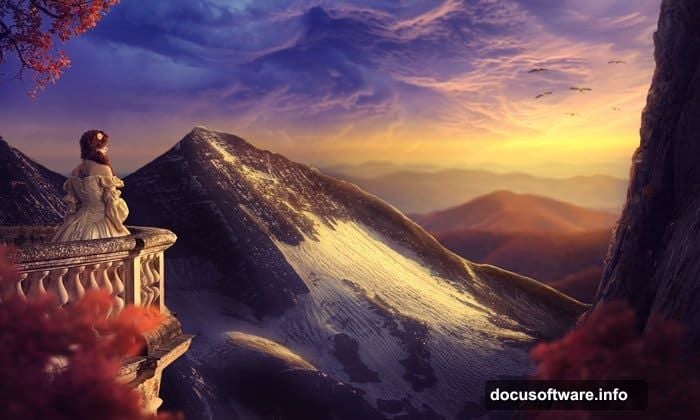
This tutorial creates a dramatic sunset landscape from scratch. We’ll blend landscapes, skies, mountains, and architectural elements into a single believable scene.
The final image includes a model on a balcony overlooking mountains at golden hour. Trees frame the composition. Birds add movement. Everything feels natural despite coming from different source photos.
Stock Images You’ll Need
Gather these resources before starting:
- Base landscape photo
- Dramatic sky image
- Mountain silhouette
- Rock formations
- Ornate balcony
- Portrait of a model
- Three different tree images
- Flying birds
Most stock sites offer these. Just ensure licensing allows manipulation and commercial use if needed.
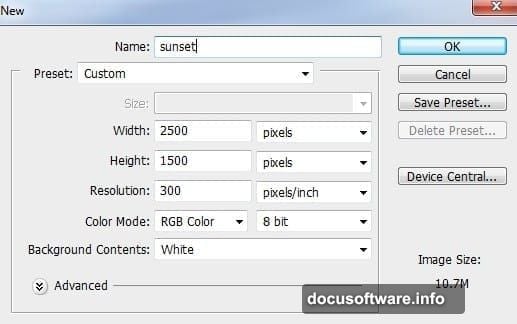
Setting Up Your Canvas
Create a new Photoshop document first. Use these settings:
- Width: 2000 pixels
- Height: 1500 pixels
- Resolution: 300 DPI
- Color mode: RGB
Higher resolution gives you flexibility later. You can always scale down. But scaling up ruins quality.
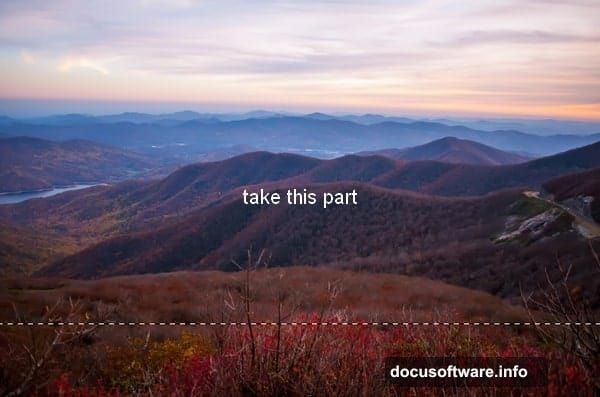
Building the Base Scene
Open your landscape image. Select the Rectangular Marquee Tool (M). Choose just the upper portion—you want interesting terrain without too much empty foreground.
Drag that selection into your main document. Press Cmd/Ctrl+T to transform it. Scale and position until it fills the lower third of your canvas.
Now add a layer mask. Click that second button at the bottom of your Layers panel. Use a soft black brush at 100% opacity to paint away hard edges where sky meets land.
This creates smooth transitions. Nobody likes obvious cutout lines.
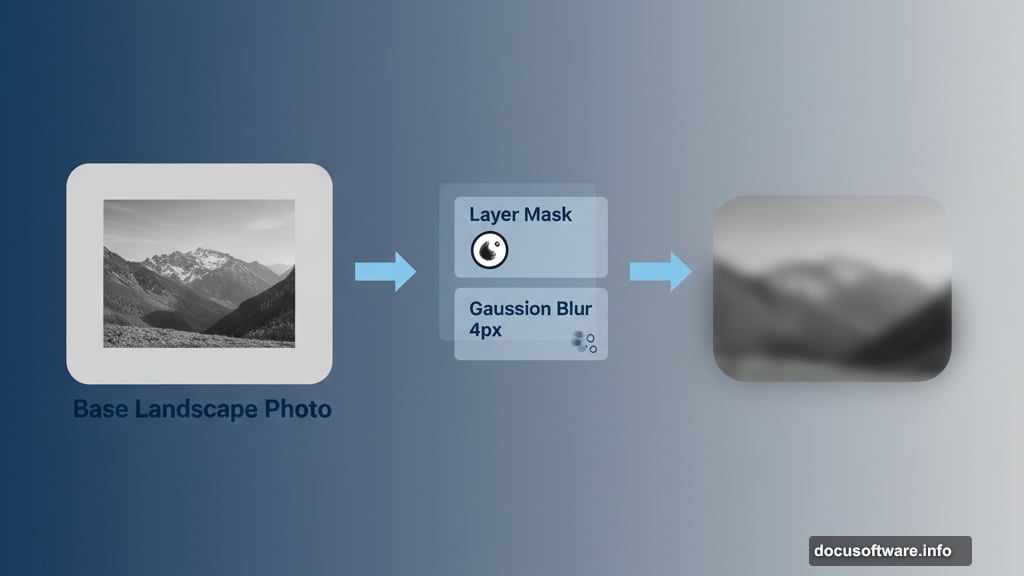
Softening the Background
Apply Gaussian Blur to your landscape layer. Go to Filter > Blur > Gaussian Blur. Set radius to 4 pixels.
Why blur it? Depth of field. Real cameras focus on subjects while backgrounds soften slightly. This technique adds realism instantly.
Darkening for Drama
Sunset landscapes need mood. Create a Curves adjustment layer above your landscape. Go to Layer > New Adjustment Layer > Curves.
Pull the curve down slightly to darken midtones. But here’s the trick—use the layer mask. Paint with a soft black brush at low opacity on the upper right. This preserves brightness where sunset light would hit.
Selective darkening beats global adjustments every time.
Adding Dynamic Sky
Place your sky image above everything else. Rotate it using Cmd/Ctrl+T until the most dramatic clouds sit where you want them.
Add a layer mask immediately. Remove rough edges with that same soft black brush. Blend sky into landscape gradually. Harsh transitions break the illusion.
Apply 2-pixel Gaussian Blur to the sky. Subtle softness helps it match the landscape’s depth.
Brightening Sky Selectively
Create a Curves adjustment layer with Clipping Mask. Right-click the Curves layer and choose “Create Clipping Mask.” This affects only the sky below.
Lift the curve to brighten. Then grab your soft black brush at 10-15% opacity. Paint gently on the layer mask’s left side. This reduces brightness there, creating directional light from the right.
Directional lighting sells the scene. Always consider where your light source sits.
Placing Mountains
Open your mountain stock image. Use any selection tool to extract the mountain. Quick Selection Tool (W) works great for silhouettes.

Place mountains on the left side of your composition. They should overlap the landscape slightly but sit behind everything else later.
Lighting the Mountains
Mountains need the same directional light as your sky. Create another Curves adjustment layer with Clipping Mask.
Brighten the curve. Then mask away lightness on edges hidden from your light source. Only surfaces facing the sunset glow.
This attention to light direction transforms flat cutouts into believable elements.
Creating Depth with Shadows
Add a Color Fill layer to darken mountain edges further. Go to Layer > New Fill Layer > Solid Color. Choose a deep warm brown that matches your sunset palette.
Set blend mode to Multiply. Lower opacity to 30-40%. Use the layer mask to paint darkness only on shadowed edges.
Subtle shadow work adds incredible depth. Don’t skip this step.
Adding Architectural Interest
Import your balcony image. Extract it carefully—architecture requires clean edges. Place it in the mid-ground, slightly right of center.
The balcony becomes your focal point. Everything else supports it. So position thoughtfully before committing.
Apply the same lighting principles. Surfaces facing sunset get warmed and brightened. Shadowed areas stay cooler and darker.
Placing Your Subject
Drop in your model image. Extract the figure carefully. Hair requires the most precision—zoom in and use a small brush on your mask.
Position the model on the balcony. Scale appropriately so proportions feel right. A figure too large or small breaks believability instantly.
Matching Model to Scene
The model needs serious adjustment to match lighting. Start with a Curves layer (Clipping Mask). Warm up the highlights by lifting the red channel.
Add a Color Balance adjustment layer. Push midtones toward yellow and red. Push highlights the same direction but less aggressively.
Then create a Hue/Saturation layer. Lower saturation slightly. Real sunset light is warm but not oversaturated.
Framing with Trees
Import your three tree images. Place them strategically:
- One large tree left foreground
- Medium tree right foreground
- Smaller tree in background
Trees frame your scene and guide the viewer’s eye toward the model. They also add depth through overlapping layers.
Apply Gaussian Blur to background trees. Use 3-4 pixels. Foreground trees stay sharp. This depth-of-field technique mimics real camera behavior.
Adjusting Tree Colors
Trees need color matching too. Use Hue/Saturation adjustment layers on each tree. Shift hues slightly toward warm tones. Lower saturation a bit.
Then add Curves layers to darken shadows and lift highlights where sunset light would hit leaves. Paint carefully on masks to control exactly where adjustments apply.
Consistent lighting across all elements creates cohesion.
Adding Atmospheric Elements
Import your birds image. Scale them small—birds in the distance should feel distant. Place them in the upper third of your composition.
Birds add movement and life. Even static images feel more dynamic with this detail.
Apply slight motion blur if desired. Go to Filter > Blur > Motion Blur. Use 3-5 pixels at an angle matching flight direction.
Color Grading the Scene
Now comes the magic—unified color grading. Create a Color Balance adjustment layer affecting everything.
Adjust midtones:
- Cyan/Red: Push toward red (-50 to -60)
- Magenta/Green: Leave near center
- Yellow/Blue: Push strongly toward yellow (+90 to +100)
This warms the entire scene into sunset territory.
Adjust highlights:
- Cyan/Red: Slight push toward red (-2)
- Yellow/Blue: Strong push toward yellow (+75 to +80)
Highlights get even warmer than midtones. That’s how real sunsets work.
Enhancing Contrast
Create a Curves adjustment layer. Make a gentle S-curve by lifting highlights slightly and lowering shadows slightly.
This increases contrast across the scene. But don’t overdo it—you want drama, not harshness.
Use the layer mask to reduce contrast effect on the model’s face. Faces need gentler treatment than landscapes.
Creating Light Rays
Light rays add that final cinematic touch. Create a new layer. Set blend mode to Screen.
Use a soft white brush at 10-20% opacity. Paint gentle streaks from the sun’s position downward through the scene. Follow the angle of your light direction.
Keep it subtle. Overdone light rays scream “fake Photoshop effect.” Real atmospheric light is gentle.
Final Lighting Adjustments
Create one more Curves adjustment layer. Lift the highlights in just the red channel. This adds a final warm glow to the brightest areas.
Then create a Levels adjustment layer. Pull the output shadows slider slightly right. This lifts the black point, creating that slightly faded look characteristic of golden hour photography.
Sharpening Strategically
Flatten a copy of your image. Go to Filter > Sharpen > Unsharp Mask. Use these settings:
- Amount: 80%
- Radius: 1.0 pixels
- Threshold: 0
Then add a layer mask to this sharpened layer. Paint away sharpening on blurred elements like background trees and distant mountains. Sharpening should emphasize your focal points, not everything equally.
Why This Technique Matters
Photo manipulation teaches fundamental compositing skills. You learn to think about light direction, atmospheric perspective, and depth of field. These principles apply whether you’re creating fantasy scenes or retouching client work.
Plus, breaking down complex images into steps makes the process manageable. Each element gets individual attention before unifying adjustments bring everything together.
The key is patience. Rush through masking or skip lighting adjustments, and your final image suffers. But invest time in each step, and you’ll create images that fool viewers into thinking they’re single photographs.
Practice these techniques repeatedly. Try different stock images. Experiment with color grades. The more you manipulate photos, the better your eye becomes for what works and what doesn’t.
Eventually you’ll develop your own style and shortcuts. But master the fundamentals first. Solid technique beats clever tricks every single time.