
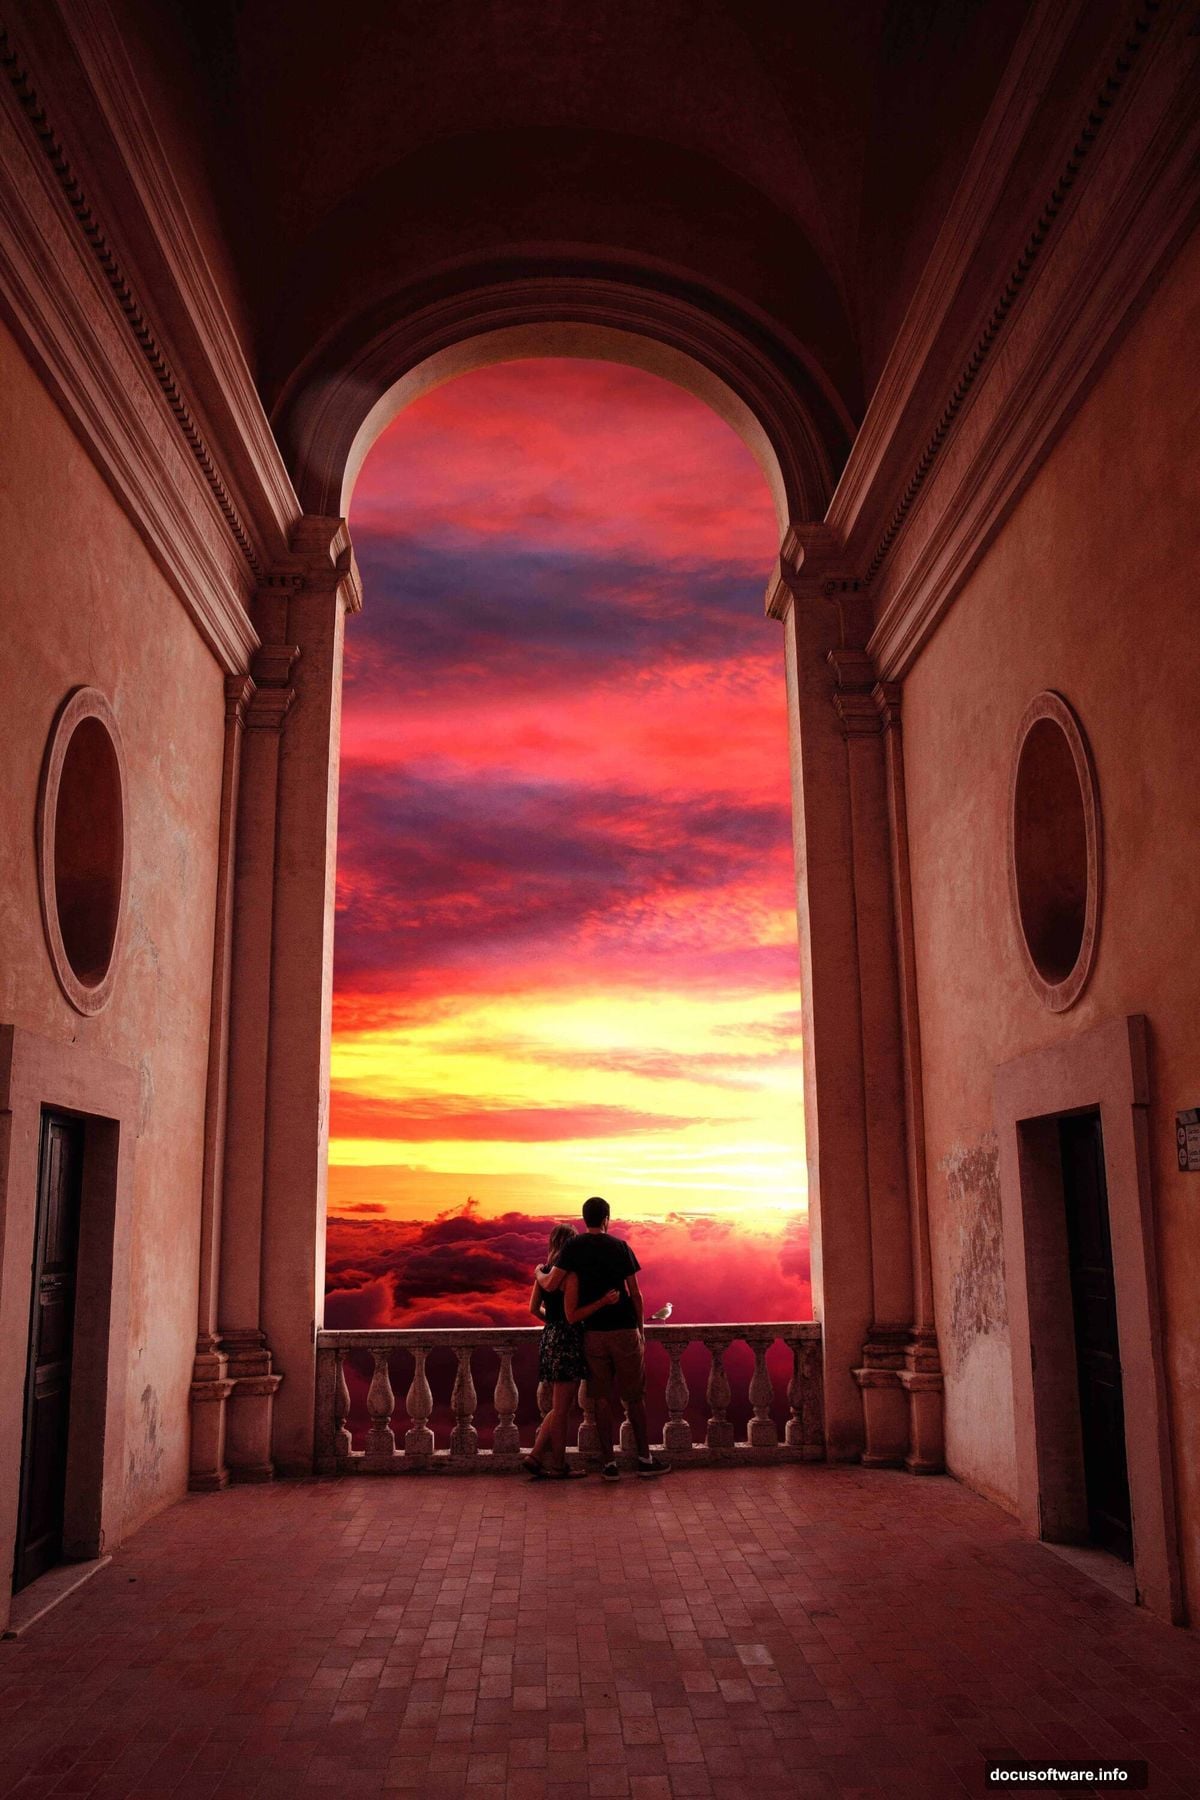
Ever wanted to place subjects above the clouds during golden hour? This technique looks complicated but breaks down into manageable steps.
You’ll learn how to composite multiple images, blend skies seamlessly, and add dramatic lighting that feels natural. Plus, we’ll use adjustment layers to unify everything. The whole process takes about 30 minutes once you understand the workflow.
Let’s build this sunset scene from scratch.
Gather Your Source Images First
Before opening Photoshop, collect three essential elements. You need a photo of your subjects (people work best), a dramatic sky image, and optional birds for atmosphere.
Make sure your subject photo has clean edges. That saves time during selection. The sky should show rich sunset colors with visible clouds. Birds add depth but aren’t mandatory.
Download high-resolution versions of each. Low-quality images create problems later when you scale or adjust colors.
Extract Your Subjects Cleanly
Open your subject photo in Photoshop. Create a layer mask immediately. Now grab the Pen Tool (P) and carefully trace around your subjects.
Take your time here. Smooth, accurate selections make everything easier. Click point by point around the figures, following their outline precisely.
When you complete the path, right-click and choose “Make Selection.” Set Feather Radius to 0px and check Anti-Aliased. Press OK.
Select your layer mask and hit Alt+Delete. This removes the background while keeping your subjects intact. Clean edges matter more than speed at this stage.
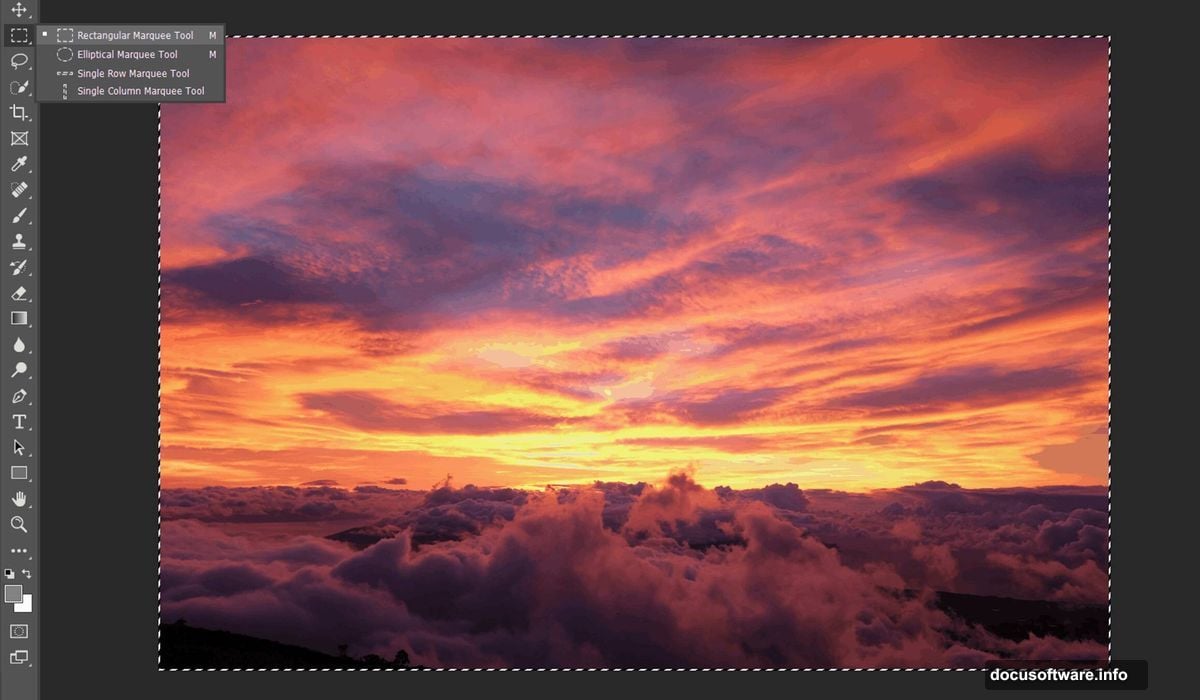
Build Your Cloud Foundation
Next, open your sky image. Use the Rectangular Marquee Tool (M) to select the portion you want. Focus on the area with the most dramatic clouds and color.
Copy the selection (Ctrl/Cmd + C) and paste it (Ctrl/Cmd + V) below your subjects layer. Position it using the Transform tool (Ctrl/Cmd + T).
Hold Alt+Shift while dragging corners to resize proportionally. In Photoshop CC, just Alt works to scale all sides together. Make the sky fill your canvas completely.
The clouds should sit naturally beneath your subjects. If gaps appear at the edges, you’ll fix those shortly.
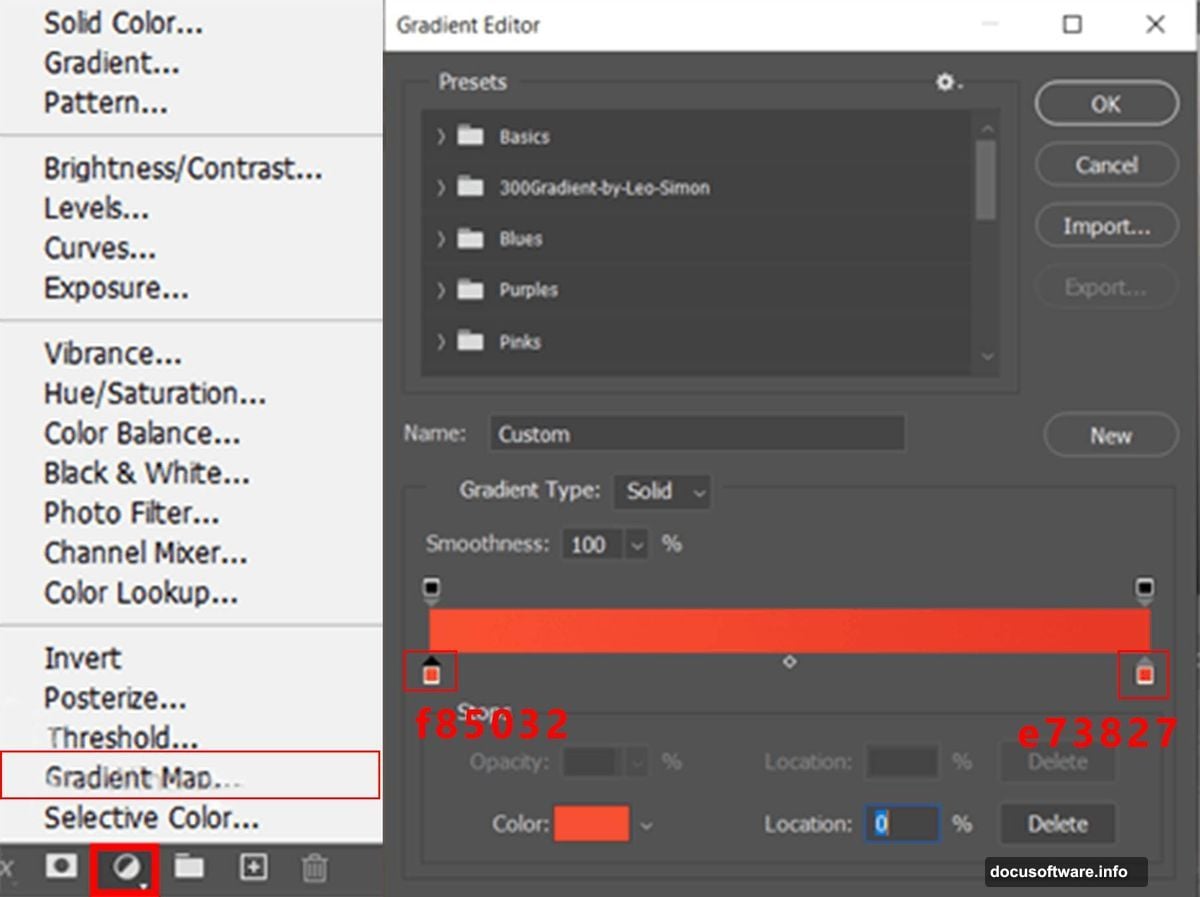
Unify Colors With Gradient Mapping
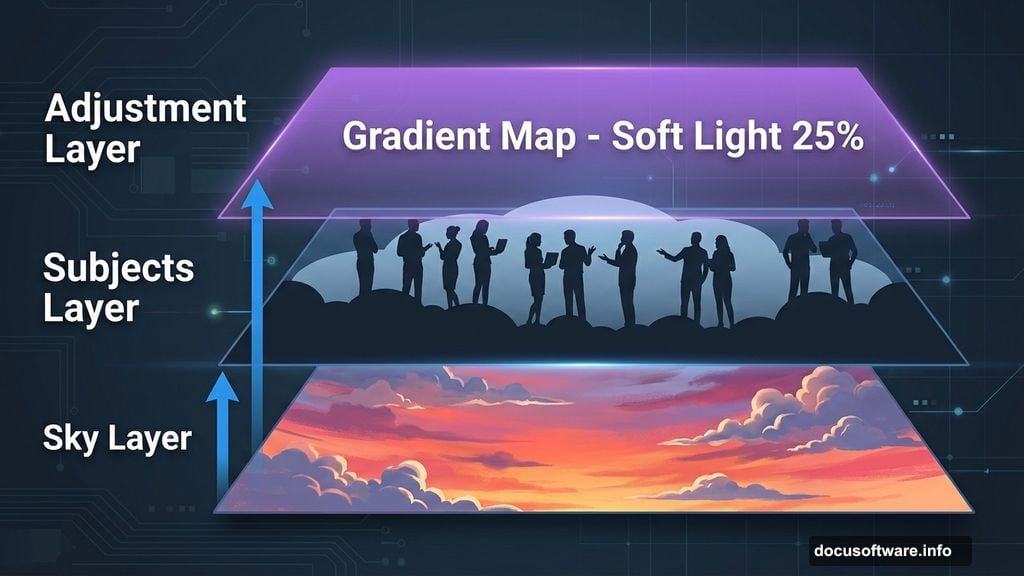
Add a Gradient Map adjustment layer above your sky. This starts harmonizing colors between elements.
Change the blend mode from Normal to Soft Light. Set opacity to 25%. This subtle shift creates color cohesion without overwhelming your scene.
The gradient should use warm tones that complement sunset lighting. Oranges, pinks, and purples work well. Experiment with different gradients until colors feel unified.
Don’t push this too hard. You’re aiming for subtle enhancement, not dramatic color shifts.
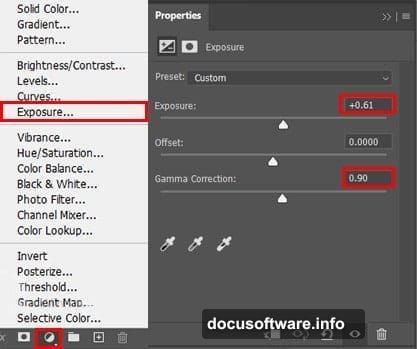
Adjust Overall Exposure
Add an Exposure adjustment layer next. This controls the overall brightness and contrast of your composite.
Increase exposure slightly to simulate sunset brightness. The glow should feel natural, not blown out. Adjust the offset slider to fine-tune shadow depth.
Remember, sunsets create strong directional light. Your brightest areas should align with where the sun sits in your sky image. Darker areas fall on the opposite side.
Keep making small adjustments. Big exposure changes look artificial.
Refine Individual Color Channels
Now add a Selective Color adjustment layer. This targets specific color ranges without affecting everything.
Focus on reds, yellows, and magentas since these dominate sunset scenes. Increase cyan slightly in reds to create richer oranges. Add yellow to yellows for warmer tones.
Adjust magentas to control purple and pink tones in clouds. Each slider changes the color in subtle ways. Move slowly and watch how it affects your image.
This step adds professional polish. Small color refinements make huge differences in realism.
Balance Color Temperature
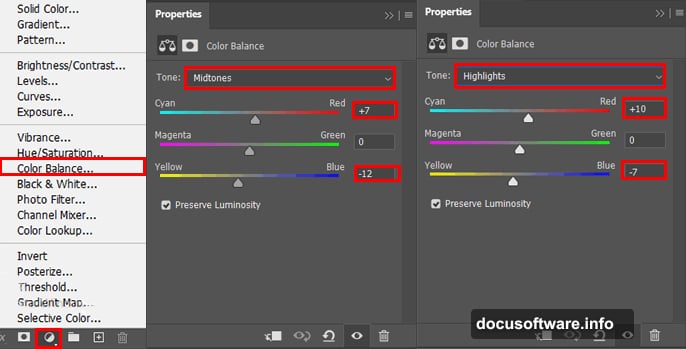
Add a Color Balance adjustment layer. Set opacity to 50% so changes feel natural rather than heavy-handed.
Push shadows toward blue slightly. This creates depth and contrast against warm highlights. Midtones should lean toward yellow and red to enhance the sunset feel.
Highlights can go either way. More yellow creates intense warmth. Adding cyan creates interesting color contrast.
Play with these sliders until your scene feels cohesive. Every image needs different amounts, so trust your eyes.
Fill Sky Gaps Seamlessly
Select your sky layer again. Use the Rectangular Marquee Tool (M) to select the top portion of your sky.
Press Ctrl/Cmd + J to duplicate this section. Move the new layer above your Color Balance adjustment layer. Drag it upward to fill any gaps at the canvas top.
Create a layer mask on this new piece. Grab a soft round Brush Tool (B) with black foreground color. Paint along the seam where the two sky pieces meet.
This blends them invisibly. No hard lines should remain. The sky should look like one continuous image.
Add Depth With Curves
Create a Curves adjustment layer. Set opacity to 50%. This adds subtle contrast that increases depth perception.
Adjust the curve into a gentle S-shape. This darkens shadows slightly while brightening highlights. Don’t make extreme adjustments.
The S-curve creates the perception of three-dimensional space. Your subjects will appear more separated from the background clouds.
Small changes here produce big visual impact. Push too far and your image looks overprocessed.
Create Directional Lighting
Add another Curves adjustment layer. Immediately press Ctrl/Cmd + I to invert the layer mask to black. This hides the adjustment completely.
Select a soft round Brush Tool (B) with white foreground color. Paint in the corner where your sun would be. This creates a glowing highlight that suggests strong directional light.
Make your brush large and soft. Build up the effect gradually with multiple strokes. The glow should fade naturally into surrounding areas.
This simulates how sunset light actually behaves. It creates a focal point and adds realism.
Add Atmospheric Elements
If you have bird silhouettes, now’s the time to add them. Place them in your sky at various distances from the camera.
Birds closer to the viewer should be larger and darker. Distant birds appear smaller and lighter. This creates depth through atmospheric perspective.
Use different sizes and positions. Don’t line them up evenly. Natural scenes have random distribution.
You can skip this step entirely. Birds add interest but aren’t essential to the core technique.

Unify Everything With Camera Raw
Flatten all your layers or create a stamp visible (Ctrl/Cmd + Alt + Shift + E). This creates one layer containing all your work.
Go to Filter > Camera Raw Filter. This final pass adds polish and fixes any remaining color issues.
Adjust clarity to enhance detail without over-sharpening. Add slight vibrance to make colors pop. Increase dehaze if your clouds look too soft.
Play with temperature and tint sliders. Small shifts here can dramatically change the mood. Warmer feels romantic, cooler feels melancholy.
Apply your changes and you’re done.
Common Problems and Quick Fixes
Selection edges looking harsh? Go back and add a 1-2 pixel feather to your mask. This creates softer transitions.
Colors not matching between elements? Add more adjustment layers. Focus on Color Balance and Selective Color. These tools offer precise control.
Scene looking flat? Increase contrast through Curves. Add more directional lighting with painted highlights. Strengthen shadows on your subjects.
Sky looking fake? Blend your sky layer using a soft brush on the layer mask. Paint away any obvious repeating patterns or unnatural transitions.
Most problems come from rushing. Take your time with selections and adjustments. Build up effects gradually rather than making huge changes all at once.
Why This Technique Works
This method works because it mimics how light actually behaves during sunset. You’re not just slapping images together. You’re thinking about light direction, atmospheric effects, and color relationships.
The adjustment layers let you make non-destructive changes. Try something, see how it looks, adjust further if needed. Nothing is permanent until you flatten.
Plus, these skills transfer to any composite work. Master subject extraction, sky replacement, and color unification, and you can create countless photo manipulations.
The technique isn’t quick at first. But after creating a few scenes, you’ll move much faster. Your eye develops for what looks natural versus forced.
Start simple. Pick images with good color compatibility. As you improve, tackle more challenging composites with bigger color differences.
This sunset scene makes an excellent portfolio piece. It demonstrates technical skill and artistic vision. Plus, it’s just fun to create something this dramatic from separate photos.