
Ever wanted to put your dog in a suit? This Photoshop technique turns any pet photo into a hilarious studio portrait. No expensive equipment needed.
I tested this method on my friend’s Golden Retriever last week. The results were surprisingly convincing. Plus, the lighting techniques work for any photo manipulation project you’re working on.
Here’s the secret. Most people struggle with realistic lighting when composing images from different sources. But layers solve everything. Let’s break down how to simulate professional studio lighting using simple Photoshop tools.
Set Up Your Canvas Right
Start by creating a new document in Photoshop. Go to File > New and choose a tabloid size with portrait orientation.
However, don’t stress about exact dimensions. Pick a size that runs smoothly on your computer. For this project, flexibility beats perfection.

Next, add a new layer by pressing Shift+Ctrl+N on Windows or Cmd+Shift+N on Mac. Name it “Background” so you can find it later.
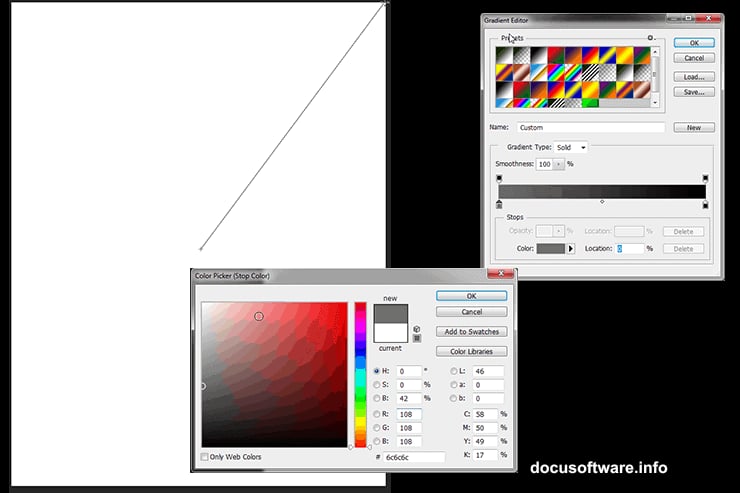
Create That Studio Gradient
Professional studio portraits typically feature dark, gradual backgrounds. We’ll recreate that look with Photoshop’s Gradient tool.
Select the Gradient tool by pressing G. Set your left color to medium gray (#6c6c6c) and the right to pure black (#000000).
Look at the top toolbar. Find the radial gradient option—it’s the second icon from the left under where it says “Type.”
Click in the center of your canvas. Then drag outward past one corner. This creates a soft, natural vignette effect that professional photographers use constantly.
Cut Out Your Pet Photo Cleanly

Import your dog photo now. Higher resolution images produce better results. But even mediocre photos can work with enough effort.
Grab the Pen tool by pressing P. Trace a rough outline around your pet. Don’t obsess over perfect edges yet—especially with fur. Just get close.
Once you’ve completed the outline, right-click and select “Make Selection.” Now comes the magic part.
Use Select and Mask for Fur
Adobe moved the Refine Edge tool in recent Photoshop versions. Here’s where to find it now.
With your selection still active, choose the Magic Wand tool by pressing W. Right-click on your selection and pick “Select and Mask.”

If that option appears grayed out, double-check that you’ve selected the correct layer. Then try again.
In the Select and Mask workspace, grab the Refine Edge Brush Tool from the left toolbar. You can also just press R.
Paint over the fuzzy edges of your pet’s fur. Photoshop intelligently separates fine details from the background. This tool works remarkably well on hair and fur textures.
Click OK when satisfied. Your cutout should now have natural-looking edges instead of harsh lines.
Add Clothing Elements
Here’s where things get fun. Import your hat and jacket images as separate layers.
Position each clothing item roughly where it should sit. Use Free Transform (Ctrl+T on Windows, Cmd+T on Mac) to resize and rotate pieces until they look natural.
Don’t worry about perfect alignment yet. We’ll refine everything with lighting next.
Build Realistic Shadows Layer by Layer
This step separates amateur composites from professional work. Multiple shadow layers create depth and realism.
Create a new layer beneath your clothing items. Name it “Shadow 1.” Use a soft black brush at low opacity (around 20%) to paint shadows where clothing overlaps fur.
Add another layer called “Shadow 2” for deeper shadows in folds and creases. Build up darkness gradually rather than painting one heavy shadow.
Then add “Shadow 3” for the darkest areas where no light reaches. This layered approach mimics how light actually behaves in real environments.

Paint Highlights for Dimension
Shadows alone won’t sell the illusion. You need highlights too.
Create a new layer above your subject. Change the blend mode to Overlay or Soft Light. Paint with white at low opacity on areas that would catch studio lights.
Focus on edges, rounded surfaces, and anywhere light would naturally hit. The top of the hat, shoulders, and collar all need subtle highlights.
Take your time here. Small touches make huge differences in perceived realism.
Match Colors Between Elements
Different source photos rarely have matching colors. You need to unify them.

Create a Color Balance adjustment layer above everything. Adjust the midtones slider until all elements feel like they belong in the same photograph.
Then add a Curves adjustment layer. Lift or lower the curve slightly to match overall brightness between your pet and clothing items.
These global adjustments tie everything together visually. Skip this step and your composite will always look artificial.
Add Final Polish
Almost done. Now we refine small details that elevate the final result.
Create a new merged layer at the top of your stack. Press Shift+Ctrl+Alt+E on Windows or Shift+Cmd+Option+E on Mac.

Apply a subtle Gaussian Blur (Filter > Blur > Gaussian Blur) at around 0.5 pixels. This softens any harsh edges that survived earlier steps.
Then add a slight noise texture (Filter > Noise > Add Noise) at maybe 2%. This makes digital elements feel more organic and camera-captured.
The Real Lesson Here
This dog portrait is silly. But the techniques are serious.
These layered lighting methods work for any photo manipulation project. Product mockups. Fantasy scenes. Professional retouching. Same principles apply.
The key insight? Build lighting gradually with multiple layers rather than painting one dramatic shadow. Real light bounces, diffuses, and creates subtle variations everywhere.
Practice this approach on any composite work. Your manipulations will immediately look more convincing and professional.