Creating fantasy art in Photoshop sounds intimidating. But this sorceress manipulation breaks down into simple, repeatable steps anyone can follow.
You’ll learn how to blend stock photos seamlessly, add glowing magical effects, and transform ordinary images into fantasy scenes. Plus, the techniques work for any character-based photo manipulation, not just sorceresses.
Let’s dive into the actual process that creates professional-looking results.
Gather Your Stock Images First
Before touching Photoshop, collect your source materials. This tutorial requires five specific elements that work together naturally.
You’ll need a misty forest background for atmosphere. The fog creates natural depth and mystery. Next, grab a model photo in a dramatic pose. Black flowing garments work best since they blend easily with shadows.
For the magic effect, find butterfly stock images. These create the energy orb later. Also download sparkle brushes and abstract light textures. These add the glowing magical elements that sell the effect.

Having everything ready saves time. You won’t break your workflow hunting for assets mid-project.
Set Up Your Canvas Properly
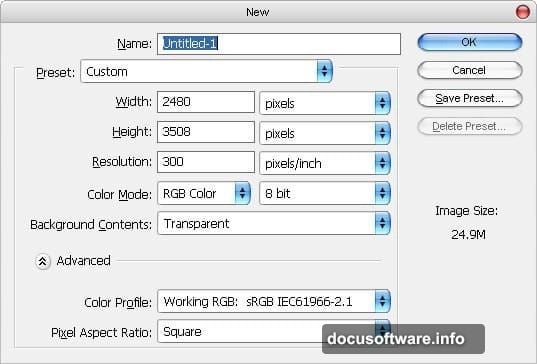
Start with the right document dimensions. Create a new file at 2480 x 3508 pixels with 300 DPI resolution. This gives you print-quality output if needed later.
Use RGB color mode with 8-bit depth. Keep the background transparent initially. You’ll add the forest background next, but starting transparent makes layer management easier.
These settings matter more than you’d think. Too small and your final image looks pixelated. Too large and Photoshop crawls to a halt on every adjustment.
Build the Fantasy Background
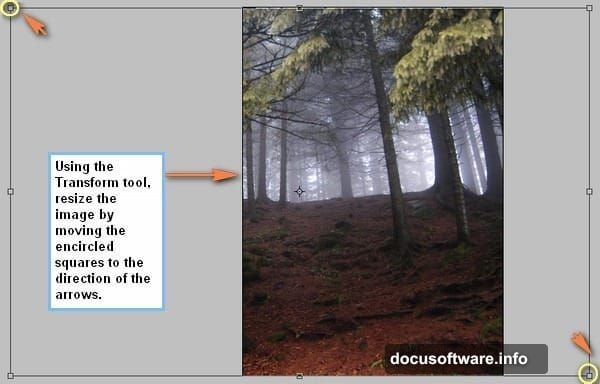
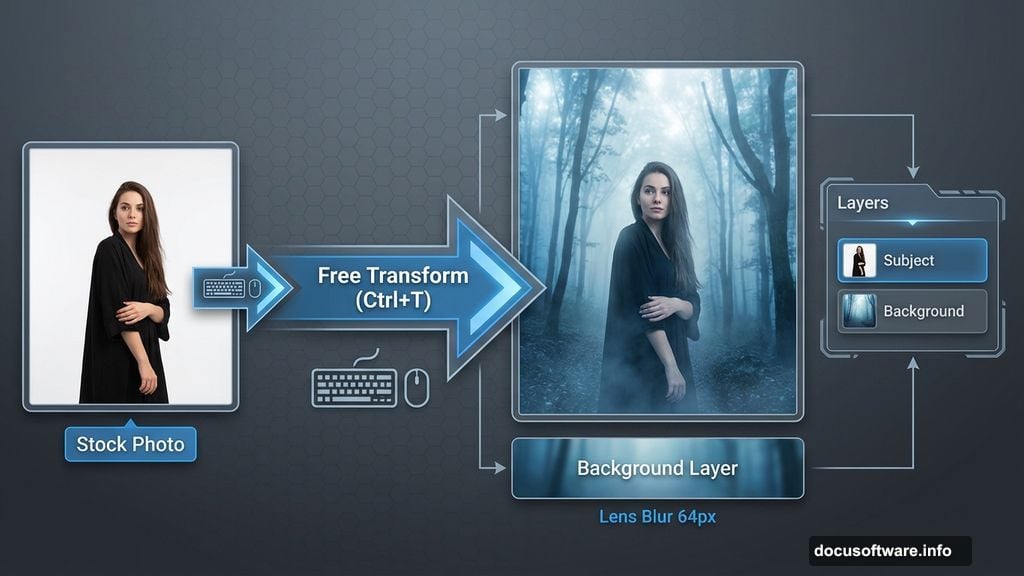
Import your misty forest stock image using the Move tool. Press V, then drag the image onto your canvas. Rename this layer “Background” immediately. Trust me, unnamed layers become confusing fast.
Now transform the image to fit your composition. Press Ctrl/Cmd + T to activate Free Transform. Scale and position the forest until it fills the frame naturally. The mist should flow from dark corners toward a lighter center area.
Here’s the crucial part most tutorials skip. Apply a Lens Blur filter to create depth. Go to Filter > Blur > Lens Blur and set the radius to 64 pixels. This softens the background so your subject pops forward.
The blur separates foreground from background psychologically. Without it, the image feels flat even with perfect lighting.
Add Glowing Atmospheric Light
Create a new layer above your background. Name it “Light 1” to stay organized. This layer handles the magical glow that makes fantasy scenes work.
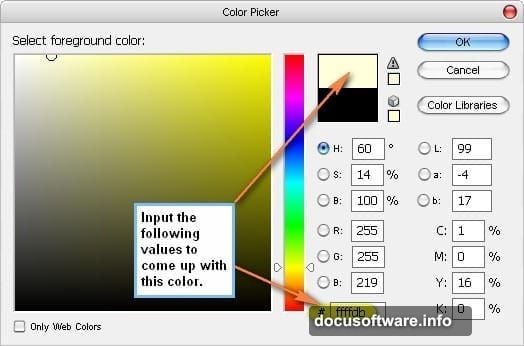
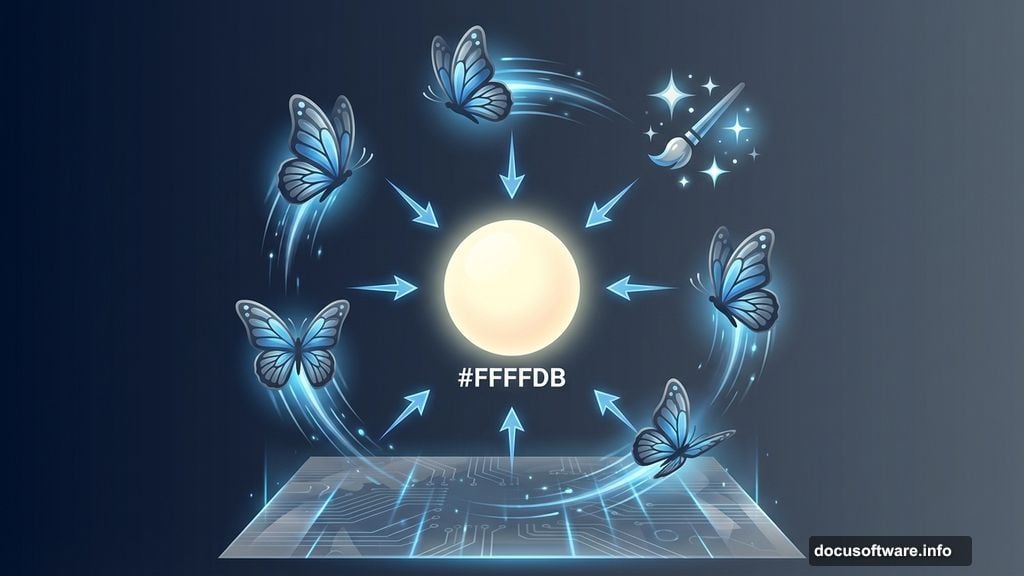
Select your Brush tool by pressing B. Set the foreground color to a warm cream tone using hex code #FFFFDB. This color mimics candlelight or magical energy naturally.
Paint soft glows in strategic spots. Focus on areas where light would naturally pool or where magical energy might concentrate. Use a large, soft brush with low opacity. Build up the glow gradually through multiple strokes.
Most beginners paint too bright, too fast. Subtlety sells the effect. You can always add more glow, but removing excess glow destroys underlying detail.
Position Your Sorceress Subject
Import your model stock image. Use the same Move tool technique from earlier. Place her in the composition where she commands attention but doesn’t overwhelm the scene.
The model should occupy roughly one-third to one-half of the vertical space. Position her slightly off-center using the rule of thirds. This creates more dynamic energy than dead-center placement.
Now comes the tedious but essential part. Remove the original background from your model using your preferred selection method. The Pen tool gives the cleanest edges, but Quick Selection works for simpler backgrounds.
Take time on the hair selection. Hair makes or breaks photo manipulations. Use the Refine Edge tool to recover fine hair details against your new background.
Blend Your Subject Naturally
Your model probably looks pasted on right now. That’s normal. Blending requires multiple adjustment layers working together.
Start with a Curves adjustment layer clipped to your model. Match her lighting to the background lighting direction. If light comes from the left in your forest, add highlights to her left side and shadows to her right.
Add a Hue/Saturation layer next. Reduce saturation slightly to match the foggy atmosphere. Real objects in mist lose color intensity. Your subject should too.
Finally, paint soft shadows beneath her feet and behind her body. Create a new layer set to Multiply blend mode. Use a soft black brush at low opacity. These contact shadows ground your subject in the scene.
Create the Butterfly Energy Orb
This effect makes the image memorable. Import your butterfly stock images and remove their backgrounds. You’ll need several butterflies at different scales for depth.
Arrange butterflies in a spiral pattern emanating from your sorceress’s hand. Vary their sizes and opacity to create depth. Butterflies closer to her hand should be larger and more opaque.
Now add the magical glow. Create a new layer and set it to Screen blend mode. Paint white or light blue glows around each butterfly using a soft brush. The glow should be strongest at the center, fading outward.
This layering technique creates the illusion that butterflies are made of pure energy rather than physical insects. The glow sells the magical transformation.
Apply Sparkle and Light Effects
Import your sparkle brush set. Create a new layer above your butterflies named “Sparkles.” Set this layer to Screen or Add blend mode depending on your Photoshop version.
Paint sparkles throughout the butterfly swarm. Vary the brush size constantly. Real magical energy wouldn’t create uniform sparkles. Randomness looks more organic.
Add a few sparkles on your subject’s clothing and hair too. This suggests the magic affects her physically, not just the butterflies. Small details like this increase realism in fantasy scenes.
For the final touch, add lens flare effects where your brightest light sources exist. Go to Filter > Render > Lens Flare. Place flares sparingly in 2-3 strategic locations maximum. Overusing lens flares screams amateur hour.
Final Color Grading and Atmosphere
Your image needs unified color now. Add a Color Lookup adjustment layer at the top of your layer stack. Try different presets until you find one matching your vision. Fantasy scenes often work well with teal and orange looks or desaturated cool tones.
Create another new layer set to Soft Light blend mode. Paint subtle color variations throughout the scene. Add warm tones where light hits, cool tones in shadows. This mimics how real light behaves and adds final polish.
Finish with a subtle vignette. Create a new layer, fill it with black, and erase the center area with a large soft eraser. Set this layer to Soft Light at 30-40% opacity. The vignette draws eyes toward your sorceress naturally.
Common Mistakes to Avoid
The biggest error beginners make is rushing the blending stage. Your subject won’t magically match the background through one adjustment layer. Plan for multiple adjustments working together.
Another mistake is overusing effects. More glow doesn’t mean better. More sparkles don’t improve the magic. Restraint creates more convincing fantasy imagery than excess.
Finally, forgetting about light direction ruins otherwise great work. If your background light comes from the right, every element you add must respect that direction. Inconsistent lighting breaks immersion immediately.
Why This Technique Works
This approach succeeds because it builds complexity gradually. Each step adds one element, making the process manageable even for intermediate users.
The butterfly energy orb concept works better than generic glows or lightning effects. Butterflies carry symbolic weight in fantasy imagery while remaining recognizable. Plus, their organic shapes blend naturally with human subjects.
Most importantly, proper blending and atmospheric effects sell the fantasy. Technical Photoshop skills matter less than understanding how light, color, and depth create believable scenes.
Practice these fundamentals and you’ll create dozens of variations beyond this single sorceress example. The techniques transfer to any fantasy photo manipulation you imagine.