
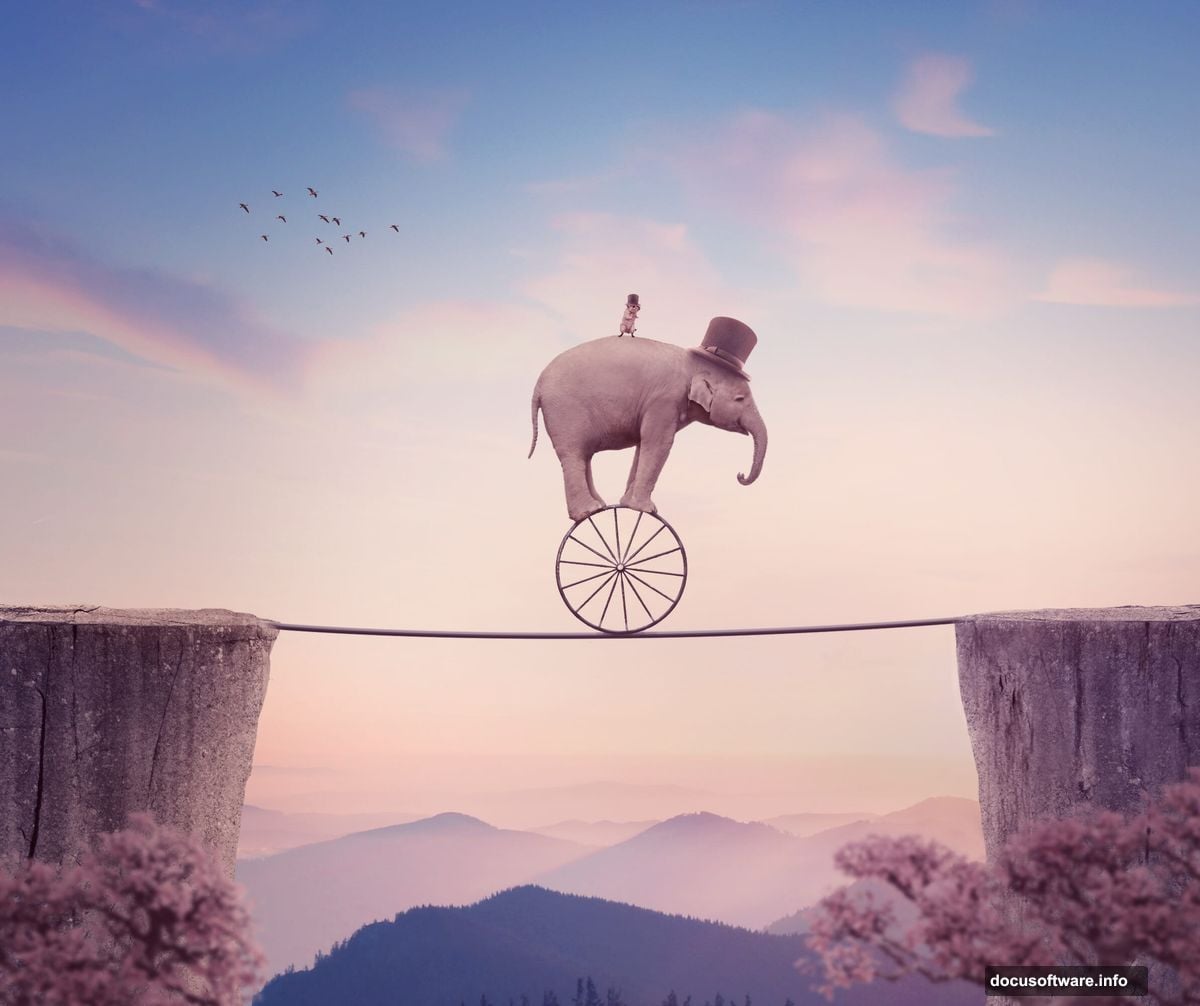
Ever wanted to create impossible scenes that look hauntingly real? This tutorial walks you through building a surreal circus composition featuring an elephant, a rat on a wheel, and a dramatic tightrope setup.
You’ll learn professional photo manipulation techniques that work for any fantasy scene. Plus, we’ll cover adjustment layers that make everything blend seamlessly. By the end, you’ll understand how to turn random stock photos into cohesive surreal artwork.
Build Your Base Scene First
Start with a 2386×2000 px document in Photoshop. Fill it with white as your foundation.
Next, open your landscape image. Drag it onto the white canvas using the Move Tool (V). This landscape forms the foundation of your entire composition.
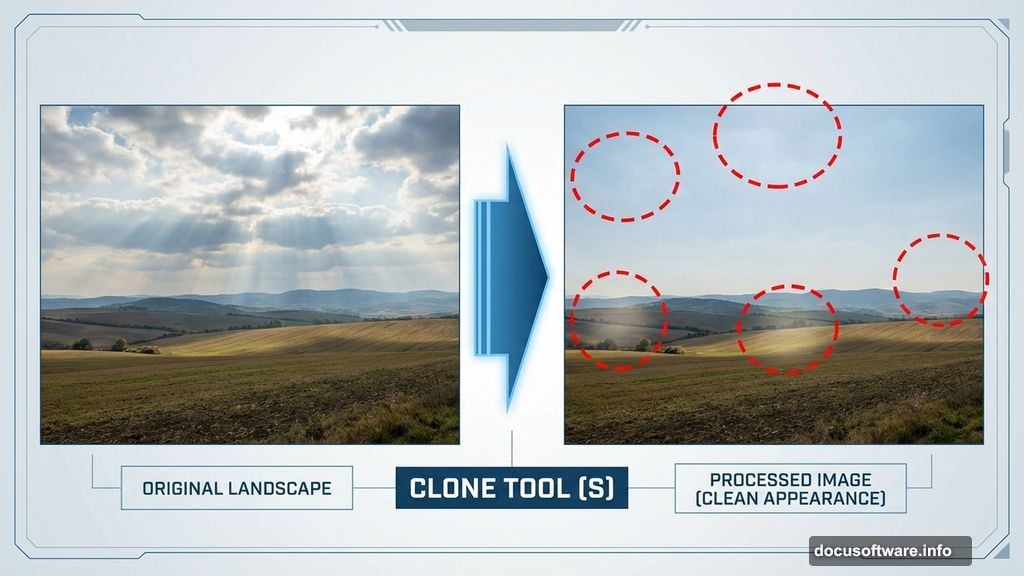
Now comes the cleanup work. Create a new layer with Ctrl+Shift+N. Grab the Clone Tool (S) and remove those distracting light rays on the left side of the sun. This step matters because unwanted elements ruin surreal scenes.
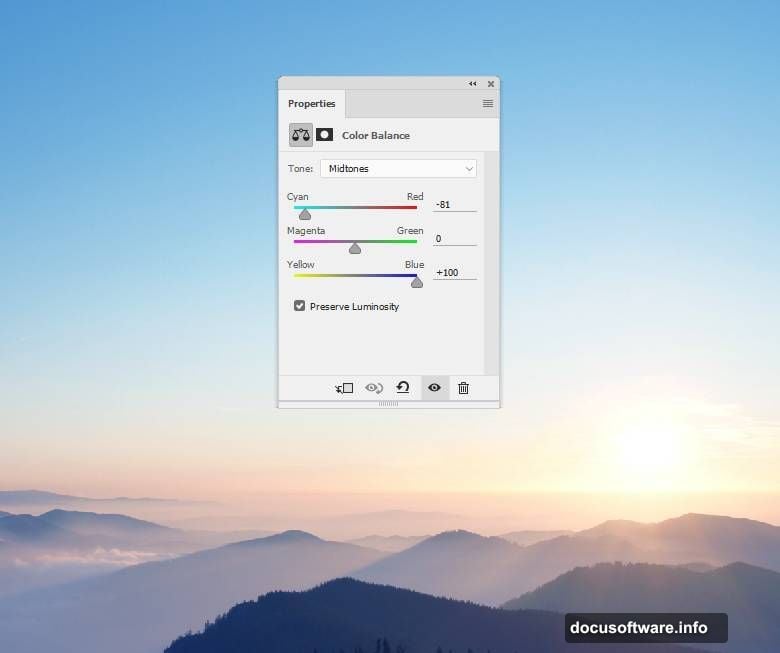
Color Balance Brings Mood
Head to Layer > New Adjustment Layer > Color Balance. Adjust the Midtones settings to shift the overall color temperature. Warmer tones create drama. Cooler tones feel eerie.
Then add a Hue/Saturation adjustment layer. Focus on the Blues values specifically. But here’s the trick: use the layer mask to protect the sky. Activate the Brush Tool (B) with a soft round brush and black color. Paint over the sky to keep its original color intact.
Why bother? Because selective color changes create depth. Changing everything at once looks flat and artificial.
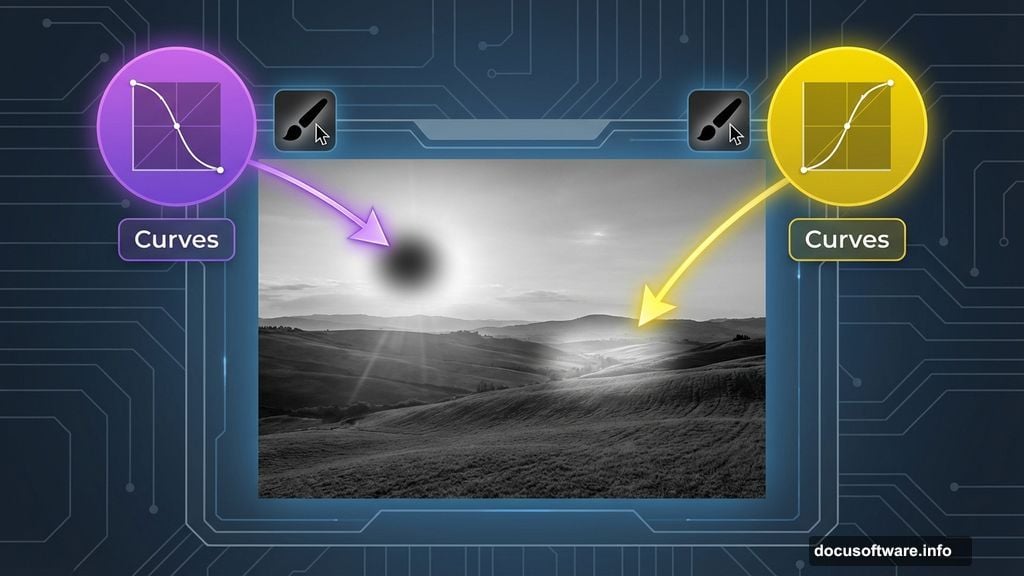
Control Light Like a Pro
Create a Curves adjustment layer and darken the area around the sun. Use the layer mask with a soft black brush to protect the rest of the image. This concentrates attention on your focal point.
But wait. Now make another Curves adjustment layer to brighten the landscape itself. Again, use a soft black brush on the mask to remove the effect from the sky area. This pushes the sky back while pulling the landscape forward.
These opposing adjustments create dimensional lighting that tricks the eye into seeing depth.
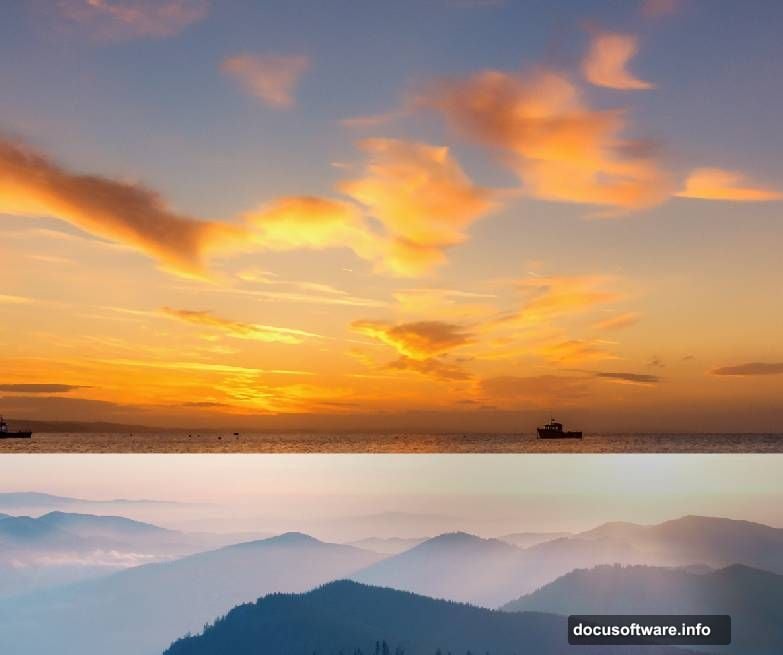
Replace the Sky for Drama
Open your sky image and place it over the existing sky. Change the layer mode to Soft Light at 100% opacity. This blends the new sky naturally with the landscape.
Add a mask to this layer. Use a soft black brush to fade the hard edges at the bottom where sky meets land. Nobody wants a visible seam ruining the illusion.
Then create a Curves adjustment layer above the sky layer. Set it as a Clipping Mask so it only affects the sky. Reduce the lightness slightly to match the landscape’s mood.
Add Rocks for Composition Balance
Open your rock image. Use the Magnetic Lasso Tool (L) to select just the rock itself. Drag it into your main document and position it in the bottom left corner.
Here’s where it gets clever. Duplicate this rock layer and flip it horizontally through Edit > Transform > Flip Horizontal. Place this mirrored rock in the bottom right corner.
But identical rocks look lazy. Add a mask to the right rock layer. Use the Lasso Tool to select random sections of the rock’s outline. Switch to a hard black brush and erase those selected areas. This creates a different silhouette so the rocks don’t look copied.
Build the Tightrope Structure
Create a new layer for your tightrope. Use the Line Tool to draw a thin line between your two rocks. Make it taut but not perfectly straight—real ropes sag slightly in the middle.
Add a subtle drop shadow to this rope layer. Real ropes cast shadows. Without shadows, your rope floats unconvincingly in space.
For extra realism, create a second line slightly below the first. This suggests rope thickness and catches light differently. These small details separate amateur composites from professional ones.
Import and Position the Elephant
Open your elephant image and use the Pen Tool (P) to carefully select around the elephant. This takes patience but produces clean edges. Feather the selection by 0.5 pixels to avoid harsh cutouts.
Place the elephant on the tightrope. Scale it proportionally using Shift+Drag on the corner handles. The elephant should look heavy and precarious, not comfortable.
Add a shadow beneath the elephant’s feet where they touch the rope. Use a soft black brush at low opacity (15-20%). Build up the shadow gradually—too dark looks fake. This shadow grounds the elephant in the scene.
Add the Rat and Wheel

Import your wheel image first. Position it on the tightrope ahead of the elephant. The wheel should tilt slightly forward, suggesting motion and instability.
Next, bring in your rat image. Cut it out carefully using the Pen Tool again. Position the rat on top of the wheel like it’s riding it. Rotate the rat slightly to match the wheel’s tilt.
Create motion blur on the wheel to suggest spinning. Go to Filter > Blur > Motion Blur. Set the angle to match your tightrope’s angle. Use about 15-20 pixels of blur—enough to suggest motion without losing detail.
Place Hats for Circus Flair
Import your hat images. Scatter them along the tightrope and floating in mid-air. This reinforces the circus theme and adds whimsy.
Vary the hat sizes using Free Transform (Ctrl+T). Larger hats in the foreground, smaller in the background. This creates depth through perspective.
Add subtle shadows beneath each floating hat. Even impossible objects need consistent lighting to look believable. Shadow direction should match your main light source—the sun in the landscape.
Add Birds for Scale and Movement
Import your bird images. Place them flying around the scene at various distances. Birds provide scale reference—viewers instinctively know how big birds are, which helps them understand the elephant’s size.
Blur distant birds slightly using Gaussian Blur (Filter > Blur > Gaussian Blur). Use 1-2 pixels of blur. This simulates atmospheric perspective and pushes those birds into the background.
Position some birds in sharp focus in the foreground. This creates layers of depth: sharp foreground, clear midground, blurred background.
Final Color Grading
Create a new Color Lookup adjustment layer at the top of your layer stack. Choose a cinematic LUT that enhances your mood. Fuji ETERNA Vivid 500T works great for surreal scenes.
Reduce the opacity to 40-50% so the effect doesn’t overwhelm your work. LUTs should enhance, not dominate.
Add a final Curves adjustment layer for contrast. Create an S-curve by pulling the highlights up slightly and shadows down slightly. This punches up contrast across the entire image.
Sharpen and Export
Flatten your image (Layer > Flatten Image). Then apply a High Pass filter for final sharpening. Go to Filter > Other > High Pass. Use a radius of 1-2 pixels.
Change this layer’s blend mode to Overlay at 50% opacity. This sharpens details without creating halos or artifacts.
Export your final image at high quality. For web use, save as JPEG at quality 90-95%. For print work, export as TIFF or high-quality PDF.
Why This Technique Works
This surreal composition succeeds because of consistent lighting, proper shadows, and careful color grading. Each element receives individual attention but contributes to one cohesive scene.
The circus theme provides narrative context that helps viewers accept the impossible. Without that theme, an elephant on a tightrope feels random. With the hats, rat, and wheel, it tells a story.
Most importantly, adjustment layers let you refine everything non-destructively. You can tweak colors and lighting endlessly without destroying your original work. That flexibility separates beginners from professionals.
Now grab your own stock images and build something impossible. The techniques here work for any surreal scene you can imagine.