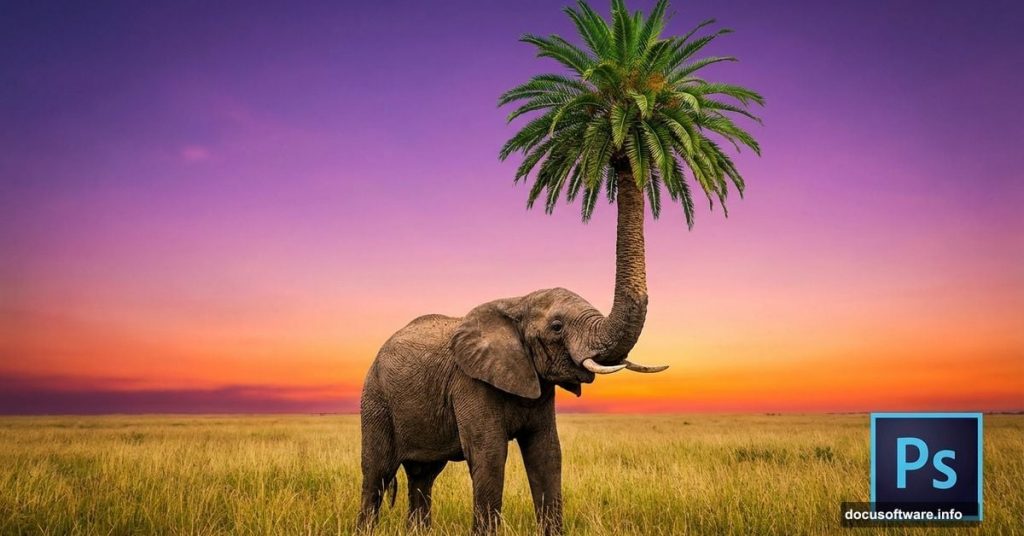
Ever wonder how photographers create those mind-bending images where reality bends into fantasy? Today we’re diving into one of the most creative photo manipulation techniques: transforming an elephant’s trunk into a living palm tree.
This tutorial walks you through every step of building a surreal scene that looks impossible yet strangely believable. Plus, you’ll learn core Photoshop skills that translate to dozens of other projects.
What You’ll Need Before Starting
Gather these resources first. Trust me, having everything ready saves massive frustration later.
Required stock photos:
- Sky background with clouds
- Elephant image (side profile works best)
- Field or grassland texture
- Elephant tusk close-up
- Palm tree with visible trunk
- Tropical parrot
- Butterfly brush (optional but adds nice detail)
Photoshop version: CC 2019 or newer recommended. Earlier versions work but lack some filters we’ll use.
Estimated time: 90-120 minutes for your first attempt. Gets faster once you understand the workflow.
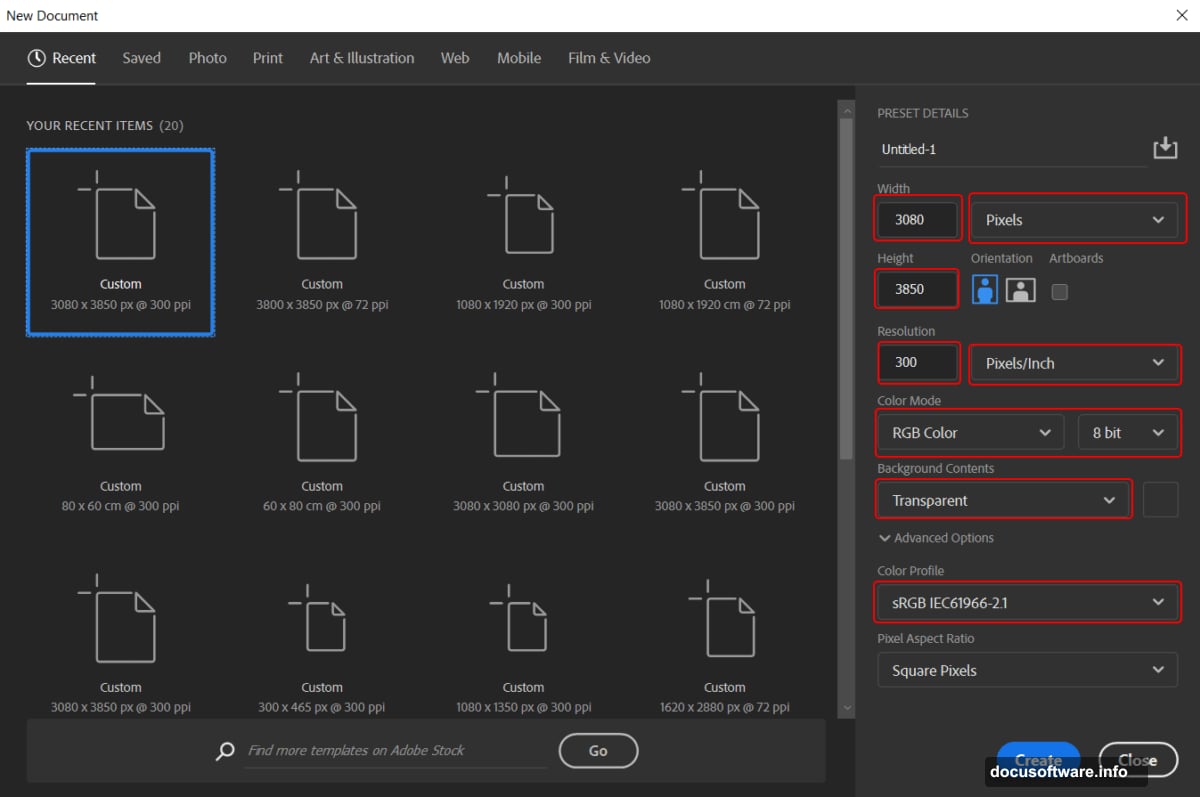
Setting Up Your Canvas Properly
Start with the right foundation. Wrong canvas settings cause headaches down the road.
Open Photoshop and create a new document with these exact specifications:
- Width: 3080 pixels
- Height: 3850 pixels
- Resolution: 300 PPI (essential for print quality)
- Color Mode: RGB 8-bit
- Background: Transparent
Why these dimensions? They provide enough resolution for detailed work while keeping file sizes manageable. Plus, the portrait orientation suits this vertical composition perfectly.
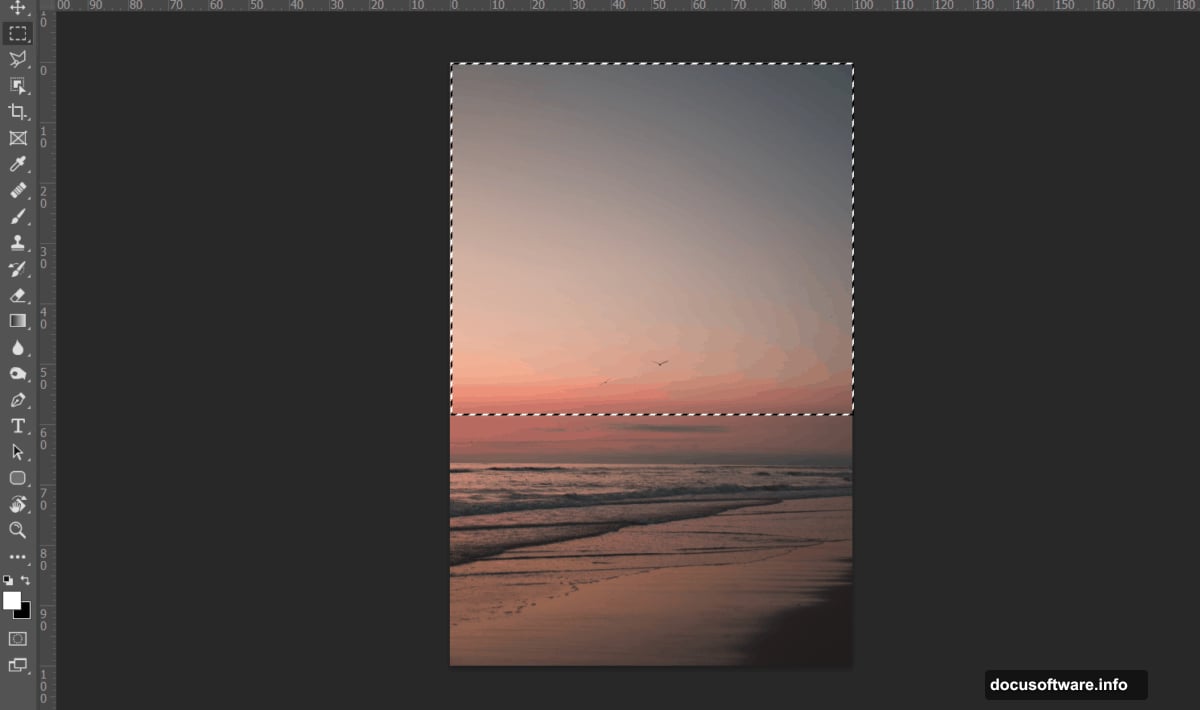
Building the Sky Foundation
Your background sets the mood for everything else. So let’s nail it first.
Open your sky stock photo. Grab the Rectangular Marquee Tool (press M). Click and drag to select the portion you want. Hold Shift while dragging to keep proportions locked. Then release your mouse before releasing Shift—this keeps your selection shape constrained.
Copy your selection (Ctrl/Cmd + C) and paste it into your working canvas (Ctrl/Cmd + V). Now press Ctrl/Cmd + T to activate Free Transform.
Here’s a crucial tip: Hold Alt + Shift while dragging corner handles. This resizes from the center while maintaining proportions. However, Photoshop CC simplified this—just hold Alt to scale all sides together.
Position your sky to fill the upper two-thirds of your canvas. Leave room below for the ground element.
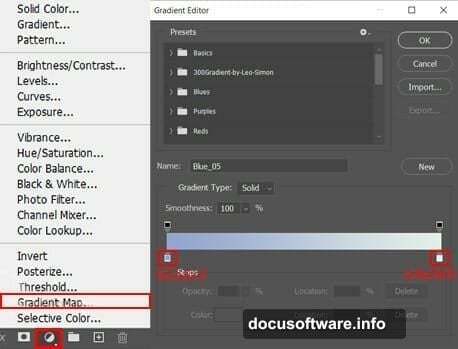
Adding Depth With Gradient Maps
Flat colors kill the surreal effect. Gradient Maps fix this instantly.
Add a new Adjustment Layer by clicking the half-filled circle icon at the bottom of your Layers panel. Select “Gradient Map” from the menu.
For this sky, choose a gradient that transitions from deep blue-purple (shadows) to warm orange-pink (highlights). This creates that magical sunset atmosphere that makes surreal scenes pop.
Adjust the opacity if the effect feels too strong. Around 60-70% usually works well. Moreover, you can always tweak this later as you add more elements.
Bringing in the Cloud Layer
Clouds add dimension and help blend your sky seamlessly.
Open your clouds stock photo and repeat the selection process from Step 2. However, this time select wispy, translucent clouds rather than thick storm clouds. Lighter clouds layer better over your base sky.
Paste the clouds above your sky layer. Then change the blend mode to “Screen” or “Lighten”—both work but produce slightly different results. Screen tends to look more natural for cloud overlays.
Reduce opacity to 40-50% so clouds don’t overpower your scene. Remember, clouds should enhance depth, not dominate the composition.
Positioning Your Elephant Subject
Now for the star of our show. This step requires patience and precision.
Open your elephant photo. Use the Pen Tool (P) for the cleanest selection—it takes longer but produces professional results. Trace carefully around the elephant, paying special attention to ear edges and legs.
Why not Quick Selection? It struggles with complex edges like elephant skin texture. Plus, manual selection gives you complete control over what stays and goes.
After completing your path, right-click and choose “Make Selection.” Set Feather Radius to 0.5 pixels for a sharp but not harsh edge. Copy and paste your elephant onto the main canvas.
Position the elephant in the lower third of your composition. Its feet should rest naturally on where your field texture will go. Furthermore, leave space above the elephant’s back for your palm trunk to extend upward.
Blending the Field Texture
Your elephant needs ground to stand on. Otherwise, it looks like it’s floating awkwardly.
Import your field or grassland texture. Position it at the bottom of your canvas, overlapping slightly with the elephant’s feet. This overlap is crucial for realistic grounding.
Add a layer mask to your field layer. Use a soft brush (set to 40-50% opacity) to gently blend the field’s top edge into your sky. Paint black on the mask where you want the field to fade away.
The goal? Smooth transition from sky to ground that feels natural, not abrupt. Take your time here—rushed blending always shows in the final result.
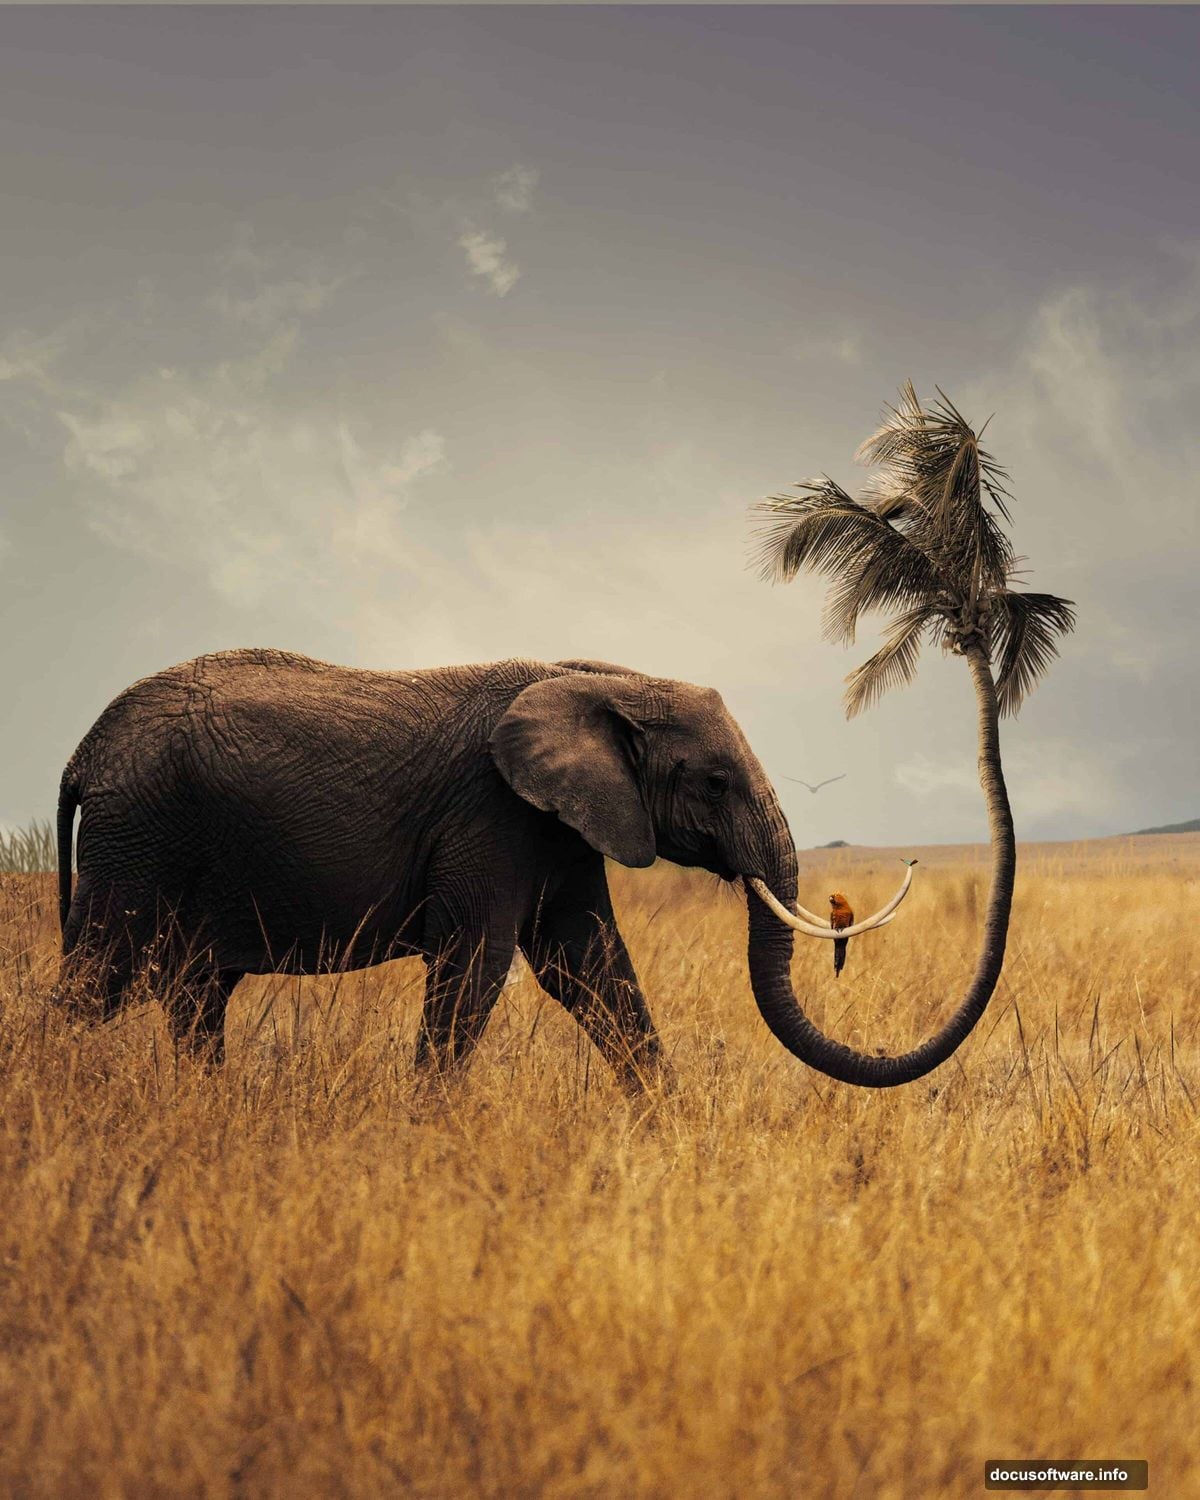
Creating the Palm Trunk Illusion
Here’s where surrealism kicks in. We’re replacing the elephant’s trunk with a palm tree trunk.
Open your palm tree photo. Select just the trunk portion—no fronds yet. We’ll add those separately for better control.
Use Free Transform (Ctrl/Cmd + T) to match the palm trunk’s width and angle to the elephant’s original trunk. Right-click within the transform box and choose “Warp” for fine-tuned adjustments.
Bend the palm trunk to follow the natural curve of an elephant’s trunk. This sells the illusion. A straight palm trunk looks obviously fake. However, a curved one matching elephant anatomy tricks the eye beautifully.
Masking and Blending the Trunk
Selection is half the battle. Blending completes the magic.
Add a layer mask to your palm trunk layer. Use a medium-soft brush to paint away the bottom edge where it meets the elephant’s face. You want a seamless transition that makes viewers question where elephant ends and palm begins.
Pay attention to lighting direction. If light hits your elephant from the left, adjust your palm trunk’s highlights and shadows to match. Use Dodge and Burn tools (O) for this refinement.
Also, reduce palm trunk opacity slightly (to about 95%) at the connection point. This subtle transparency helps blend dissimilar textures.
Adding Tusks for Anatomical Accuracy
Elephants without tusks look wrong to our subconscious. So let’s add them back.
Import your tusk close-up photo. Select individual tusks carefully with the Pen Tool. Paste each tusk on its own layer—this gives you independent control over positioning and adjustment.
Use Free Transform to scale tusks appropriately. They should look natural for your elephant’s apparent age and size. Too large looks cartoonish. Too small looks oddly proportioned.
Position tusks so they emerge naturally from the elephant’s face. Study reference photos if you’re unsure about correct tusk placement and angle.
Refining the Nose Connection

The nose area where trunk meets face needs special attention. This junction point makes or breaks believability.
Create a new layer between your elephant and palm trunk. Use the Clone Stamp Tool (S) to sample elephant skin texture. Paint this texture over harsh transition lines.
Alternate between Clone Stamp and Healing Brush (J) for best results. Clone Stamp maintains texture better. Healing Brush blends tones more smoothly. Together, they create invisible transitions.
Zoom in to 200% magnification for this work. What looks good at 50% often shows obvious flaws when enlarged.
Adding Palm Fronds Naturally
A trunk without fronds looks unfinished. But placement matters enormously.
Import your palm tree photo again. This time, select only the frond cluster at the top. Use the Pen Tool for clean edges that won’t halo against the sky.
Position fronds at the tip of your palm trunk. They should appear to grow naturally from the trunk’s end, just like a real palm tree.
Duplicate the fronds layer. Flip it horizontally (Edit > Transform > Flip Horizontal). Adjust size and position slightly. This asymmetry looks more organic than perfectly symmetrical fronds.
Introducing the Parrot Element
Parrots add life and reinforce the tropical surrealism. Plus, they provide a pop of color that draws the eye.
Open your parrot photo. Select the parrot carefully—feathers are tricky but worth the effort. Use the Refine Edge tool (Select > Select and Mask) to capture fine feather details.

Position your parrot either perched on a palm frond or in flight nearby. In-flight works better for compositional balance. It adds motion and directs viewer attention.
Scale the parrot proportionally to your scene. Too large destroys depth perception. Too small makes it invisible. Aim for noticeable but not dominant.
Applying Color Harmony Adjustments
Individual elements look good separately. But they need unified color to feel like one scene.
Add a Color Balance adjustment layer above all your other layers. Push midtones slightly toward the warm side (more red and yellow). This creates cohesion across disparate photo sources.
Next, add a Curves adjustment layer. Create a slight S-curve to boost contrast gently. This makes your image pop without looking overdone.
Finally, add a Vibrance adjustment (not Saturation). Vibrance increases color intensity intelligently, protecting skin tones and avoiding oversaturation.
Enhancing With Camera Raw Filter
Camera Raw isn’t just for RAW photos. It’s a powerful finishing tool for composites.
Flatten your image to a Smart Object first (right-click layer > Convert to Smart Object). This preserves editability. Then go to Filter > Camera Raw Filter.
Adjust these sliders for maximum impact:
- Clarity: Increase to +20 for texture enhancement
- Dehaze: Add +10 to punch up atmosphere
- Vibrance: Boost to +15 for color richness
- Shadows: Lift slightly to reveal hidden detail
Don’t go overboard. Subtle adjustments maintain realism within your surreal concept. Heavy-handed filters scream “over-processed.”
Adding Final Atmosphere Effects
Small touches elevate good work to great work. These finishing details make the difference.
Create a new layer at the very top. Set blend mode to “Overlay.” Paint soft white highlights where sun hits prominent features—elephant’s back, palm fronds, parrot. Use a soft brush at 10-15% opacity.
Add subtle vignetting by creating a Curves adjustment layer. Add a layer mask. Use a large, soft black brush at low opacity to darken canvas edges slightly. This focuses attention on your central subject.
Consider adding light dust particles or butterflies using your brush preset. Scatter a few sparingly. They suggest life and movement without cluttering your composition.
The Power of Surreal Photo Manipulation
This technique opens endless creative possibilities. Once you master blending disparate elements convincingly, you can create any surreal scene you imagine.
The core skills transfer directly to other projects. Client work, personal art, social media content—they all benefit from strong compositing fundamentals. Moreover, this style stands out in crowded digital spaces where everyone posts the same filtered selfies.
Practice this tutorial multiple times with different animals and plant combinations. Try a giraffe with a tree trunk neck. Or a lion with flower petals for a mane. Each variation teaches new lessons about light, shadow, and believable blending.
Start creating. Push boundaries. Make people look twice at your work and question what’s real.