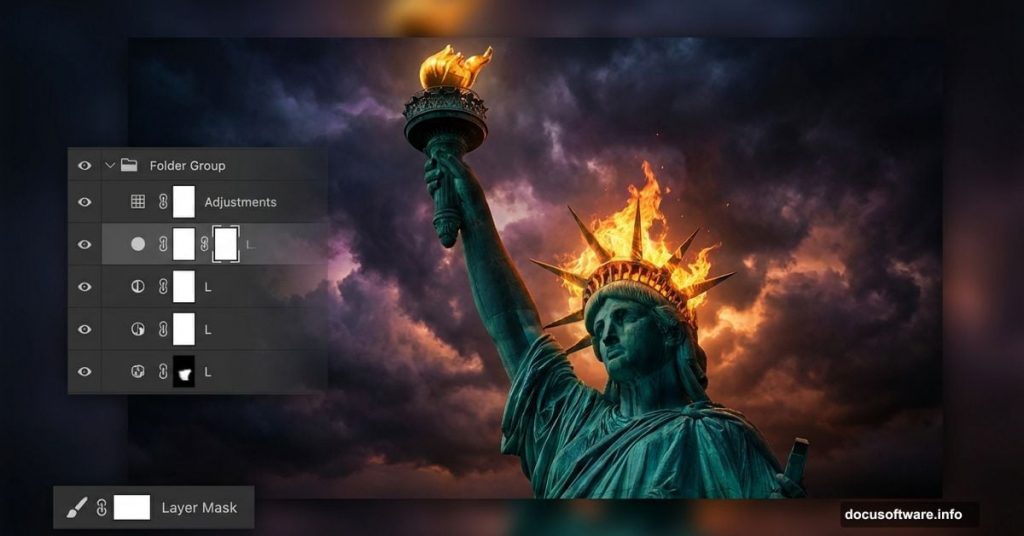
Want to create powerful, surreal imagery that makes people stop scrolling? This Photoshop tutorial shows you exactly how to transform the Statue of Liberty into a haunting symbolic piece.
You’ll blend multiple images, add dramatic fire effects, and create atmosphere with custom brushes. Plus, I’ll walk you through every layer mask and adjustment so nothing feels confusing.
The final result? A striking composition that combines patriotic symbolism with surreal artistry. Best part? You don’t need advanced Photoshop skills to follow along.
Set Up Your Canvas Right
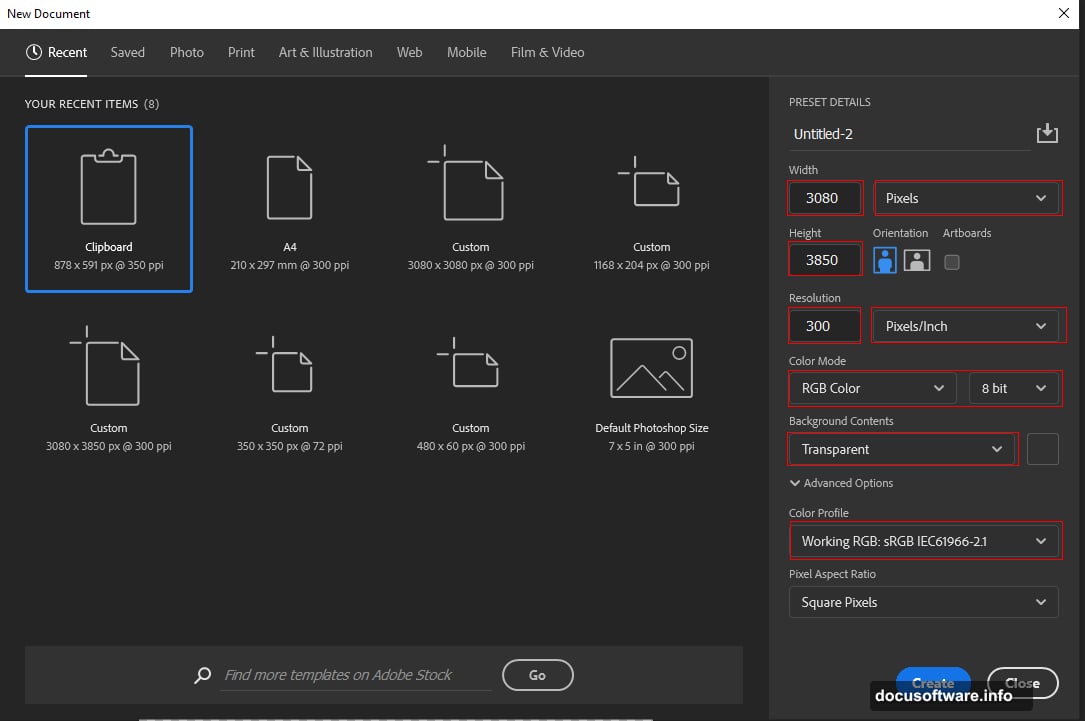
First, create a properly sized workspace. Go to File > New and input these exact settings:
Canvas Settings:
- Preset: Custom
- Width: 3080px
- Height: 3850px
- Resolution: 300px
- Color Mode: RGB Color 8 bit
- Background Contents: Transparent
Why these dimensions? They give you enough resolution for print-quality output while keeping file sizes manageable. Plus, the vertical orientation works perfectly for statue compositions.
Remember to work non-destructively. That means using layer masks instead of erasing, and keeping adjustment layers separate from your image layers.
Build Your Background Foundation
Now place your background sky image. Hit File > Place and select your cloud background.

Position it with the Transform tool (Ctrl/Cmd + T). Hold Alt + Shift while dragging corners to maintain proportions. In Photoshop CC, just hold Alt to constrain all sides together.
Here’s a quick tip. Don’t just accept the default placement. Take time to position dramatic cloud formations where they’ll frame your main subject later.
Once you’re happy with the position, rasterize the layer by right-clicking and selecting Rasterize Layer. This converts your smart object to a regular layer you can edit freely.
Add the American Flag
Open your flag image next. Use the Rectangular Marquee Tool (M) to select the portion you want.
Copy (Ctrl/Cmd + C) and paste (Ctrl/Cmd + V) it onto your main canvas. Again, use Transform (Ctrl/Cmd + T) to size and position it. Hold Alt + Shift while resizing to keep proportions locked.
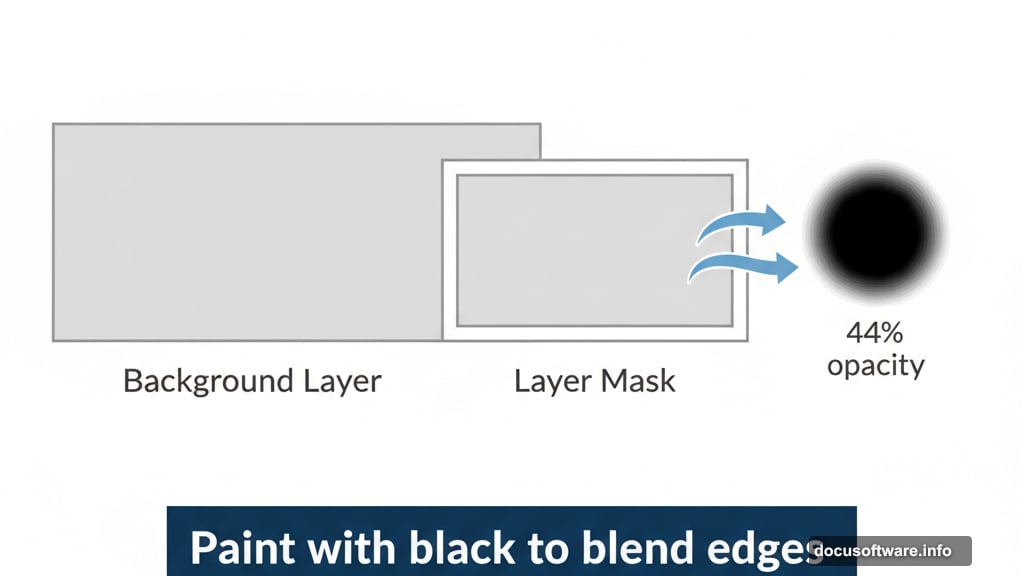
Now comes the blending magic. Create a layer mask on your flag layer by clicking the mask icon at the bottom of the Layers panel.
Select the Brush Tool (B) and choose a soft round brush. Set your foreground color to black. Then paint over the flag edges to blend them seamlessly into the background.
Key setting: Drop brush opacity to 44%. This creates a subtle blend rather than harsh edges. The flag should look like it’s part of the atmospheric scene, not pasted on top.
Extract the Statue Perfectly
Open your Statue of Liberty image. Here’s where precision matters.
Grab the Pen Tool (P). Start clicking around the statue’s outline to create anchor points. The Pen Tool gives you the cleanest selection possible for complex shapes like the statue’s torch and crown.
Take your time here. Click at every major curve or corner. For straight edges, fewer points work better. For curves, add more points to follow the shape smoothly.
Pro technique: When drawing paths with the standard Pen tool, straight lines are simplest. Just click to create anchor points. Each click adds a straight segment between points.
Once your path is complete, right-click inside the path and choose “Make Selection.” Set Feather Radius to 0.5 pixels for a slight edge softening. Then click OK.
Now create a layer mask with your selection active. The statue is now cleanly extracted from its original background.
Blend Everything Together
Here’s where your composition comes alive. Start positioning your statue layer where it creates the strongest visual impact.
Use Transform (Ctrl/Cmd + T) to scale the statue appropriately. It should dominate the composition but still leave room for dramatic sky above.
Layer order matters:
- Bottom: Cloud background
- Middle: Flag
- Top: Statue
This stacking creates proper depth. The flag appears behind the statue, and both sit against the sky backdrop.
Next, adjust each layer’s blending. Select your flag layer and try different blend modes from the dropdown at the top of the Layers panel. Overlay and Soft Light often work beautifully for this effect.
Also experiment with layer opacity. Sometimes dropping a layer to 85-90% opacity creates more natural blending than leaving it at 100%.
Add Fire and Lava Textures
Now for the dramatic part. Place your lava texture image onto the canvas.
Position it where you want fire effects to appear. Maybe flames rising from the base, or lava replacing the water around the statue.
Create a layer mask on the lava texture. Use a soft brush with black foreground color to paint away areas where you don’t want lava visible. This technique lets you reveal fire in specific spots while hiding it elsewhere.
Blending tip: Set your lava layer to Screen or Lighten blend mode. This makes dark areas transparent while keeping bright flames visible. It creates realistic fire that glows against darker elements.
Add multiple lava layers if needed. Stack them at different opacities and blend modes to build up intensity where you want maximum drama.
Create Atmosphere with Birds
Place your bird images next. Seagulls work great for this composition since they’re associated with harbors and the Statue of Liberty’s location.
Scatter several bird layers across your sky. Vary their sizes to create depth. Smaller birds appear farther away, while larger ones seem closer to the viewer.
Size variation trick: Place one bird layer, then duplicate it (Ctrl/Cmd + J). Transform each duplicate to different sizes. This creates a flock from a single bird image.
Adjust bird layer opacities too. Birds farther in the distance should be slightly transparent, mimicking atmospheric haze. Birds in the foreground can stay at 100% opacity.
Enhance Mood with Custom Brushes
Load your cloud brushes into Photoshop. These add extra atmosphere quickly.
Create a new layer above your background. Select the Brush Tool (B) and choose one of your downloaded cloud brushes from the brush picker.
Set foreground color to white or light gray. Click once or twice to stamp additional clouds into your sky. This fills empty areas and adds visual interest.
Then load your ray brushes. Create another new layer. Select a ray brush and set foreground to yellow or orange (for dramatic light rays).
Brush settings:
- Mode: Screen
- Opacity: 30-50%
- Flow: 50%
Click to add light rays breaking through clouds. Position them so they appear to emanate from behind the statue or through gaps in clouds.
These custom brushes add polish that’s hard to achieve with standard tools. They make your composition feel more professional and intentional.
Add Texture with Cracks
Place your crack texture image. This adds gritty realism to surfaces.
Position it over the statue, flag, or both. Then set the blend mode to Multiply or Overlay. This makes the texture interact with underlying layers rather than covering them.
Reduce opacity to 20-40%. You want subtle texture, not overwhelming grunge.
Create a layer mask and paint away cracks from areas where they don’t make sense. For example, keep texture on solid surfaces but remove it from sky areas.
Advanced technique: Use different crack textures on different elements. One texture on the statue, another on the flag. This creates varied surface qualities that feel more realistic.
Polish with Adjustment Layers
Now fine-tune your overall color and tone. Add adjustment layers from the bottom of the Layers panel.
Essential adjustments:
Curves: Boost contrast by creating an S-curve. Click the middle of the curve line and drag up slightly for highlights, then click and drag down on the shadows end.
Hue/Saturation: Adjust individual color channels. Maybe boost reds in the flag or enhance blue-greens in the sky. Use the dropdown to target specific colors.
Color Balance: Shift overall color temperature. Add warmth to highlights for a sunset feel, or cool shadows for dramatic mood.
Levels: Ensure your blacks are truly black and whites are properly bright. Drag the shadow slider right until it meets the edge of your histogram.
Each adjustment layer includes a mask. Paint with black on these masks to hide adjustments from specific areas. This gives you precise control over where each effect applies.
Final Polish with Camera Raw
Here’s the finishing touch that pulls everything together. Go to Filter > Camera Raw Filter.
This opens Adobe Camera Raw interface with powerful editing controls.
Key adjustments to make:
- Exposure: Brighten or darken the overall image
- Contrast: Increase for punch, decrease for dreamy looks
- Highlights: Pull down to recover bright areas
- Shadows: Lift to reveal detail in dark areas
- Clarity: Boost for edge definition (but don’t overdo it)
- Vibrance: Gentle saturation increase that protects skin tones
Also try the Effects panel. Add a subtle vignette by dragging the Amount slider left. This darkens edges and draws focus to your central subject.
The Graduated Filter tool in Camera Raw lets you darken the top or bottom of your image selectively. Perfect for creating dramatic skies or darkened foregrounds.
When you’re satisfied, click OK. Camera Raw applies all adjustments as a smart filter you can edit later if needed.
Layer Organization Matters
Before you finish, clean up your layer stack. Proper organization makes future edits easier.
Group related layers together. Select multiple layers (hold Ctrl/Cmd and click each one), then press Ctrl/Cmd + G to group them.
Suggested groups:
- Background elements (sky, clouds)
- Main subjects (statue, flag)
- Effects (fire, rays, birds)
- Adjustments (all adjustment layers)
Name each group clearly. “Background” beats “Group 1” when you reopen this file in three months.
Also name important individual layers. “Statue mask” tells you more than “Layer 3” ever will.
Finally, delete any unused layers or hidden experiments. A clean layer stack saves file size and prevents confusion.
Save Your Work Properly
Save a master PSD file with all layers intact. This preserves your ability to edit anything later.
Hit File > Save As and choose Photoshop (*.PSD) as the format. Name it something descriptive like “statuelibertymanipulation_master.psd”
Then save a flattened version for sharing. Go to File > Save As again, but this time choose JPEG.
JPEG settings:
- Quality: 10-12 (maximum quality)
- Format Options: Baseline (“Standard”)
For web use, you might create a smaller version too. Go to File > Export > Export As. Here you can resize and optimize specifically for screen display.
Now you’ve got a stunning symbolic photo manipulation that combines technical skill with creative vision. The Statue of Liberty emerging from flames creates powerful imagery that works for political commentary, artistic projects, or portfolio pieces.
The techniques you learned here translate to any photo manipulation project. Master layer masks, learn to blend textures naturally, and use adjustment layers strategically. Those skills unlock endless creative possibilities in Photoshop.