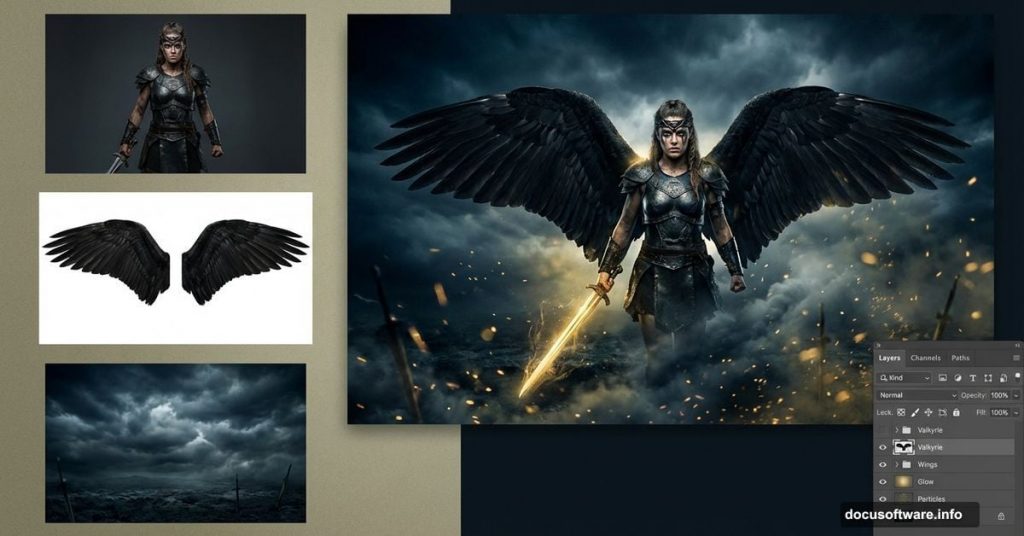
Want to create a dramatic fantasy portrait of a Norse goddess? This Valkyrie manipulation combines mythological imagery with modern photo editing techniques.
You’ll learn how to build atmospheric backgrounds from scratch, blend multiple elements seamlessly, and add cinematic particle effects. Plus, I’ll show you depth-of-field tricks that make your composition feel three-dimensional.
Let’s dive into creating dark fantasy artwork that captures the power of these legendary figures.
What You’ll Build
Valkyries chose who lived and died in Norse mythology. Your manipulation will capture that dramatic power.
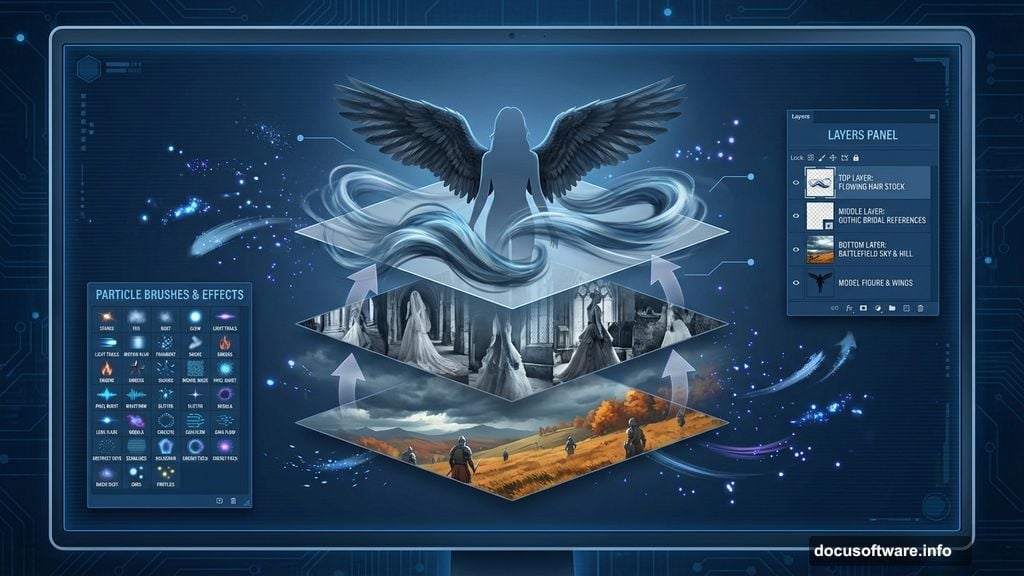
The process breaks down into three main stages. First, you’ll construct a moody battlefield background using just two stock photos. Next, you’ll add your model with authentic goddess props and flowing elements. Finally, you’ll enhance everything with particle effects and color grading that ties it all together.
This tutorial requires Photoshop CS5 or newer. The techniques work in any recent version, though.
Stock Photos You’ll Need
Gather these resources before starting. Most come from free stock sites, so you won’t need to spend money:
- Black wings from actress stock collections
- Misc Objects 018 from pixelchemist
- Water background from fantasystock
- Gothic Bridal 4 reference images
- Particles brushes (free PSD versions available)
- Battlefield sky photos
- Autumn coastal hill landscapes
- Hair stock images for flow and movement
- Particle packs with 25+ free images
- Additional model references
Alternative sources work fine. Just match the mood and lighting conditions.
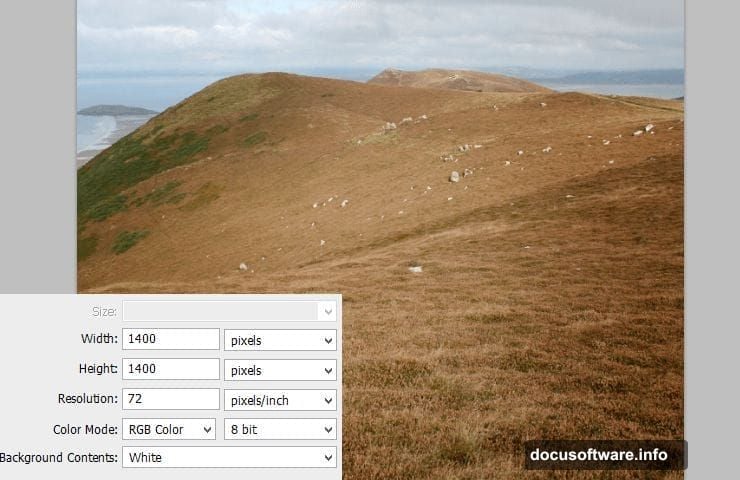
Building Your Background Foundation
Start with a 1400×1400 pixel canvas. This square format works great for social media while giving you room to work.
Place your autumn hill stock at the center. You’ll use this as the foundation for your battlefield setting.
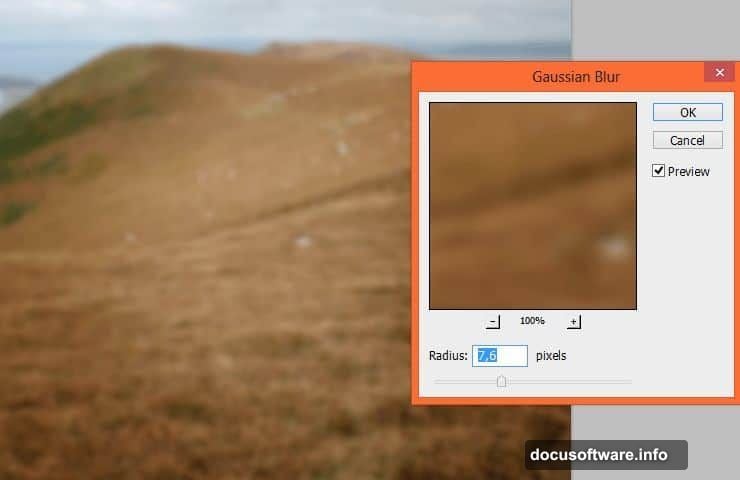
Now add depth immediately. Go to Filter > Blur > Gaussian Blur and set it to 7.6 pixels. This creates atmospheric perspective right away.
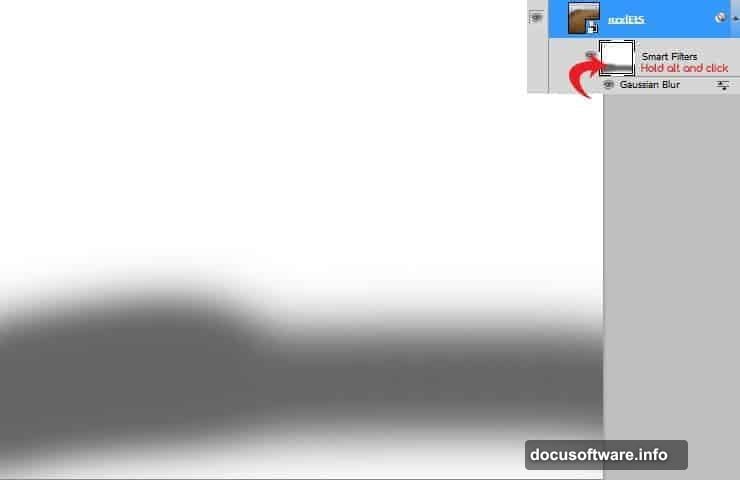
Here’s the clever part: Smart Filters come with built-in masks. Click the white canvas thumbnail on the Smart Filter line. Pick a large, soft brush at 60% opacity. Carefully erase the blur from the bottom portion while leaving the edges blurred.
This selective blurring creates realistic depth. Our eyes see distant objects as softer, so you’re mimicking natural vision. Hold Alt and click the mask to edit it in isolation.
Adjusting Hill Exposure and Contrast
Your hill needs tonal adjustments to match the dramatic mood you’re building.
Add a Brightness/Contrast adjustment layer. Increase brightness slightly and pump up contrast to make the landscape pop. Don’t go overboard—subtle changes look more realistic.
Next, add another Brightness/Contrast layer for targeted highlights. This time, use a mask to apply the effect only where light would naturally hit. Paint on the mask with a soft brush, focusing on the center and top portions.
This layered lighting approach creates dimension. Real light doesn’t hit surfaces evenly, so neither should your adjustments.
Color Grading the Landscape
Add a Hue/Saturation adjustment layer. You’ll use this to blend the hill seamlessly with the sky you’re about to add.
Shift the hue slightly toward cooler tones. Valkyrie imagery calls for that cold, mythological atmosphere. Decrease saturation just enough to remove any overly vibrant greens or browns.
These subtle color shifts make disparate stock photos feel like they belong in the same scene.
Blending Sky Elements
Place your battlefield sky stock above the hill layer. The sky sets your entire mood, so choose dramatic cloud formations.
Add a layer mask and use the gradient tool to blend where sky meets landscape. Alternatively, paint with large soft brushes for more control. Either approach works—choose what feels comfortable.
Make the sky a clipping mask by right-clicking and selecting “Create Clipping Mask.” Add a Hue/Saturation adjustment layer and decrease saturation. You want the sky moody, not postcard-pretty.
Creating Atmospheric Vignette
Add a final Brightness/Contrast adjustment layer. This one stays unclipped—it affects your entire composition.
Darken the overall image slightly. Then click the layer mask and use a radial gradient from the center outward. This creates a natural vignette that draws eyes toward your focal point.
The gradient should be subtle. You’re adding atmosphere, not creating a harsh border.
Positioning Your Valkyrie Model
Now comes the fun part: adding your goddess figure.
Import your model stock and carefully cut her out using your preferred selection method. I recommend the Pen Tool for clean edges around hair and fabric. Take your time here—sloppy selections ruin otherwise great manipulations.
Position her prominently in the composition. Valkyries command attention, so don’t make her too small. She should feel powerful and central to the scene.
Add a layer mask and use soft brushes to blend her feet with the ground. Real figures cast shadows and interact with their environment. Even small contact shadows make a huge difference in believability.
Adding Gothic Props and Wings
Import those dramatic black wings. Scale them appropriately and position them behind your model layer.
Wings need careful blending. Use layer masks to soften edges where feathers meet the body. Real wings have depth and shadow, so don’t leave them looking pasted on.
Add Gothic props like flowing fabric, weapons, or armor pieces. Each element needs its own layer for maximum control. Position them logically—think about how fabric drapes and how armor sits on a body.
Use Free Transform (Ctrl/Cmd+T) liberally. Warp and distort props to match your model’s pose and perspective. Flat, unaltered stock elements scream “photoshop fail.”

Creating Hair Flow and Movement
Valkyries need dynamic, windswept hair. Your stock photo probably won’t have enough movement.
Import hair stock images and blend them with your model’s existing hair. Use layer masks and soft brushes to merge seamlessly. Pay attention to hair direction—all strands should flow from the same wind source.
Lower opacity on some hair layers to create semi-transparent wisps. Real windblown hair has depth and layers, not a solid mass.
Color-match the hair using Hue/Saturation adjustment layers set as clipping masks. You want everything looking like it belongs to the same person.
Lighting Your Subject
Your model needs to match the background lighting. Right now, she probably looks too bright or too flat.
Add a Curves adjustment layer (set as clipping mask). Create an S-curve to increase contrast. Then use the layer mask to apply this selectively—stronger on lit sides, softer on shadow sides.
Add another Curves layer for shadows. Pull the curve down to darken, then mask everything except shadow areas. This localized darkening creates realistic depth.
Finally, add highlights. Create a new layer set to Overlay blend mode. Paint white with a soft brush where light would naturally hit—shoulders, cheekbones, forehead. Lower opacity until it looks natural, not painted.
Adding Particle Effects
Particles create magical atmosphere. Import your particle brushes or use free particle stocks.
Create a new layer above your model. Choose white as your foreground color. Stamp particles around her figure, concentrating them near focal points. Vary brush sizes for depth—larger particles appear closer, smaller ones recede.
Change blend mode to Screen or Linear Dodge (Add). Both eliminate black backgrounds from particle stocks. Adjust opacity until particles enhance without overwhelming.
Add a second particle layer with a different pattern. Vary the sizes and densities between layers. Real particle effects have randomness and depth.
Creating Depth with Blur
Your particles need depth too. Select particle layers and convert them to Smart Objects (right-click > Convert to Smart Object).
Apply Gaussian Blur, but use a smaller radius than your background blur—maybe 3-4 pixels. This makes particles in the “middle distance” slightly soft.
Add another particle layer with no blur for foreground particles. This three-tier depth (sharp foreground, medium blur middle, heavy blur background) creates convincing 3D space.
Final Color Grading
Time to unify everything with color grading. This step transforms good manipulations into great ones.
Add a Color Lookup adjustment layer at the top of your layer stack. Photoshop includes several cinematic presets. Try “Moonlight” or “Late Sunset” for dark fantasy moods. Adjust opacity to taste—full strength often looks too heavy-handed.
Add a Selective Color adjustment layer. Tweak individual color channels to perfect your palette. For Valkyrie imagery, I typically:
- Boost cyans and blues in shadows
- Add warmth to highlights (subtle yellows)
- Desaturate reds slightly to avoid distracting pops
Adding Atmospheric Effects
Create a new layer at the very top. Fill it with 50% gray (Edit > Fill > 50% Gray). Set blend mode to Overlay.
Use Dodge and Burn tools directly on this layer. Dodge (lighten) areas where light pools. Burn (darken) areas in shadow. This non-destructive technique adds final polish to your lighting.
Paint with low opacity—5-10% strength. Build up effects gradually. Heavy-handed dodging and burning looks amateurish.
Sharpening Your Final Image
Flatten a copy of your image (Image > Duplicate, then Layer > Flatten Image). Run Filter > Sharpen > Smart Sharpen at 100-150% with a 1-2 pixel radius.
Immediately fade the sharpening (Edit > Fade Smart Sharpen). Set it to Luminosity blend mode at 50-70% opacity. This prevents color fringing while keeping crisp details.
Never sharpen your working file. Always work on a duplicate or use Smart Objects.
Export Settings That Matter
Save your working file as PSD with all layers intact. You’ll thank yourself later when you want to make adjustments.
For web sharing, export as JPEG at 80-85% quality. This balances file size with visual quality. Use “Save for Web” (Shift+Ctrl/Cmd+Alt+S) for maximum control.
Export dimensions depend on your platform. Instagram prefers 1080x1080px for square posts. DeviantArt and Behance handle larger files—I typically upload 2000px on the long edge.
Common Mistakes to Avoid
Don’t skip the background blurring steps. Depth of field makes or breaks photorealistic composites. Everything in perfect focus looks flat and fake.
Match your lighting direction across all elements. If the background shows light from the left, your model must have left-side highlights. Mismatched lighting immediately reveals the manipulation.
Go easy on particle effects. Beginners often add too many, creating visual clutter. Particles should enhance, not dominate. When in doubt, use fewer at lower opacity.
Pay attention to color temperature. Warm elements next to cool elements look jarring unless you have a specific reason. Use adjustment layers to harmonize temperatures across your composition.
Taking It Further
This Valkyrie manipulation demonstrates core photo compositing techniques. You’ve learned background construction, element blending, particle effects, and professional color grading.
These same skills apply to any fantasy portrait manipulation. Swap the Valkyrie theme for angels, demons, faeries, or original characters. The workflow stays consistent.
Practice makes these techniques second nature. Your first attempt might take hours. Eventually, you’ll work through similar projects in under an hour. The quality comes from intentional choices, not speed.
Experiment with different mythologies and time periods. Norse Valkyries work great, but what about Greek goddesses, Egyptian deities, or Celtic warriors? Each culture offers rich visual material for dramatic fantasy portraits.