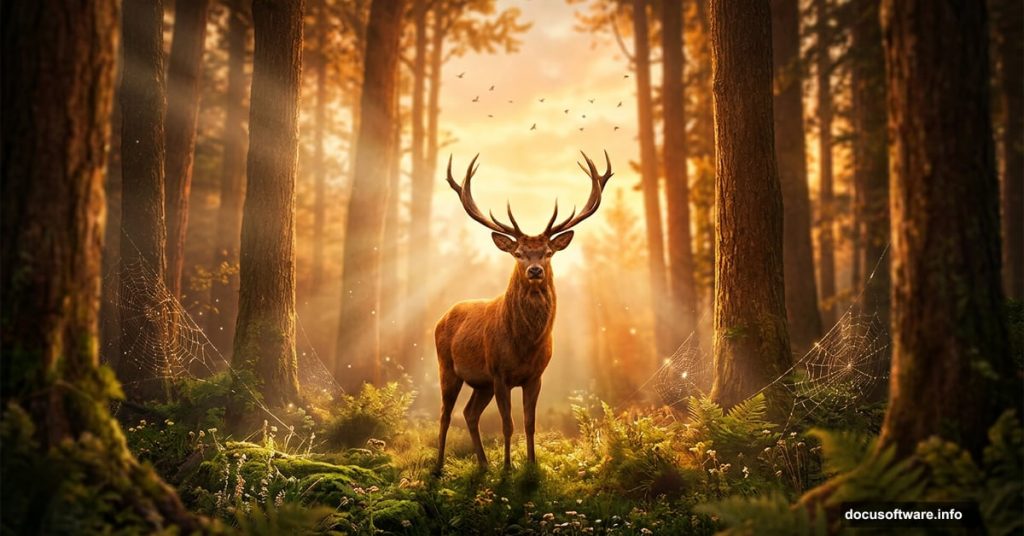
There’s something magical about transforming a blank canvas into a glowing woodland scene. This tutorial walks you through building a warm, atmospheric deer landscape from scratch in Photoshop — layering skies, blending backgrounds, and adding tiny details like spiderwebs and birds that make the whole scene feel alive.
By the end, you’ll have a rich, cinematic image that feels like a moment caught deep in the forest at golden hour.
What You’ll Need Before Starting
Grab these resources before opening Photoshop. You’ll need a background forest image, a deer photo, a sky shot, butterfly and bird images (six total), plus brush sets for spiderwebs, spiders, and moss.
Having everything downloaded and organized in a folder saves a lot of back-and-forth once you get going. Also, make sure you’re working in Photoshop CC for the best experience — one of the transform steps behaves slightly differently in older versions.
Set Up Your Canvas the Right Way
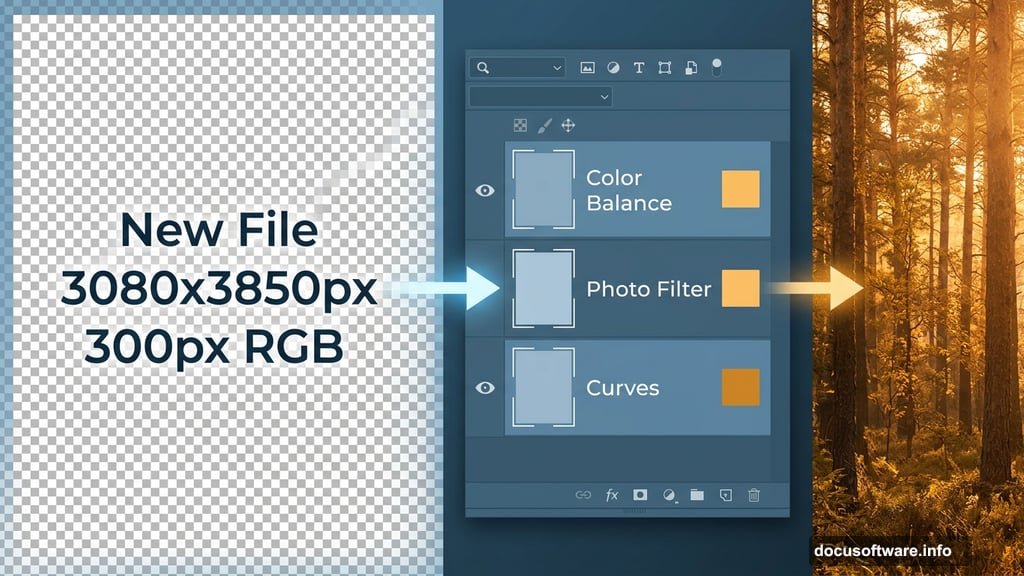
First, create a new file. Go to File > New and enter these exact settings:
- Preset: Custom
- Width: 3080px
- Height: 3850px
- Resolution: 300px
- Color Mode: RGB Color, 8-bit
- Background Contents: Transparent
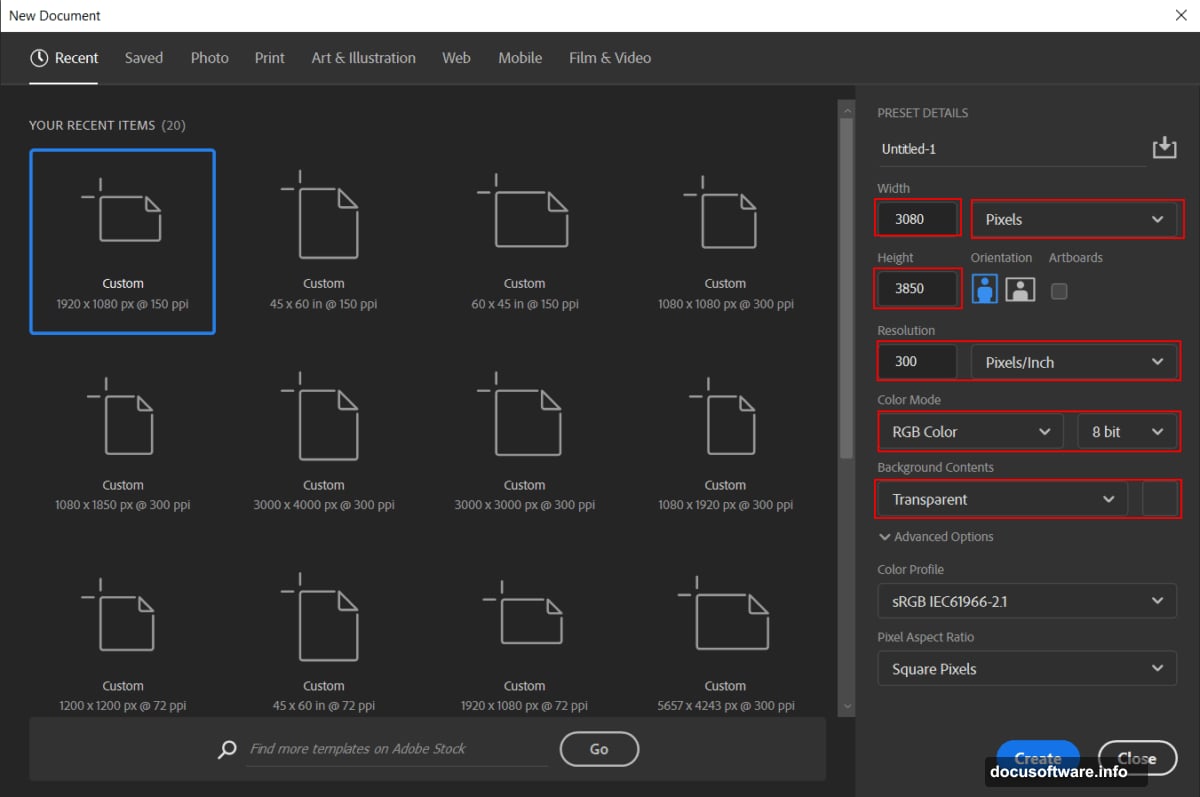
That tall aspect ratio gives you plenty of vertical space to build the scene upward, which really suits a forest composition. The 300px resolution also means this image prints beautifully if you ever want a physical copy.
Place and Blend Your Background
Go to File > Place and select your background forest image. Once it’s on the canvas, hit Ctrl/Cmd + T to bring up the transform tool.
Here’s the key difference between Photoshop versions. In older versions, hold Alt + Shift to scale from the center while keeping proportions locked. In Photoshop CC, just hold Alt alone — it handles all sides together automatically.
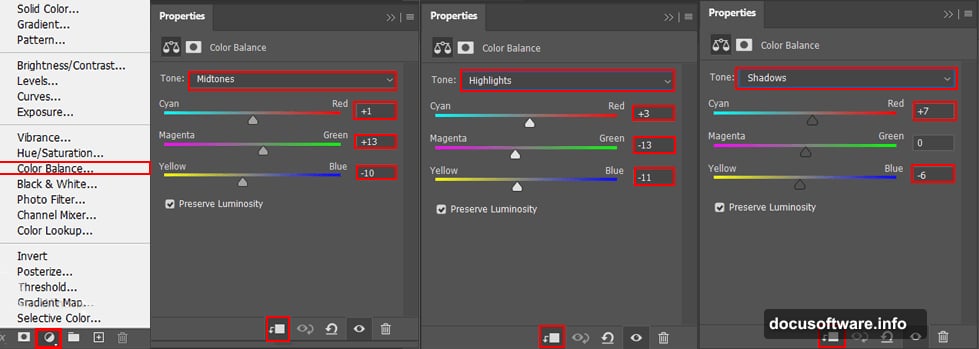
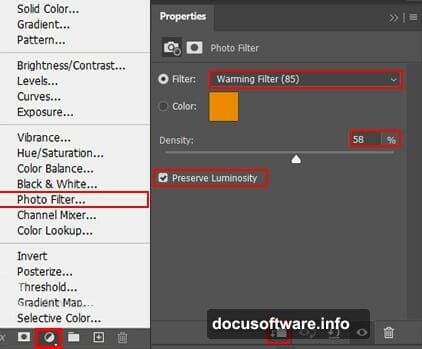
Now add your adjustment layers to warm up the mood. Stack these three on top of the background layer:
- Color Balance — nudge the tones warmer, pulling toward yellows and reds
- Photo Filter — adds an overall warm tint that feels like late afternoon light
- Curves — boost contrast slightly to give the scene depth and punch
These three layers working together are what create that signature golden-hour forest glow. Don’t rush this step. Small adjustments here pay off big when you add the deer later.
Bring In the Sky
Open your sky image with File > Open. Grab the Rectangular Marquee Tool (M) and drag over the sky area you want to use. Hold Shift while dragging to keep the selection clean and straight — just remember to release the mouse button before releasing Shift.
Once selected, add a layer mask to the sky layer. Then grab a Soft Round Brush, set your foreground color to black, and gently paint over the bottom edge of the sky. This softens the transition so it blends naturally into the forest background instead of looking like a hard cut.
Set the sky layer Opacity to 40%. That keeps it subtle — more of a luminous glow peeking through the trees than a competing focal point.
Cut Out the Deer with the Pen Tool
This is the most precise part of the whole project, but don’t let it intimidate you. Open your deer image via File > Open, then select the Pen Tool (P).
Click around the deer’s outline to place anchor points. The Pen Tool works by connecting these points with straight or curved segments. For a straight segment, just click from point to point. For curves along the deer’s back and legs, click and drag to pull out curve handles.
Work slowly around the entire animal. When you close the path back to your starting point, right-click and choose Make Selection. Then add a layer mask — this hides the original background while keeping your deer intact.
Place your masked deer onto the main canvas and position it in the lower-center of the frame, sitting naturally in the landscape. The deer should feel grounded, like it belongs in that specific patch of forest.
Add Brushwork Details: Webs, Moss, and Spiders
This is where the scene gets texture and character. Load your downloaded brush sets for spiderwebs, spiders, and moss into Photoshop via the Brushes panel.
Create new layers for each element. Spiderwebs work best in upper corners or strung between trees — paint them lightly at low opacity so they catch the light subtly. Moss brushes along the bottom edges of rocks or tree trunks sell the idea that this forest is old and undisturbed. A small spider near its web adds a wonderful tiny story within the larger scene.
Work with these on separate layers so you can adjust each one independently without wrecking the others.
Place the Birds
Add your six bird images across the sky area. Vary their sizes — birds that appear smaller feel farther away, which adds natural depth. Scatter them loosely rather than in a neat row.
A good placement strategy: two birds mid-left, one higher on the right, and three scattered in the upper background. That asymmetry feels organic, like they’re mid-flight rather than posed.
You can also use the Bird brushes from your brush set to add extra silhouettes in the distance. Keep these very small and at reduced opacity so they read as background birds without competing with your main focal elements.
Finish With Camera Raw Filter
With your layers complete, flatten a merged copy of the whole image. Go to Filter > Camera Raw Filter to open the Camera Raw panel.
This is your final color grade. Boost the Temperature slider slightly toward warm. Increase Clarity just a touch to bring out texture in the trees and deer fur. Add a gentle Vignette in the Effects tab — this darkens the edges and naturally draws the eye toward the deer in the center.
Play with the HSL sliders too. Pulling down the saturation on blues keeps the sky from competing with the warm forest tones. Boosting yellow and orange saturation makes those golden light patches really sing.
Camera Raw is the difference between a good composite and one that feels like a single, cohesive photograph. Spend time here and your deer will look like it genuinely belongs in that forest.
The final scene should feel warm, quiet, and a little magical — the kind of image where you almost expect the deer to blink and glance up at you. That’s the goal. Every layer, every brush stroke, every adjustment works together toward that single feeling.