
Photoshop painting feels intimidating at first. You see gorgeous sunset scenes and wonder how artists create those glowing colors and atmospheric clouds.
Good news? You don’t need fancy custom brushes or expensive plugins. Standard Photoshop brushes work perfectly for painting realistic sunsets. Plus, this technique teaches foundational digital painting skills you’ll use everywhere.
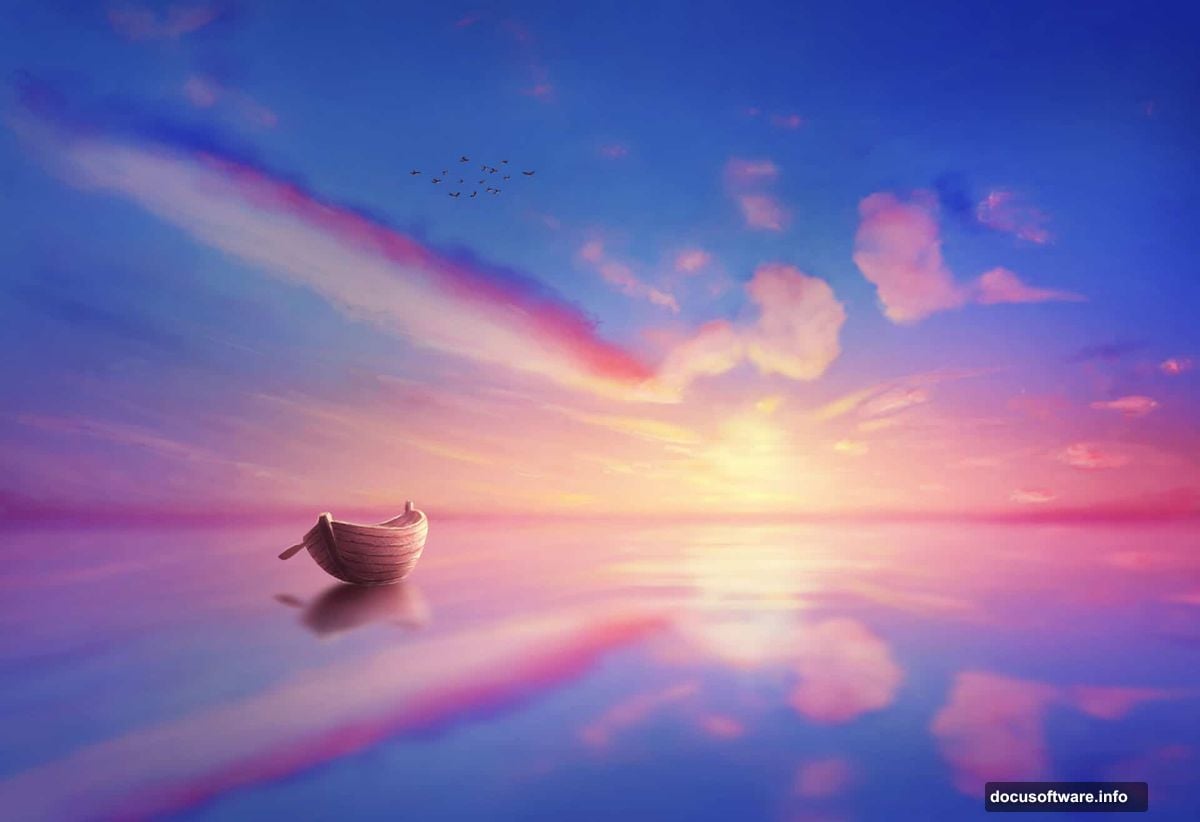
Let’s paint a complete sunset scene from scratch. We’ll build layers of color, add clouds, create a lake reflection, and finish with a boat and birds.
Set Up Your Canvas and Base Gradient
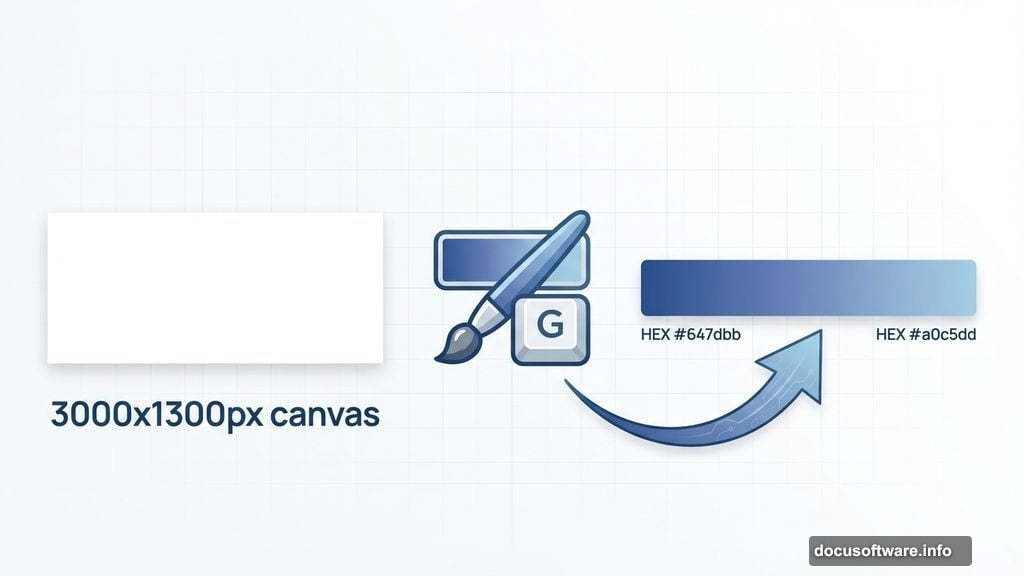
Create a new 3000×1300 px document and fill it white. This wide format works great for landscape scenes.
First, we’ll paint the sky. Then we’ll use that same sky as a reflection for the water below. This approach saves time and keeps lighting consistent.
Make a new layer (Ctrl+Shift+N). Grab the Gradient Tool (G) and select Linear Gradient. Set your colors to #647dbb (blue) and #a0c5dd (lighter blue). Drag from left to right across your canvas.
You now have a basic sky gradient. However, it needs depth and atmosphere. Real sunsets show darker blues at the top transitioning to warmer tones near the horizon.
Build Atmospheric Depth with Soft Brushes
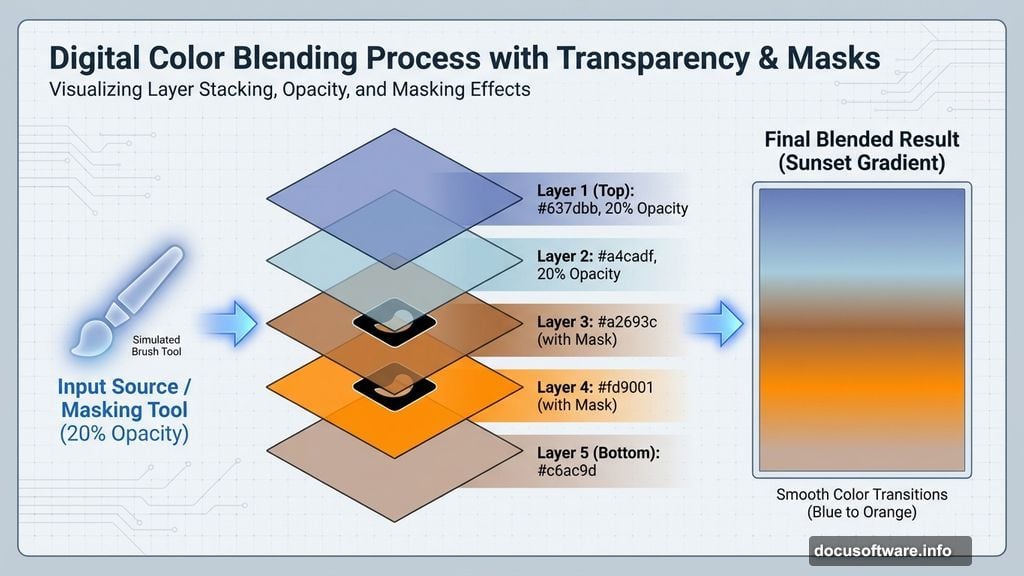
Create another new layer. Select a soft round brush at 20% opacity with color #637dbb. Paint along the top left area to darken it naturally.
Why low opacity? Because building color gradually looks more realistic than painting everything at full strength. Multiple light passes create smooth transitions that feel atmospheric.
Next, make another layer. Use the same soft brush technique with color #a4cadf at 20% opacity. This time, brighten the bottom middle section slightly. This mimics how light diffuses near the horizon.
Now for the warm sunset glow. Create a new layer and use color #a2693c (picked from reference photos of real sunsets). Paint along the entire bottom edge with a soft brush.
Here’s a crucial technique: Add a layer mask to this warm layer. Use a soft black brush on the mask to reduce opacity on the left side. This creates natural variation instead of a uniform band of color.
Add the Golden Hour Glow
Make a new layer. Switch to color #fd9001 (bright orange) and paint softly in the middle bottom area. Add a layer mask and erase the top of this effect so it fades naturally into the blue sky above.
On another new layer, use color #c6ac9d (dusty pink) along the bottom. This color bridges the gap between the warm orange and cooler blue tones.

Real sunsets show multiple color bands. You’re layering these colors just like nature does. Each layer adds richness and complexity.
Paint Cloud Details
Create a new layer. Use a small brush with color #d67751 (warm coral) to paint small cloud shapes from left to right. Don’t overthink the shapes—clouds are irregular and organic.
Change this layer’s blend mode to Overlay at 100%. Overlay mode makes your brush strokes interact beautifully with the colors underneath. The coral tones will blend into the sky instead of sitting on top like opaque paint.
Now make another layer. Use a medium-soft brush with color #dab473 (golden tan) to paint larger cloud formations. Reference actual sunset photos if you need inspiration for cloud shapes.
Reduce your brush opacity and hardness when painting lighter cloud areas. This creates soft, wispy edges that look realistic. Change this layer to Hard Light at 100%. Hard Light intensifies the colors and creates dramatic lighting.
Create one more cloud layer. Paint small details on the right bottom area using the same golden tan color. Set this layer to Overlay at 100%.
Create the Water Reflection
Select all your sky layers. Duplicate them (Ctrl+J) and merge the duplicates into one layer (Ctrl+E). Flip this merged layer vertically (Edit > Transform > Flip Vertical).
Position the flipped sky below your original sky layers. This creates an instant reflection effect. However, water isn’t a perfect mirror.
Add a layer mask to your reflection layer. Use a soft brush with black at low opacity to fade the reflection gradually as it moves down. Water reflections appear stronger near the horizon and weaken toward the foreground.
Add Water Surface Details
Make a new layer above your reflection. Use a small hard brush with dark blue (#2a4a6c) to paint horizontal ripple lines across the water. Vary the spacing and length—real water shows irregular patterns.
Lower this layer’s opacity to around 40%. The ripples should suggest water movement without overwhelming the reflection.
Create another layer. Use a soft brush with lighter blue (#8ba8c4) to paint horizontal streaks of light on the water. These represent how light bounces off water surfaces at different angles. Set this layer to Overlay or Screen mode for a luminous effect.
Paint the Boat

Make a new layer for the boat. Use a hard brush with dark brown (#3d2817) to paint a simple boat silhouette. Start with the basic hull shape—just a curved bottom and straight sides.
On the same layer, paint a small figure sitting in the boat. Keep it simple—a basic human silhouette works perfectly since the boat is distant. Add a long oar extending from the side.
Boats at sunset typically appear as dark silhouettes against bright skies. So don’t worry about adding details or colors to the boat itself. The contrast against the sky tells the story.
Create the Boat’s Reflection
Duplicate your boat layer. Flip it vertically and position it below the boat in the water. Add a layer mask and use a soft black brush to fade the bottom of the reflection.
Make the reflection slightly less opaque than the boat itself—around 70-80% opacity. Water reflections never match the exact intensity of the object above.
Use a small hard brush to add subtle horizontal breaks in the reflection. This suggests water movement disturbing the mirror image.
Paint Atmospheric Lighting on the Boat
Create a new layer set to Overlay or Soft Light mode. Use a soft brush with warm orange (#ff8c3a) at low opacity. Paint a gentle glow on the side of the boat facing the sunset.
This rim lighting makes the boat feel integrated into the scene instead of pasted on top. Even silhouettes catch some ambient light in real life.
Add another layer above your water. Use the same warm orange to paint a subtle glow where the boat meets the water. This represents light reflecting off the water surface near the boat.
Add Birds to Complete the Scene
Create a new layer at the top. Use a small hard brush with black to paint simple bird shapes—just small V shapes at various distances. Place 3-5 birds flying across the sky.
Vary the sizes. Birds closer to the viewer should be slightly larger. Birds farther away become tiny specks. This adds depth and scale to your scene.
Keep the bird shapes simple. At sunset distances, you wouldn’t see details anyway. The recognizable V shape instantly reads as birds to viewers.
Final Adjustments
Flatten your image or merge visible layers. Go to Image > Adjustments > Curves. Add a subtle S-curve to increase overall contrast. This makes the sunset colors pop more dramatically.
If certain areas look too bright or dark, create a new adjustment layer (Curves or Levels) with a layer mask. Paint on the mask to apply adjustments only where needed.
Consider adding a subtle vignette. Create a new layer, fill it with black, and change the blend mode to Soft Light at low opacity. Add a layer mask and use a large soft brush with black to reveal the center of your image. This draws viewer attention to the sunset and boat.
Why This Painting Technique Works
This method builds colors gradually instead of trying to nail everything in one pass. Multiple semi-transparent layers create depth and atmosphere that single opaque layers can’t match.
Using blend modes like Overlay and Hard Light lets colors interact naturally. You’re thinking like a traditional painter mixing colors, but with digital advantages like undo and layer adjustment.
The reflection technique—painting the sky once and flipping it—saves massive time while maintaining consistency. Real water reflects the sky above it, so this approach is both efficient and realistic.
Most importantly, you learned to build a complete scene from scratch using only standard tools. No special brushes. No plugins. Just fundamental painting techniques that apply to any digital artwork.
Practice this sunset scene a few times. Change the colors for dawn scenes (cooler purples and pinks). Try different boat types or add islands in the distance. These foundational skills unlock endless creative possibilities.