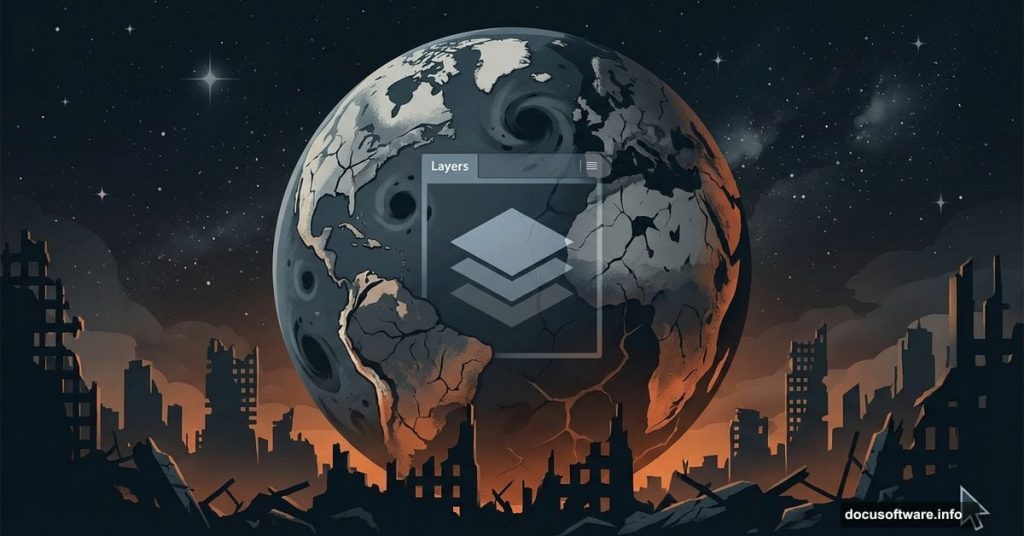
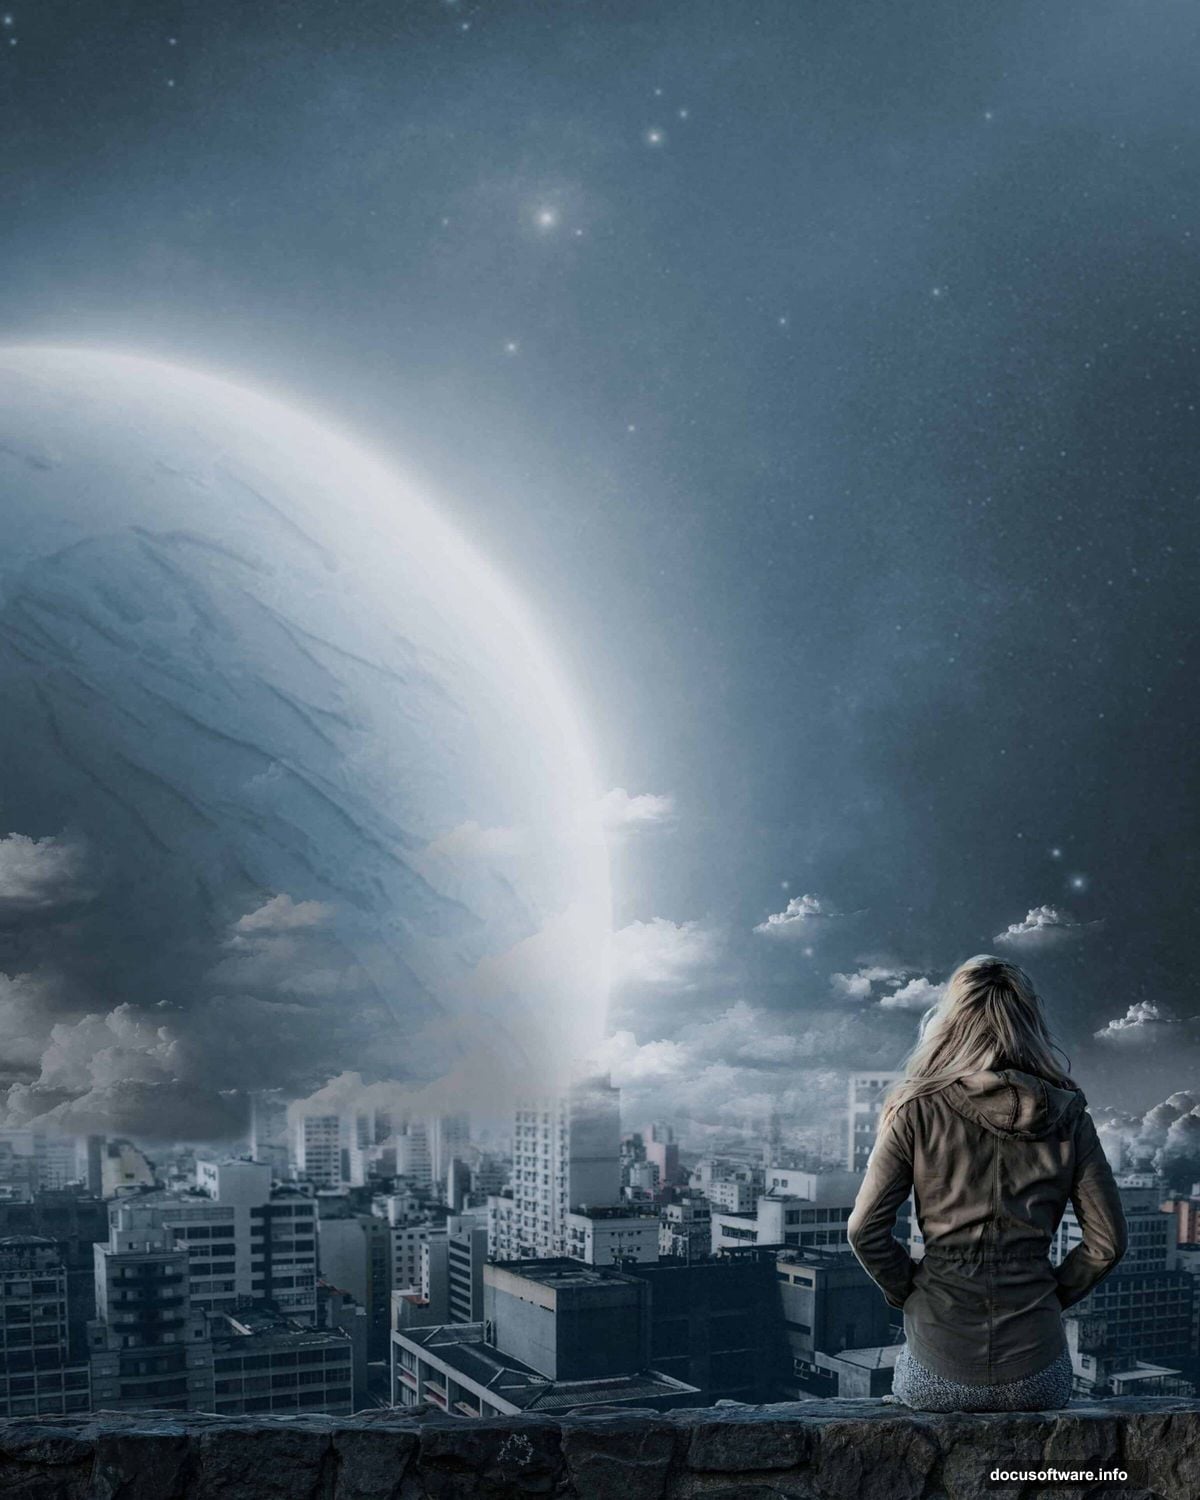
Ever wanted to create a haunting end-of-world scene that stops viewers cold? This Photoshop manipulation turns simple stock images into a chilling apocalyptic vista.
You’ll composite a damaged planet, ruined cityscape, and atmospheric effects into one cohesive scene. Plus, the technique works for sci-fi book covers, game concepts, or dramatic portfolio pieces. Let’s build something memorably bleak.
What You’ll Need Before Starting
Grab these resources first. Having everything ready prevents mid-tutorial scrambling.
Required Images:
- Planet stock photo (high-resolution sphere)
- Destroyed city landscape
- Figure on rock (optional dramatic element)
- Cloud texture brushes
Photoshop Version:
This tutorial works in Photoshop CS6 and later. Some features like Smart Objects function slightly differently in CC versions. But the core techniques translate across versions.
Skill Level:
Intermediate. You should know basic layer masks, adjustment layers, and transform tools. If those concepts feel shaky, practice them first. This builds on fundamentals rather than teaching them.
Step 1: Set Up Your Canvas
Create a new document with professional print dimensions. Go to File > New and enter these settings:
- Preset: Custom
- Width: 3080px
- Height: 3850px
- Resolution: 300ppi
- Color Mode: RGB Color 8 bit
- Background: Transparent
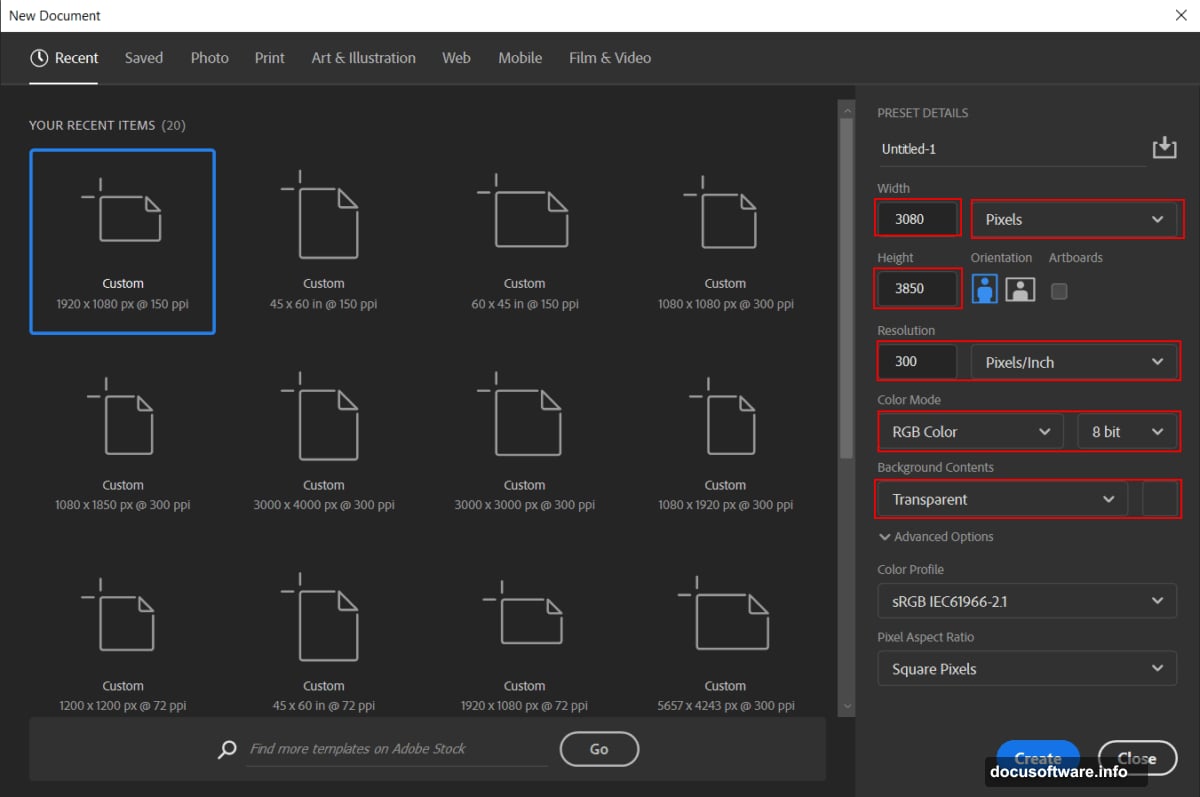
Why these dimensions? The 4:5 aspect ratio works perfectly for vertical compositions. Plus, 300ppi ensures print quality if you want physical copies later. That matters more than people think.
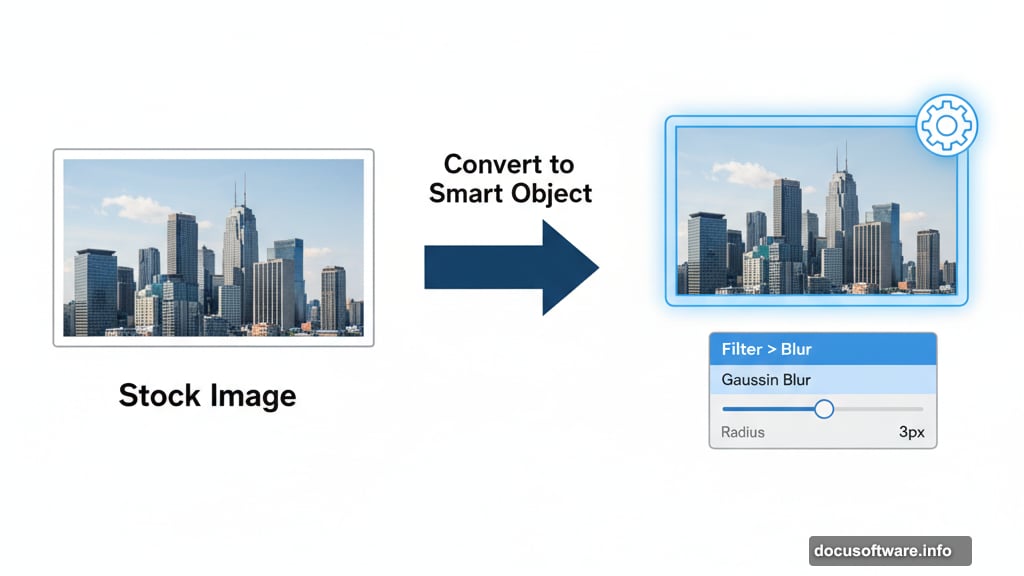
Step 2: Place and Blur Your Planet
Now bring in your planet image. Navigate to File > Place and select your planet stock photo.
Position it using the transform tool (Ctrl/Cmd + T). Hold Alt + Shift while dragging corners to resize proportionally. In Photoshop CC, just holding Alt maintains proportions from the center.
Critical next step: Right-click the layer and choose Convert to Smart Object. This protects your original image quality during edits.
Then apply atmospheric blur. Go to Filter > Blur > Gaussian Blur and set the radius to 3px. This slight softness mimics distant atmosphere and haze. Sharp planets look fake and jarring.
Step 3: Adjust Planet Color Temperature
Add a Hue/Saturation adjustment layer above your planet. Click the adjustment layer icon at the bottom of your layers panel.
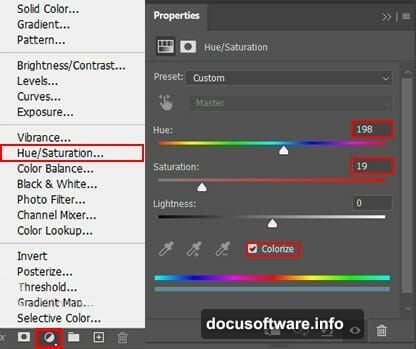
Shift the hue slider slightly toward cooler tones. Apocalyptic scenes benefit from desaturated, blue-gray color palettes. The exact values depend on your source image. But aim for lifeless and cold.
Remember, adjustment layers let you modify non-destructively. You can always tweak values later without damaging original pixels. That flexibility saves hours during revisions.
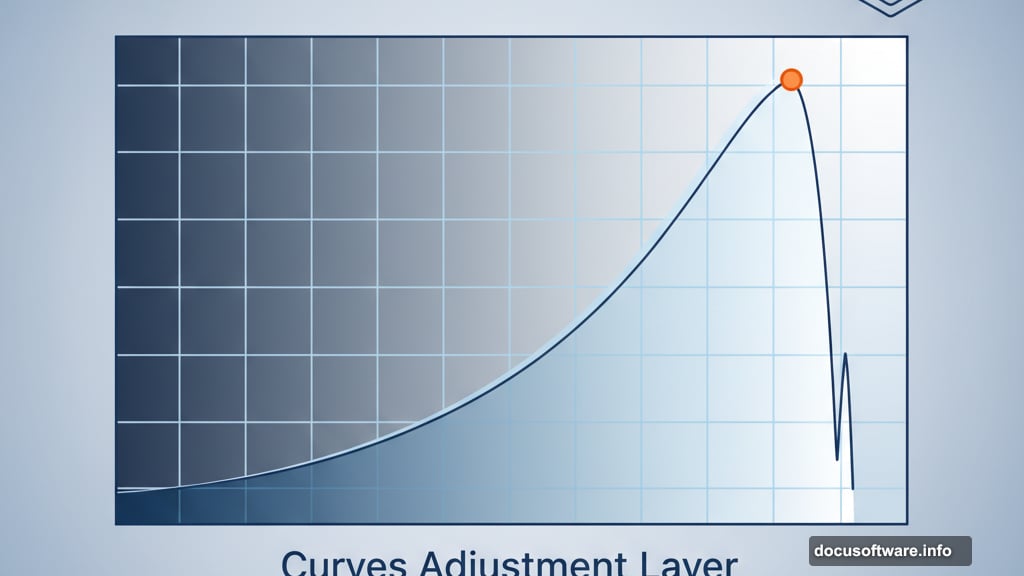
Step 4: Add Dramatic Lighting with Curves
Create a Curves adjustment layer. Pull the curve upward in the highlights section to brighten the planet’s upper hemisphere.
This mimics a distant dying sun casting final light. The contrast between bright and dark sections adds depth. Flat lighting kills drama instantly.
Also, curves give finer control than basic brightness sliders. You can target specific tonal ranges without affecting the entire image. That precision matters for professional results.
Step 5: Enhance Shadow Details Selectively
Add another Curves adjustment layer. But this time, press Ctrl/Cmd + I immediately to invert the layer mask to black.
Now grab your Brush Tool (B) with a soft round brush. Set foreground color to white. Paint only on the upper lighter portions of the planet where you want enhanced shadows and texture.
Why invert first? You’re painting detail back in selectively rather than adding it everywhere. This targeted approach looks more natural. Plus, you maintain control over exactly which areas receive enhancement.
Step 6: Deepen Planet Texture
Create yet another Curves adjustment layer and invert the mask (Ctrl/Cmd + I).
Use your soft brush with white foreground color again. This time paint over darker textured areas of the planet surface. Pull the curve down slightly to deepen those tones.
These layered curve adjustments build dimensional lighting. One adjustment layer alone looks flat. But multiple targeted curves create convincing three-dimensional form. That’s the difference between amateur and professional compositing.
Step 7: Composite Your Destroyed City
Place your ruined city image (File > Place). Position it using the transform tool. Size it to fill the lower portion of your canvas.
Then create a layer mask on the city layer. Use a soft round brush with black foreground to paint away the sky portions. Leave only the destroyed buildings and structures visible.
Blending tip: Lower the city layer opacity to around 80-90% initially. This helps it integrate with the background atmosphere. Too opaque looks pasted on rather than part of the scene.
Also consider adding a slight Gaussian Blur (1-2px) to the city layer. This atmospheric perspective makes distant elements feel appropriately hazy. Sharp details only work in foreground elements.
Step 8: Final Atmospheric Effects
Now add your finishing touches. Create a new layer above everything and paint subtle cloud textures using soft brushes. Set this layer to Overlay or Soft Light blend mode at reduced opacity.
Then comes the critical final step. Flatten your visible layers (keep a backup with layers intact). Go to Filter > Camera Raw Filter.
In Camera Raw:
- Reduce overall saturation slightly
- Add subtle vignetting to darken edges
- Increase clarity for gritty texture
- Adjust color temperature toward cooler tones
Camera Raw acts like Instagram filters but with professional control. It unifies disparate elements into one cohesive scene. That final polish transforms good composites into great ones.
Common Mistakes to Avoid
Overblending everything: Some edges should stay sharp for contrast. Blurring every element creates muddy results. Keep foreground details crisp.
Ignoring light direction: All elements should share consistent lighting. If your planet shows light from the left, the city must too. Mismatched lighting screams fake immediately.
Forgetting atmospheric perspective: Distant elements appear hazier, less saturated, and cooler in tone. Nearby elements show more contrast and saturation. Breaking this rule kills depth.
Skipping Smart Objects: Always convert placed images to Smart Objects before applying filters. Otherwise you permanently damage image data. Non-destructive editing saves you when clients request revisions.
Why This Technique Matters
Photomanipulation combines photography and digital painting skills. You’re not just moving pictures around. You’re building believable alternate realities.
These skills translate directly to concept art, book covers, movie posters, and game design. Studios need artists who can quickly mockup dramatic scenes for pitches and presentations. This tutorial teaches that exact workflow.
Plus, apocalyptic themes never go out of style. From climate change imagery to sci-fi narratives, dystopian visuals remain commercially valuable. Master this aesthetic and you’ve got portfolio pieces that attract attention.
The key is understanding how light, atmosphere, and color temperature work together. Those fundamentals apply to every composite project. Not just apocalyptic scenes.
Practice this tutorial multiple times with different source images. Each iteration teaches new problem-solving approaches. Eventually you’ll manipulate scenes intuitively without following step-by-step instructions.
That’s when you’ve truly learned the skill rather than just copying a tutorial.