Creating dramatic fisheye perspective effects in Photoshop sounds intimidating. But it’s actually just smart layer blending plus one key distortion trick.
This tutorial walks you through building a warped desert battlefield scene. You’ll learn how to merge multiple landscape photos seamlessly and create that distinctive fisheye curvature without fancy plugins. Plus, you’ll master color matching techniques that make completely different images look like they belong together.
The best part? Once you understand these core techniques, you can apply them to any scene you want to warp.
Gather Your Desert Battlefield Elements
Before diving into Photoshop, you need the right raw materials. This project requires three main stock images: a rock formation for your base landscape, a desert horizon shot, and a warrior statue for your focal point.
You’ll also want some atmosphere elements like dust particles or fireworks. These add drama to the final composition. However, the technique works even without them if you’re just learning the basics.
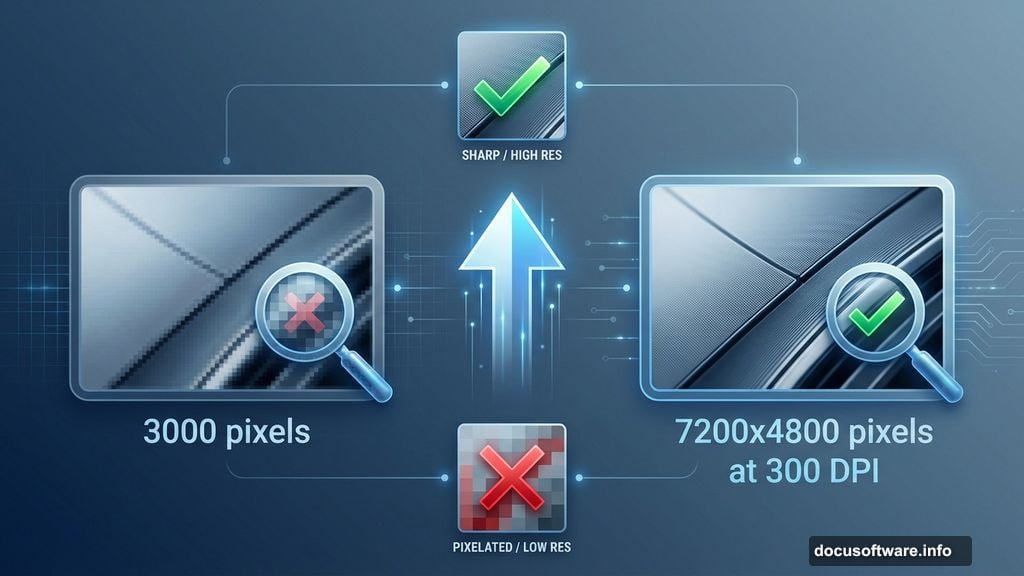
Make sure your images are high resolution. Working with at least 3000 pixels on the longest side gives you flexibility for adjustments later. Low-res source images create pixelated disasters when you start warping perspective.
Set Up Your Canvas for Maximum Detail
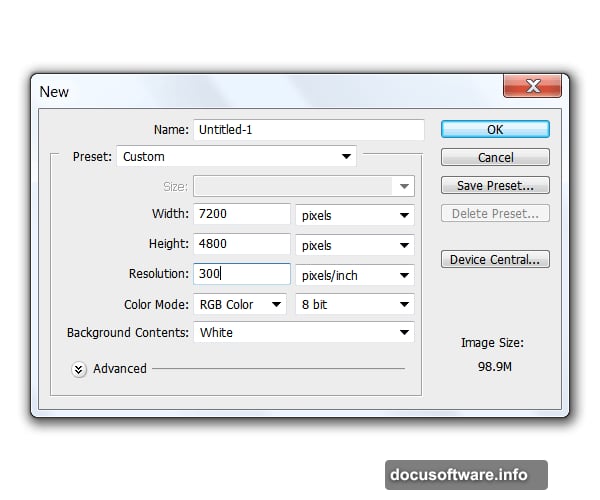
Start with a massive canvas. Create a new document 7200 pixels wide by 4800 pixels tall at 300 DPI resolution. Yes, that’s enormous. But you need that size to maintain quality after perspective distortions.
Too slow on your computer? Cut those dimensions in half. A 3600×2400 pixel canvas still gives you plenty of room to work. Just remember that larger files preserve more detail in your final export.
Set your background to white or neutral gray. This helps you see blend edges clearly as you work. You can always change it later once your composition comes together.
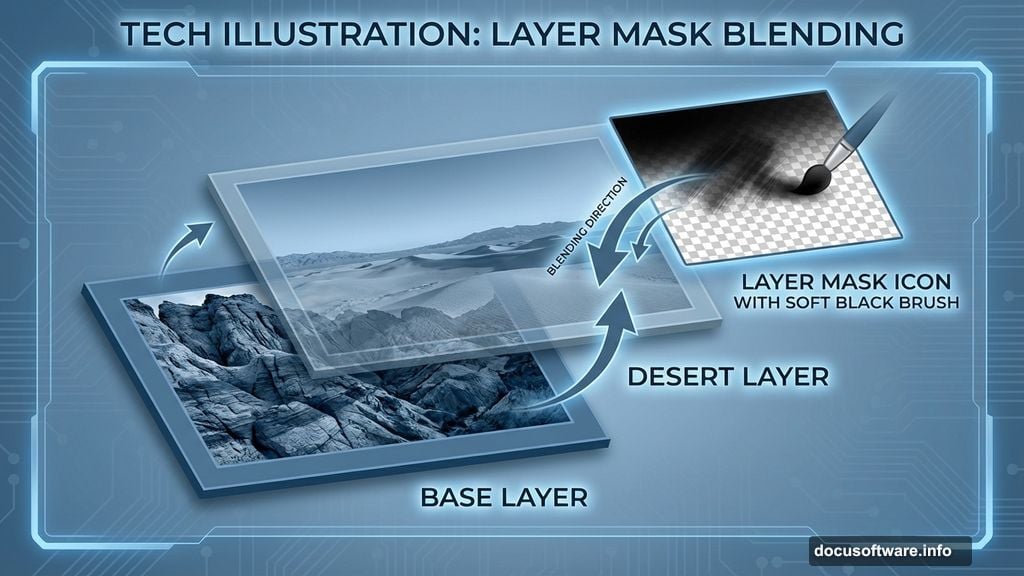
Build Your Base Landscape Layer
Drag your rock formation image into the document. Rotate it slightly to one side, maybe 5-10 degrees. This tilt starts creating the dynamic perspective that makes fisheye effects feel real.
Next, place your desert horizon stock directly above the rock layer. Rotate this image to match the angle you set with the rocks. Can’t see how they align? Lower the desert layer’s opacity to about 50% temporarily.
Now add a layer mask to the desert image. Grab a soft brush with 0% hardness and paint black on the mask to erase the top portion. Your goal is making the horizons blend naturally where the two landscapes meet.
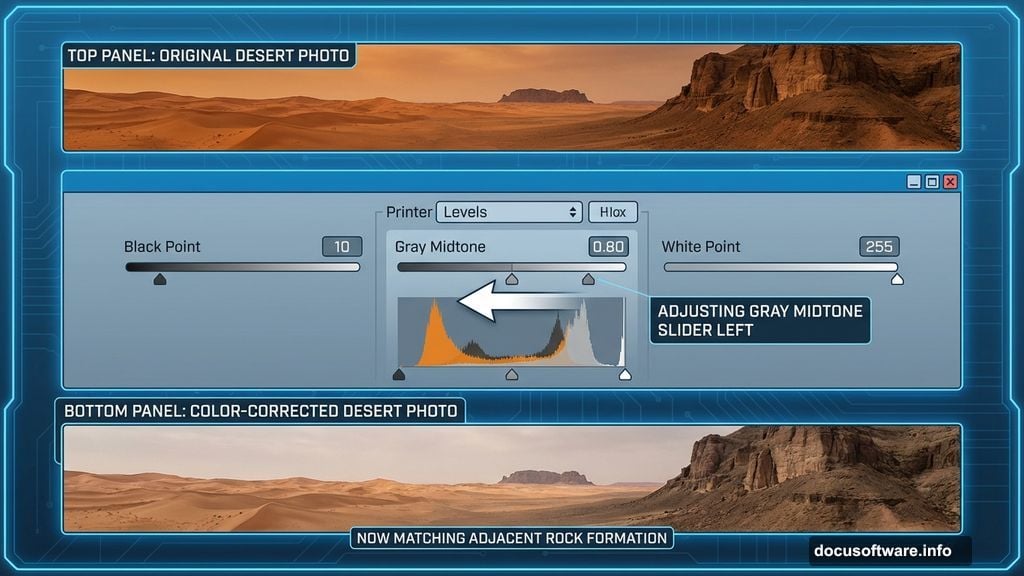
Match Colors Between Different Photos
Two different photos rarely match in tone or color. So we need to fix that before they’ll look like one cohesive scene. Select your desert layer and open Image > Adjustments > Levels.
Drag the middle gray slider slightly left to brighten midtones. Adjust the black and white point sliders until the desert sand matches the rock formation’s overall brightness. There’s no magic numbers here because every photo differs. Just use your eyes.
Next, open Image > Adjustments > Hue/Saturation. Shift the hue slider to warm up or cool down the desert tones. Then adjust saturation so both images have similar color intensity. The desert shouldn’t look more vibrant than the rocks.
Finally, use Image > Adjustments > Brightness/Contrast for fine-tuning. Small adjustments here make a big difference. Plus, this step often reveals blend issues you missed earlier.
Soften Transitions with Clone Stamp Magic
Even perfectly color-matched images show hard edges where they meet. The Clone Stamp tool fixes this problem beautifully. Create a new blank layer above your desert images.
Select the Clone Stamp tool and configure it carefully. Use a soft round brush at 0% hardness. Set opacity to 45%. Most importantly, set the sample dropdown to “Current and Below” so it samples from all visible layers.
Hold Alt and click somewhere that represents the blend area you want. Then brush along the seam where your two landscapes meet. The clone tool pulls texture from both images, creating a seamless transition that looks completely natural.
Take your time here. Rushing this step leaves obvious blend lines that scream “bad Photoshop.” Work in small sections and resample frequently by Alt-clicking new source points.
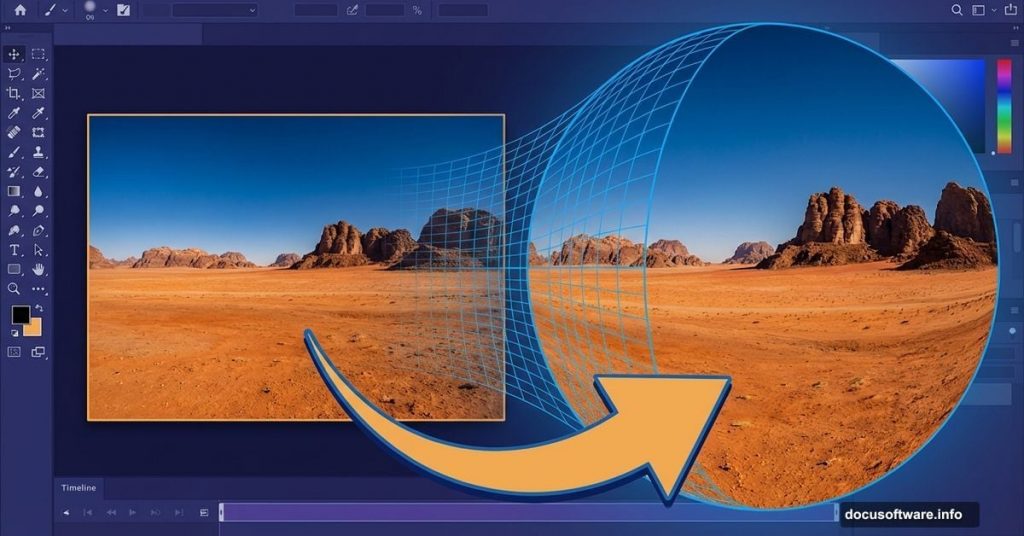
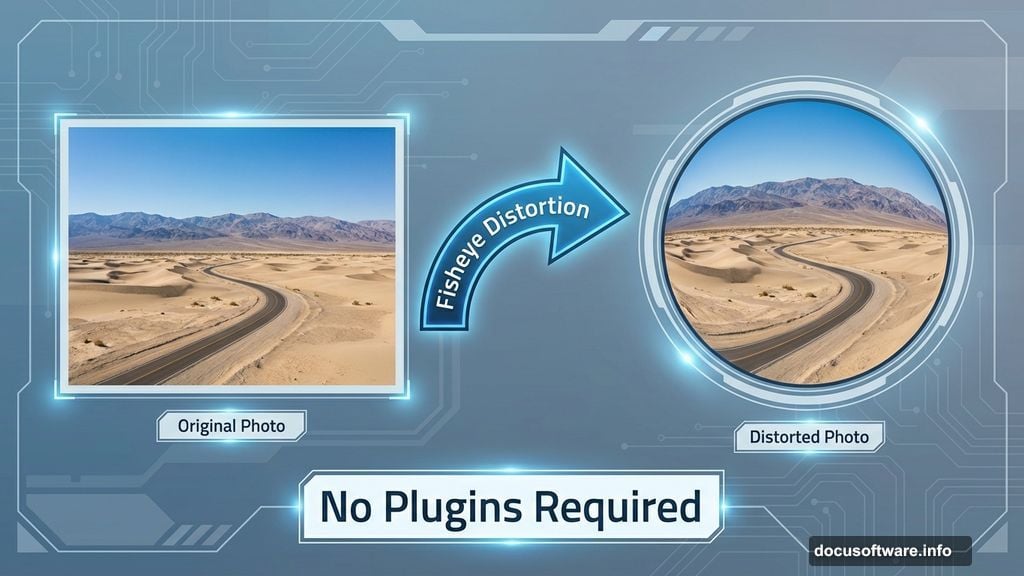
Create the Dramatic Fisheye Warp
This is where everything comes together. Merge all your landscape layers into one. Then go to Filter > Distort > Spherize. This filter creates that signature fisheye bulge effect.
Start with the amount slider around 50% in normal mode. Too much? The image looks cartoonish. Too little? You barely notice the effect. Preview different values until you find the sweet spot for your composition.
Want more control? Apply the filter multiple times at lower percentages instead of once at maximum. This gives you a more subtle, refined warp. Plus, you can undo individual applications if one goes too far.
Some artists prefer using Edit > Transform > Warp for manual control. That works too. Just drag the warp grid handles to curve your landscape exactly how you want. However, Spherize delivers faster results for most scenes.
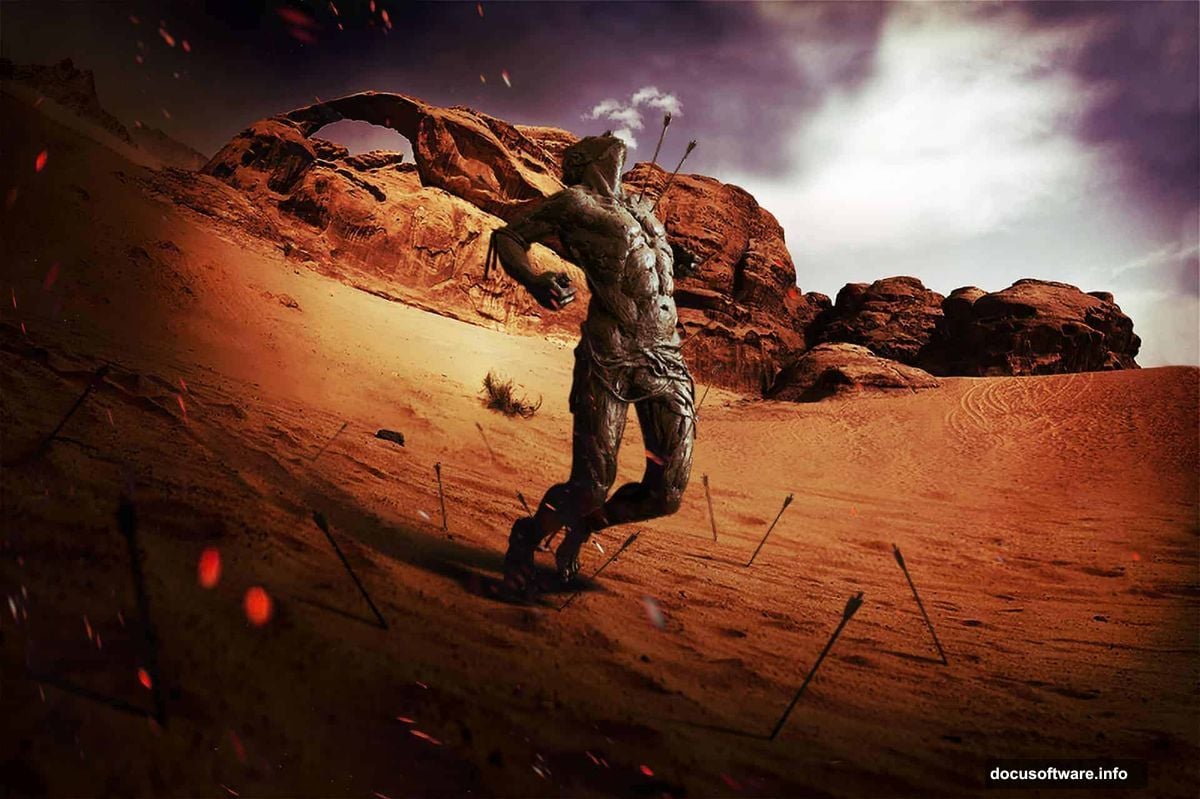
Add Your Warrior Focal Point
Place your warrior statue image into the scene. Position it slightly off-center because centered subjects feel static and boring. The rule of thirds works perfectly here.
Scale the statue to match your landscape’s perspective. Figures in the foreground should appear larger. But remember that fisheye distortion exaggerates size differences. So your warrior might need to be smaller than you initially think.
Add a layer mask and blend the statue’s base with your ground texture. Use the same clone stamp technique you learned earlier. This makes the statue look like it’s actually standing on the warped desert surface instead of floating above it.
Enhance Atmosphere with Particle Effects
Drag in your dust or fireworks stock images. Set these layers to Screen or Lighten blend mode so they integrate naturally. Lower the opacity until they add atmosphere without overwhelming your main subject.
Consider adding multiple particle layers at different scales. Small dust near the camera, medium particles in the midground, and larger elements in the background create convincing depth. This layered approach makes the fisheye perspective feel more pronounced.
Color these atmospheric elements to match your scene. A warm orange glow works great for desert environments. Cool blues suggest evening or night scenes. Match the lighting direction across all your particle layers for consistency.
Fine-Tune with Adjustment Layers
Create a Curves adjustment layer above everything. Increase contrast by creating an S-curve. This makes highlights pop and shadows deepen, adding drama to your warped landscape.
Add a Color Balance adjustment layer to push the overall tone toward warm or cool. Desert battlefields typically look better with warm yellow-orange shifts. However, cool blue tones create an otherworldly alien desert feel.
Consider a Selective Color adjustment to target specific hues. You might want to make the sky more dramatic while keeping skin tones natural. This adjustment layer gives you precise control over individual color ranges.
Finally, add a subtle vignette using a Curves adjustment layer with a radial gradient mask. Darken the corners slightly to draw attention toward your central warrior figure. Just don’t overdo it because heavy vignettes look amateurish.

Polish Your Final Composition
Zoom out to see your entire composition. Does the fisheye perspective lead your eye toward the main subject? If not, adjust element placement or enhance the warp effect slightly.
Check for color consistency across all elements. Everything should feel lit by the same light source. Shadows should fall in the same direction. Atmospheric haze should affect distant elements more than foreground objects.
Add sharpening selectively to your warrior statue and foreground details. Use Filter > Sharpen > Unsharp Mask with a low radius and moderate amount. However, avoid sharpening the background because that flattens your depth perception.
Save your master PSD file with all layers intact. Then flatten and export a high-quality JPG for sharing. Your dramatic fisheye warrior scene is ready to wow viewers with its impossible warped perspective.
This technique works for any dramatic scene you want to create. Sci-fi cityscapes, fantasy forests, or apocalyptic ruins all benefit from fisheye perspective effects. Master these blending and warping fundamentals, and you’ll build epic impossible worlds whenever inspiration strikes.