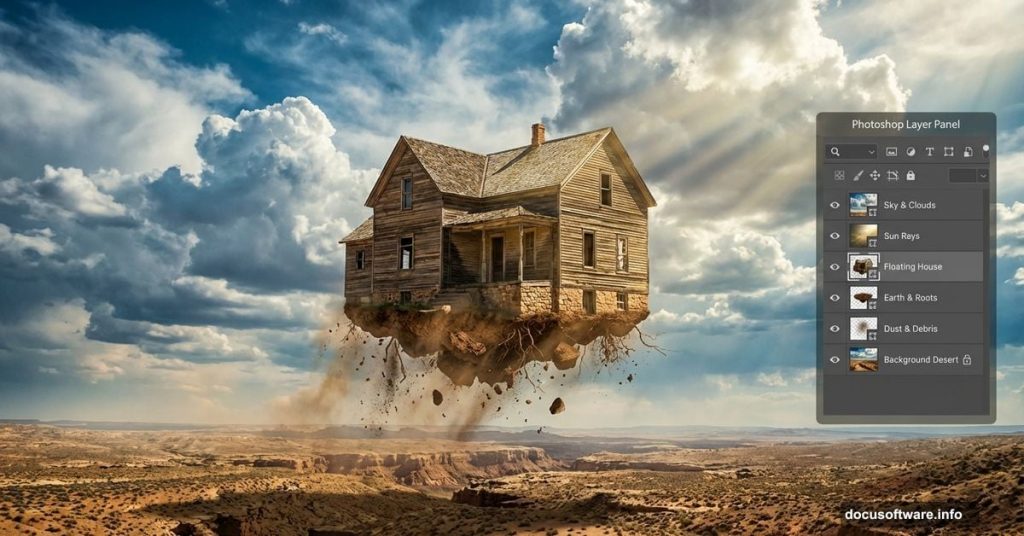
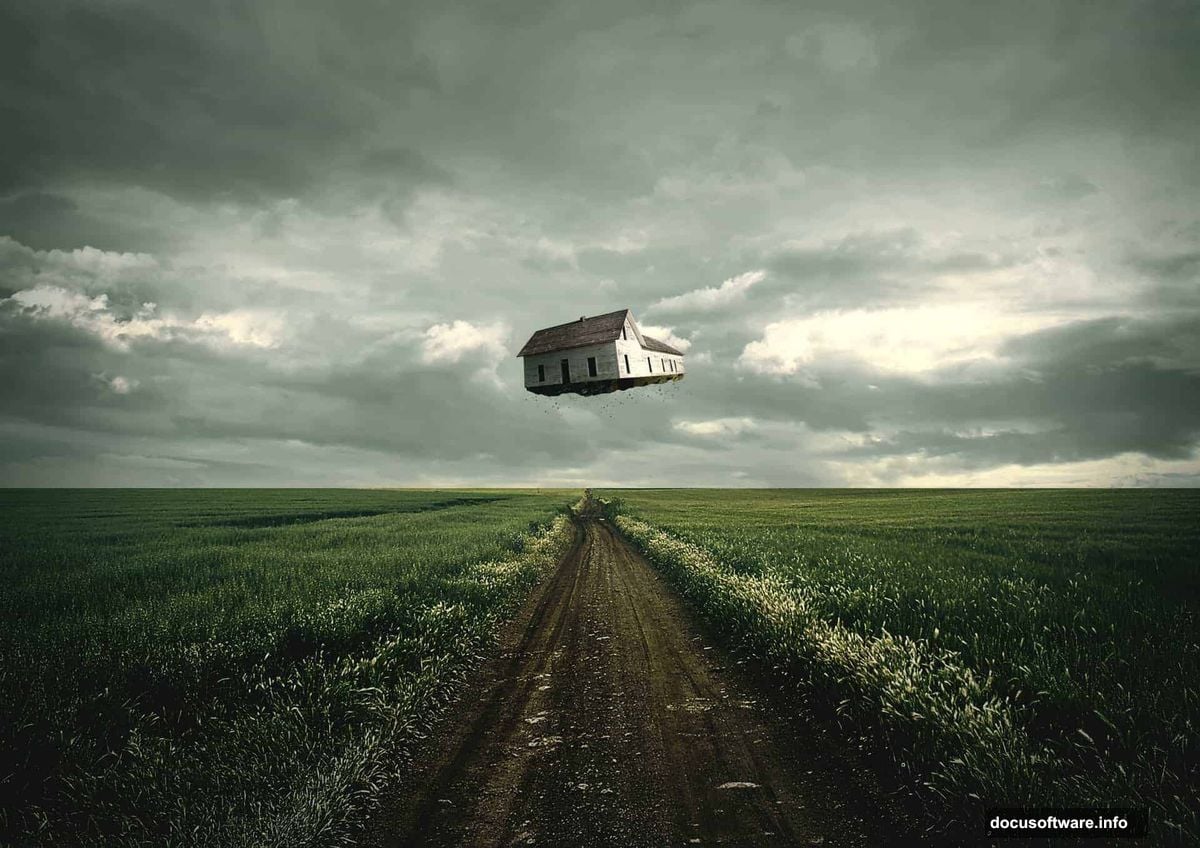
Ever wanted to rip a house from the ground and send it soaring through the sky? This Photoshop tutorial makes it surprisingly simple.
You’ll learn how to blend multiple photos seamlessly, create that uprooted dirt effect, and add dramatic lighting that makes the whole scene feel mystical. Plus, the techniques work for floating anything—cars, trees, entire buildings. Let’s get started.
What You’ll Need Before Starting
This tutorial assumes basic Photoshop knowledge. You should know how to use the Move tool and create selections. If you’ve never used layer masks, you’ll learn that here.
Required stock images:
- Desert road photo for the ground
- Sky with dramatic clouds
- Old farmhouse or house image
- Floating island reference (optional)
- Snow brushes for atmosphere
Most stock sites offer these. Search for “desert road,” “dramatic sky,” and “abandoned house.” Free alternatives work fine—you’re learning technique, not perfecting a portfolio piece.
Photoshop version: CS6 or newer recommended. Older versions work but lack some blending features.
Set Up Your Canvas
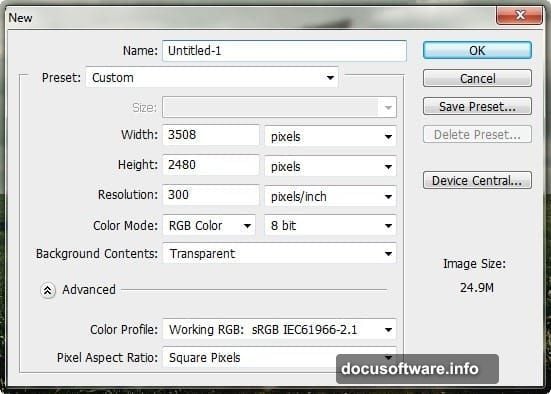
Start by creating a new document. Go to File > New and input these settings:
- Size: A4 (3508 x 2480 pixels)
- Resolution: 300 DPI
- Color Mode: RGB, 8-bit
- Background: Transparent
Why these specs? A4 at 300 DPI gives you print quality if you want to frame this later. Plus, starting with high resolution means you can scale down without losing quality. Starting small and scaling up looks terrible.
Build the Background Scene
Now we’ll create the ground and sky. This forms the foundation everything else sits on.
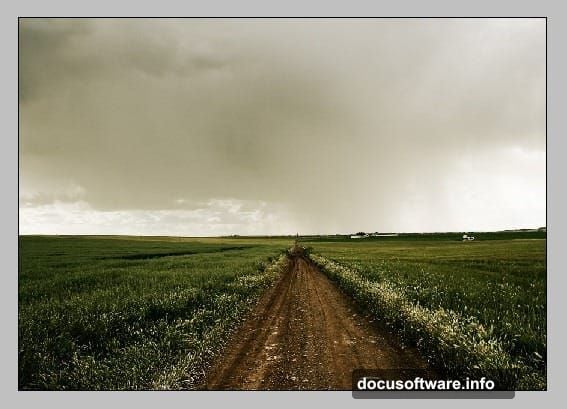
Add the desert road:
Open your desert road stock image. Press V to activate the Move tool, then drag that photo onto your canvas. Position it so the road runs horizontally across the bottom two-thirds of your canvas.
Next, press Ctrl/Cmd + T to activate Free Transform. Stretch the image to fill your canvas width. Don’t worry about slight distortion—we’re going for atmosphere, not realism.
The result should show desert stretching across your canvas with sky visible at the top.
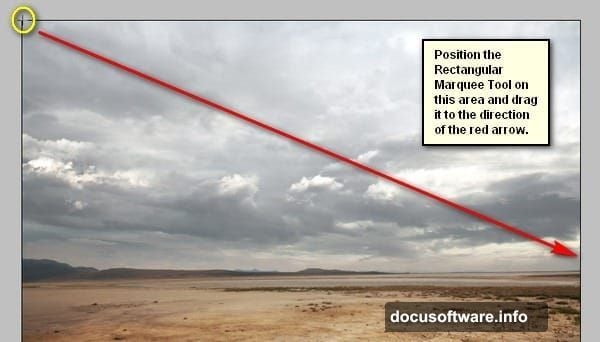
Replace the sky:
Open your dramatic sky image. Press M for the Rectangular Marquee tool and select just the sky portion—avoid including any ground or horizon.
Drag this selection to your canvas using the Move tool (V). Position it above your desert layer so it covers the original sky completely.
On your Layers panel, it should look like this: Sky layer on top, desert layer below.
Press Ctrl/Cmd + T again and stretch the sky to match your canvas dimensions. The clouds should feel massive and overwhelming. That’s exactly what we want.
Enhance Background Lighting
Here’s where things get interesting. We’ll paint in light and shadow to make the scene more dramatic.
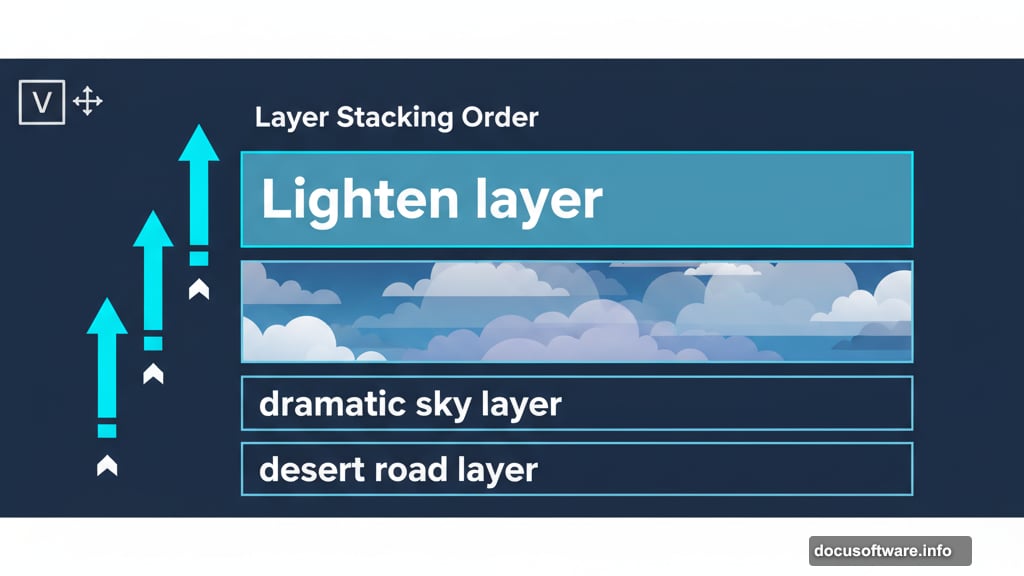
Create a new layer above your sky layer (Ctrl/Cmd + Shift + N). Name it “Lighten.” This keeps your project organized—trust me, you’ll have dozens of layers soon.
Add rim lighting:
Set your foreground color to white. Grab a soft brush (B), set opacity to 20%, and paint along the horizon where sky meets ground. This simulates light bleeding through clouds.
Make several passes. Build up the effect gradually. One heavy stroke looks artificial. Five light strokes look like actual light.
Deepen the shadows:
Create another layer. Name it “Darken.” Set your foreground to dark brown (#1a0f0a works well).
Paint shadows into the lower corners of your canvas. This creates vignetting—drawing the viewer’s eye toward the center where our floating house will eventually sit.
Again, build up gradually. Light passes, not heavy strokes.
Add Your House Element
Time for the main attraction. Open your house stock image.
Cut out the house:
You’ll need to remove the house from its background. The method depends on your Photoshop version:
- Quick Selection tool (W): Click and drag across the house. Photoshop automatically finds edges. Refine the selection using the Subtract mode for areas it grabbed wrong.
- Pen tool (P): More precise but slower. Trace around the house, then right-click and choose “Make Selection.”
- Select Subject button: If you have Photoshop 2020+, just click this. AI does the heavy lifting.
Once selected, press Ctrl/Cmd + J to copy the house to a new layer. Delete or hide the original background layer.
Drag this cutout house onto your main canvas. Press Ctrl/Cmd + T to resize and position it. The house should sit in the middle-upper portion of your canvas, overlapping the horizon slightly.
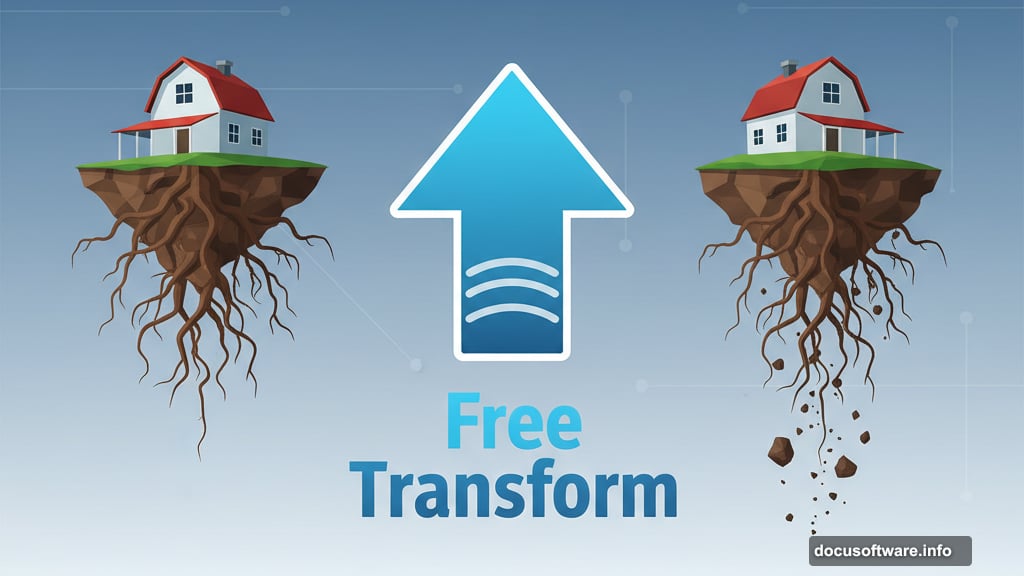
Create the uprooted effect:
This separates good composites from great ones. We need dirt and roots hanging from the bottom.
Find a stock image of a floating island or uprooted tree. We just need the dirt clump. Cut that out using the same selection techniques.
Position this dirt chunk directly under your house. It should look like the house tore free from the ground, bringing earth with it.
Use the Eraser tool (E) with a soft brush to blend where dirt meets house foundation. You’re not removing much—just softening the transition so it looks like one piece.
Match Colors and Lighting
Your house probably doesn’t match the background lighting yet. It looks pasted in. Let’s fix that.
Adjust house color temperature:
With the house layer selected, go to Image > Adjustments > Color Balance. Shift the midtones toward blue and cyan to match the cool sky tones. Small adjustments—move sliders 10-15 points, not 50.
Add shadows under the house:
Create a new layer below the house. Grab a soft black brush at 30% opacity. Paint directly under the floating house, creating a shadow on the ground below.
This shadow grounds the impossible. It tells the viewer’s brain, “Yes, this house is really there.” Without it, everything looks flat.
Add light wrap:
Create a new layer above the house. Set blend mode to Screen. Grab a soft white brush at 20% opacity and paint along the edges of the house that face the light source (top and sides if light comes from above).
This simulates atmospheric scattering—how light bounces around objects. It’s subtle but makes composites feel real.
Enhance with Atmosphere
Almost done. Now we add finishing touches that sell the scene.
Add atmospheric haze:
Create a new layer. Set foreground to light blue (#a8c5dd). Use a large soft brush at 10% opacity and paint haze between foreground and background elements. This creates depth—objects far away look hazier.
Paint more haze near the horizon and less near the foreground desert.
Add particles:
Download snow or dust brushes (links in requirements section). Create a new layer. Scatter particles across the scene, heavier in the foreground, lighter in the background.
Vary the size. Small particles in the distance, larger ones up close. This enhances the depth effect.
Final color grading:
Create a Curves adjustment layer at the very top of your layer stack. Slightly crush the blacks (pull the bottom-left point up a tiny bit) and lift the highlights (pull top-right point up slightly).
This creates that washed, mystical look. Not too much—you want subtle, not overcooked.
The Detail That Makes It Work
Most tutorials end here. But there’s one more step that separates amateur composites from professional work.
Add light interaction:
Your floating house casts light and receives light. We’ve handled shadows below, but what about reflected light on surrounding elements?
Create a new layer. Set blend mode to Overlay. Use a soft orange brush at 15% opacity. Paint very subtle orange light on the ground directly below the house.
Why orange? Because most house windows glow warm. Even if we can’t see windows clearly, that warm light spills out. This tiny detail makes the composite believable.
Beyond the Tutorial
This technique works for any floating object. Cars, people, entire cities. The principles stay the same:
First, create a convincing environment. Then, add your impossible element. Finally, use lighting and atmosphere to blend everything together.
The uprooted dirt trick is particularly powerful. It answers the question viewers always ask: “Where did that come from?” By showing the earth it tore free from, you make the impossible feel possible.
Experiment with different objects. Try floating a vintage car with chunks of pavement dangling below. Or suspend a tree with roots trailing in the wind. The weirder you get, the more important those grounding details become.
Master these blending techniques and you’ll stop being limited by what photos exist. You’ll start creating the photos you imagine.