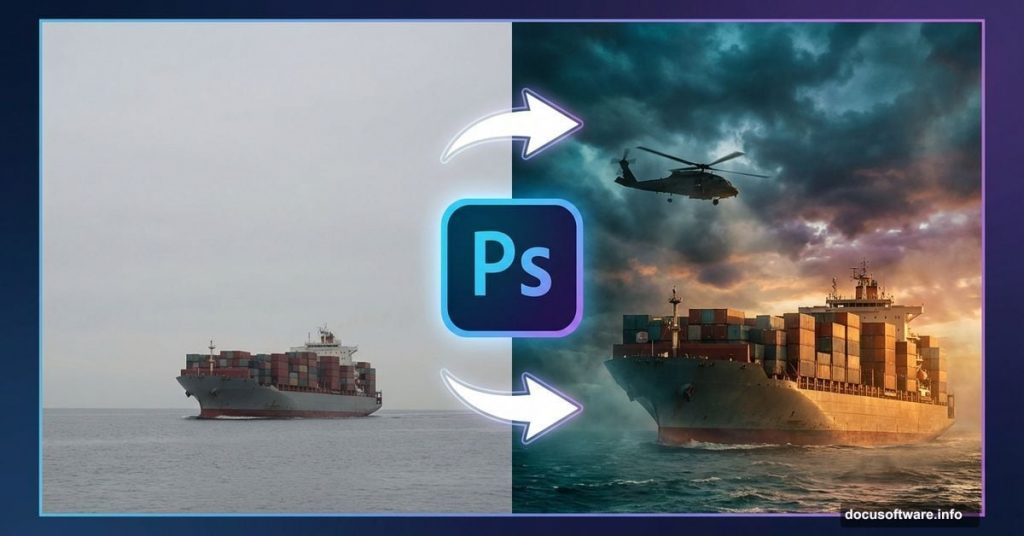
Want to create intense military scenes that look straight out of an action movie? This detailed walkthrough shows exactly how to blend containers, soldiers, and helicopters into one cohesive image.
Photo manipulation isn’t just about dropping elements onto a canvas. The real magic happens when lighting, perspective, and atmosphere work together seamlessly. Plus, getting weather effects right makes the difference between amateur composites and professional work.
Let’s build something memorable.
Setting Up Your Workspace
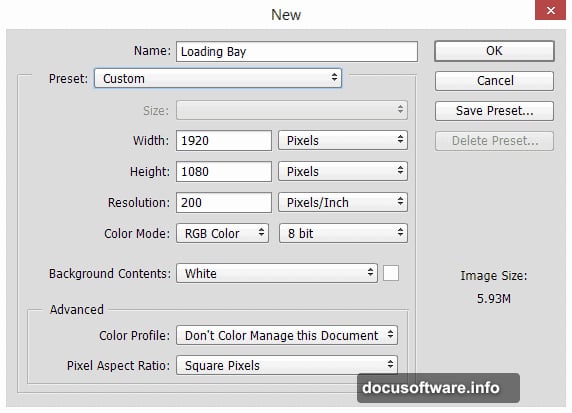
Start with a new Photoshop document at 1920×1080 pixels, 200 PPI resolution. These dimensions give you enough quality for detailed work without slowing down your computer.
Name your file something descriptive like “Loading Bay Mission.” Trust me, future you will appreciate clear file names when managing multiple projects.
Now gather your assets. You’ll need container ship photos, dramatic sky images, urban backgrounds, military personnel stock photos, and helicopter references. Free stock sites like Pixabay and Freeimages work perfectly for practice projects.
Building the Base Scene
Place your container vessel image first using File > Place Embedded. This creates a smart object that preserves quality when resizing.
Hit Cmd/Ctrl + T to transform the ship. Scale it to fill your lower canvas area, leaving room for sky above. Press Return to confirm your changes.
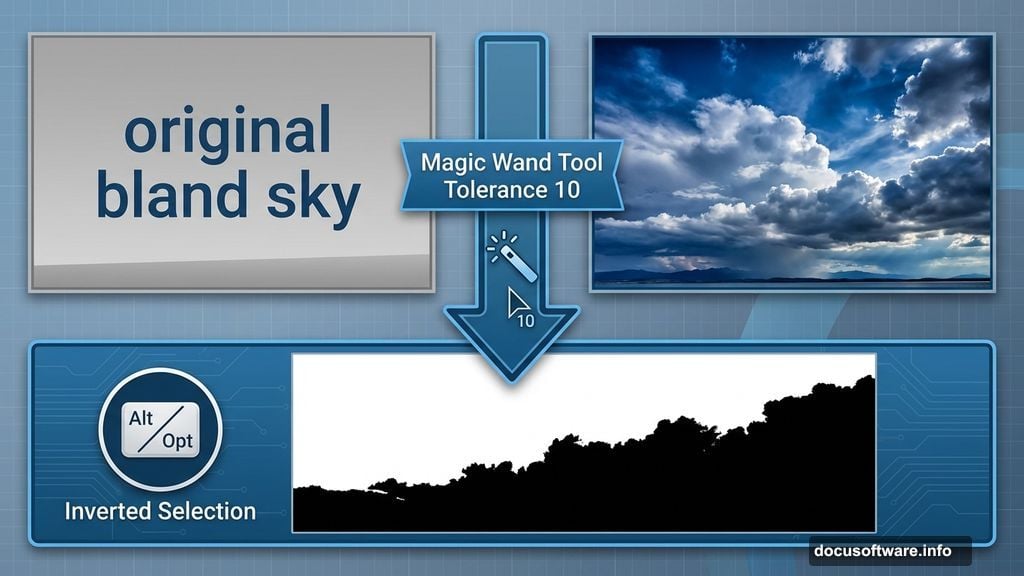
Next comes the sky replacement trick. Drop your dramatic sky image below the ship layer. Then use the Magic Wand Tool (W) with Tolerance set to 10. Click “Add to Selection” mode and start selecting the original bland sky.
Don’t stress about capturing every tiny fragment. You’ll clean up stragglers later with manual masking. Just avoid selecting ship parts accidentally.
Hold Opt/Alt and click the Layer Mask icon. This inverts the mask, hiding the old sky while revealing your dramatic replacement. The Alt/Opt trick saves you from manually inverting masks afterward.
Color Grading the Sky
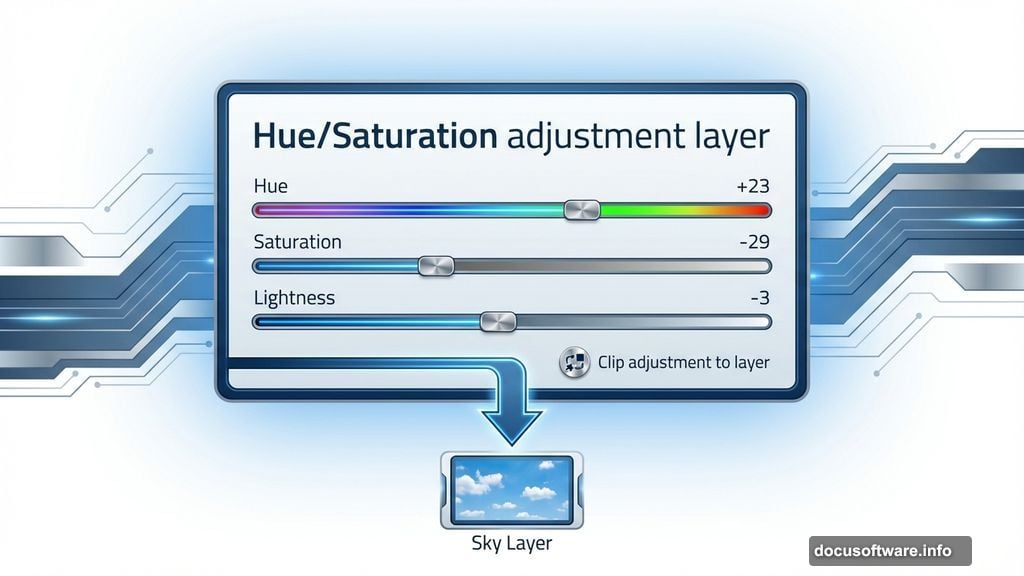
Raw sky photos rarely match your scene’s mood perfectly. So create a Hue/Saturation adjustment layer (Layer > New Adjustment Layer > Hue/Saturation).
Set Hue to +23, Saturation to -29, and Lightness to -3. These numbers shift the sky toward warmer tones while reducing intensity. Click the “Clip adjustment to layer” icon at the bottom of Properties panel.
Clipping ensures adjustments affect only the sky layer, not your entire image. This targeted approach gives you precise color control over individual elements.
Adding Urban Background Elements
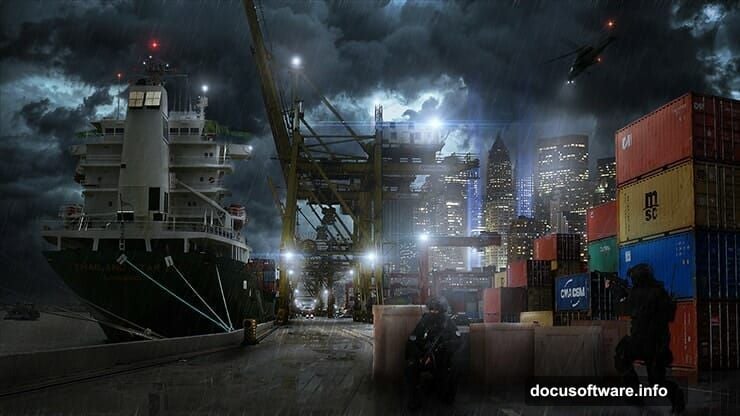
Port scenes need context. Place your city skyline image behind the containers and ship. New York cityscapes work great because recognizable buildings add authenticity.
Blend the city using layer masks and soft brushes. Paint away hard edges where buildings meet sky. Lower the city layer’s opacity to around 60-70% so it feels distant and atmospheric.
Here’s the key: background elements should support your main subjects without competing for attention. Subtle integration beats obvious compositing every time.
Placing Military Equipment

Now the fun part begins. Drop in your helicopter image as a new layer. Scale it appropriately using Free Transform. Military helicopters hovering over ports should feel imposing but proportional.
Pay attention to perspective. If your port shot has a low camera angle, your helicopter needs a corresponding viewpoint. Mismatched perspectives scream “fake composite” immediately.
Duplicate the helicopter layer. Set the copy to about 30% opacity and blur it heavily using Filter > Blur > Gaussian Blur. This creates atmospheric haze between the camera and distant helicopter.
Adding Soldier Characters
Character placement requires careful consideration. Place soldiers in the foreground using higher-resolution stock photos. The closer an element sits to the camera, the more detail it needs.
Extract soldiers from their backgrounds using your preferred selection method. Pen Tool offers precision but takes longer. Quick Selection Tool works faster for clean stock photos with clear edges.
Position soldiers on crates or near containers. They should interact with the environment, not float awkwardly in empty space. One soldier pointing, another crouching behind cover—these details sell the narrative.
Creating Realistic Lighting

Nothing betrays amateur composites faster than inconsistent lighting. Study your base container image carefully. Where’s the light source? What direction are shadows falling?
Create a new layer above each added element. Set blend mode to Overlay. Paint with a soft brush using light yellow or warm orange on areas that should catch light. This mimics how sunlight wraps around forms.
Then create another layer set to Multiply mode. Paint cool blue-grays on shadow sides. The contrast between warm lights and cool shadows adds dimension and realism.
Remember: light doesn’t just illuminate surfaces uniformly. It bounces, scatters, and creates subtle color variations. Those details separate good work from great work.
Adding Atmospheric Effects
Real port environments have haze, dust, and moisture in the air. So create a new layer and paint soft white or light gray fog using a large, soft brush at 20-30% opacity.
Focus atmospheric effects in the background. More haze equals more distance. This layering technique creates depth even in relatively flat compositions.

Add lens flares sparingly. Too many scream “2005 DeviantArt.” One subtle flare catching the helicopter rotor or glinting off metal works better than overdone effects.
Weather and Environmental Details
Military operations happen in all conditions. Adding rain dramatically increases tension and realism.
Create rain using Filter > Noise > Add Noise on a new layer. Then apply Motion Blur set to vertical direction. Adjust the blur distance based on how heavy you want rainfall to appear.
Set the rain layer to Screen or Lighten blend mode at 50-60% opacity. This makes rain streaks translucent and believable.
For extra impact, add a few larger rain streaks by hand using a thin white brush. These hero details give viewers’ eyes something specific to focus on.
Final Color Grading
Time to unify everything with color adjustments. Create a Color Lookup adjustment layer (Layer > New Adjustment Layer > Color Lookup). Try “FallColors.3DL” or “Moonlight.3DL” for dramatic military moods.
Then add a Curves adjustment layer. Lift the shadows slightly and pull down highlights a touch. This compressed tonal range mimics cinematic color grading.
Finally, add a Gradient Map set to Soft Light blend mode at 20-30% opacity. Use a gradient going from deep blue to warm orange. This pushes your image toward that blockbuster movie look.
Sharpening and Final Touches
Flatten your image (Layer > Flatten Image) and duplicate the background layer. Go to Filter > Sharpen > Unsharp Mask. Set Amount to 80%, Radius to 1.0, Threshold to 0.
Sharpening enhances details but also amplifies noise. So use it carefully. If areas look crunchy, mask away sharpening from those sections.
Add a vignette using the Lens Correction filter (Filter > Lens Correction). Push the Vignette slider left to darken corners. This draws viewers’ eyes toward your central composition.
Common Mistakes to Avoid
Beginner compositors often neglect light direction consistency. Every element must share the same light source. Otherwise, your brain immediately recognizes something feels off.
Another trap: oversaturating everything. Real military environments feature muted colors—grays, browns, dusty blues. Resist the urge to boost saturation across your entire image.
Finally, watch your edges. Halos around extracted subjects destroy believability instantly. Zoom in and manually refine masks wherever you spot edge problems. Those minutes spent cleaning up edges separate amateur work from professional results.
Taking It Further
This tutorial covers fundamentals, but photo manipulation is endlessly deep. Try adding motion blur to helicopter rotors. Experiment with reflections on wet surfaces. Create depth maps for realistic depth-of-field effects.
Study real military photography. Notice how professionals frame action shots and what makes them compelling. Those observations will inform your creative decisions more than any tutorial possibly could.
Most importantly, keep practicing. Your first composite probably won’t win awards. But each project teaches new techniques and builds your visual problem-solving skills.
So grab those stock photos and start creating. The best way to learn Photoshop is by actually using it, making mistakes, and figuring out solutions. No tutorial replaces hands-on experience.